Introducing Stage|Tracks
The Stage|Tracks software provides world-class, fully orchestrated performance tracks brought to your theater. It integrates seamlessly with our rehearsal tool Show|Ready! This page will describe the desktop version. Don’t worry- once you have used Show|Ready, the desktop version of Stage|Tracks is easy!
Before diving into this user manual, we recommend that you read this page first:
Menu
- Unlocking the Editor Features
- Using the License Manager to Add Another Show
- Selecting Audio Output
- Keyboard Shortcuts
- Go to Bar
- Adding an Event
- Event ID
- Editing an Event
- Deleting an Event
- Undoing a Change
- Redoing a Change
- Saving Changes to Local Device
- Sharing Changes with Cast and Show|Ready
- Reverting to a Previous Event Log
- Exporting the Event Log
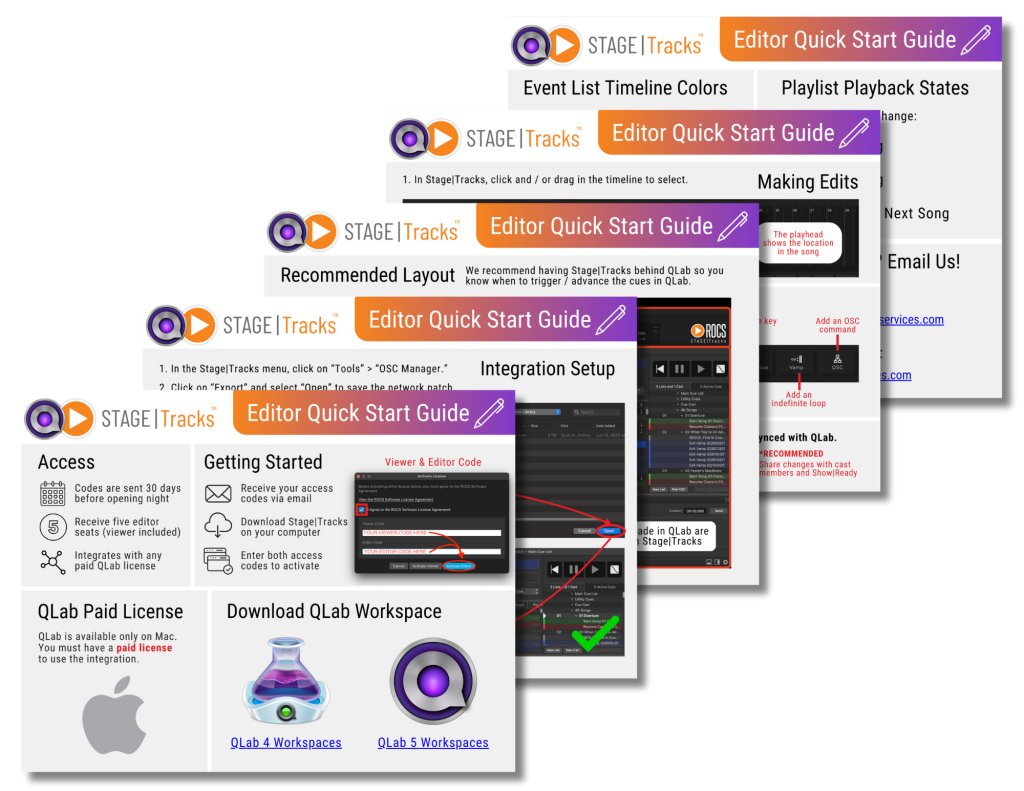
1. Managing Your Stage|Tracks License
Click the image below to open the quick start guide:
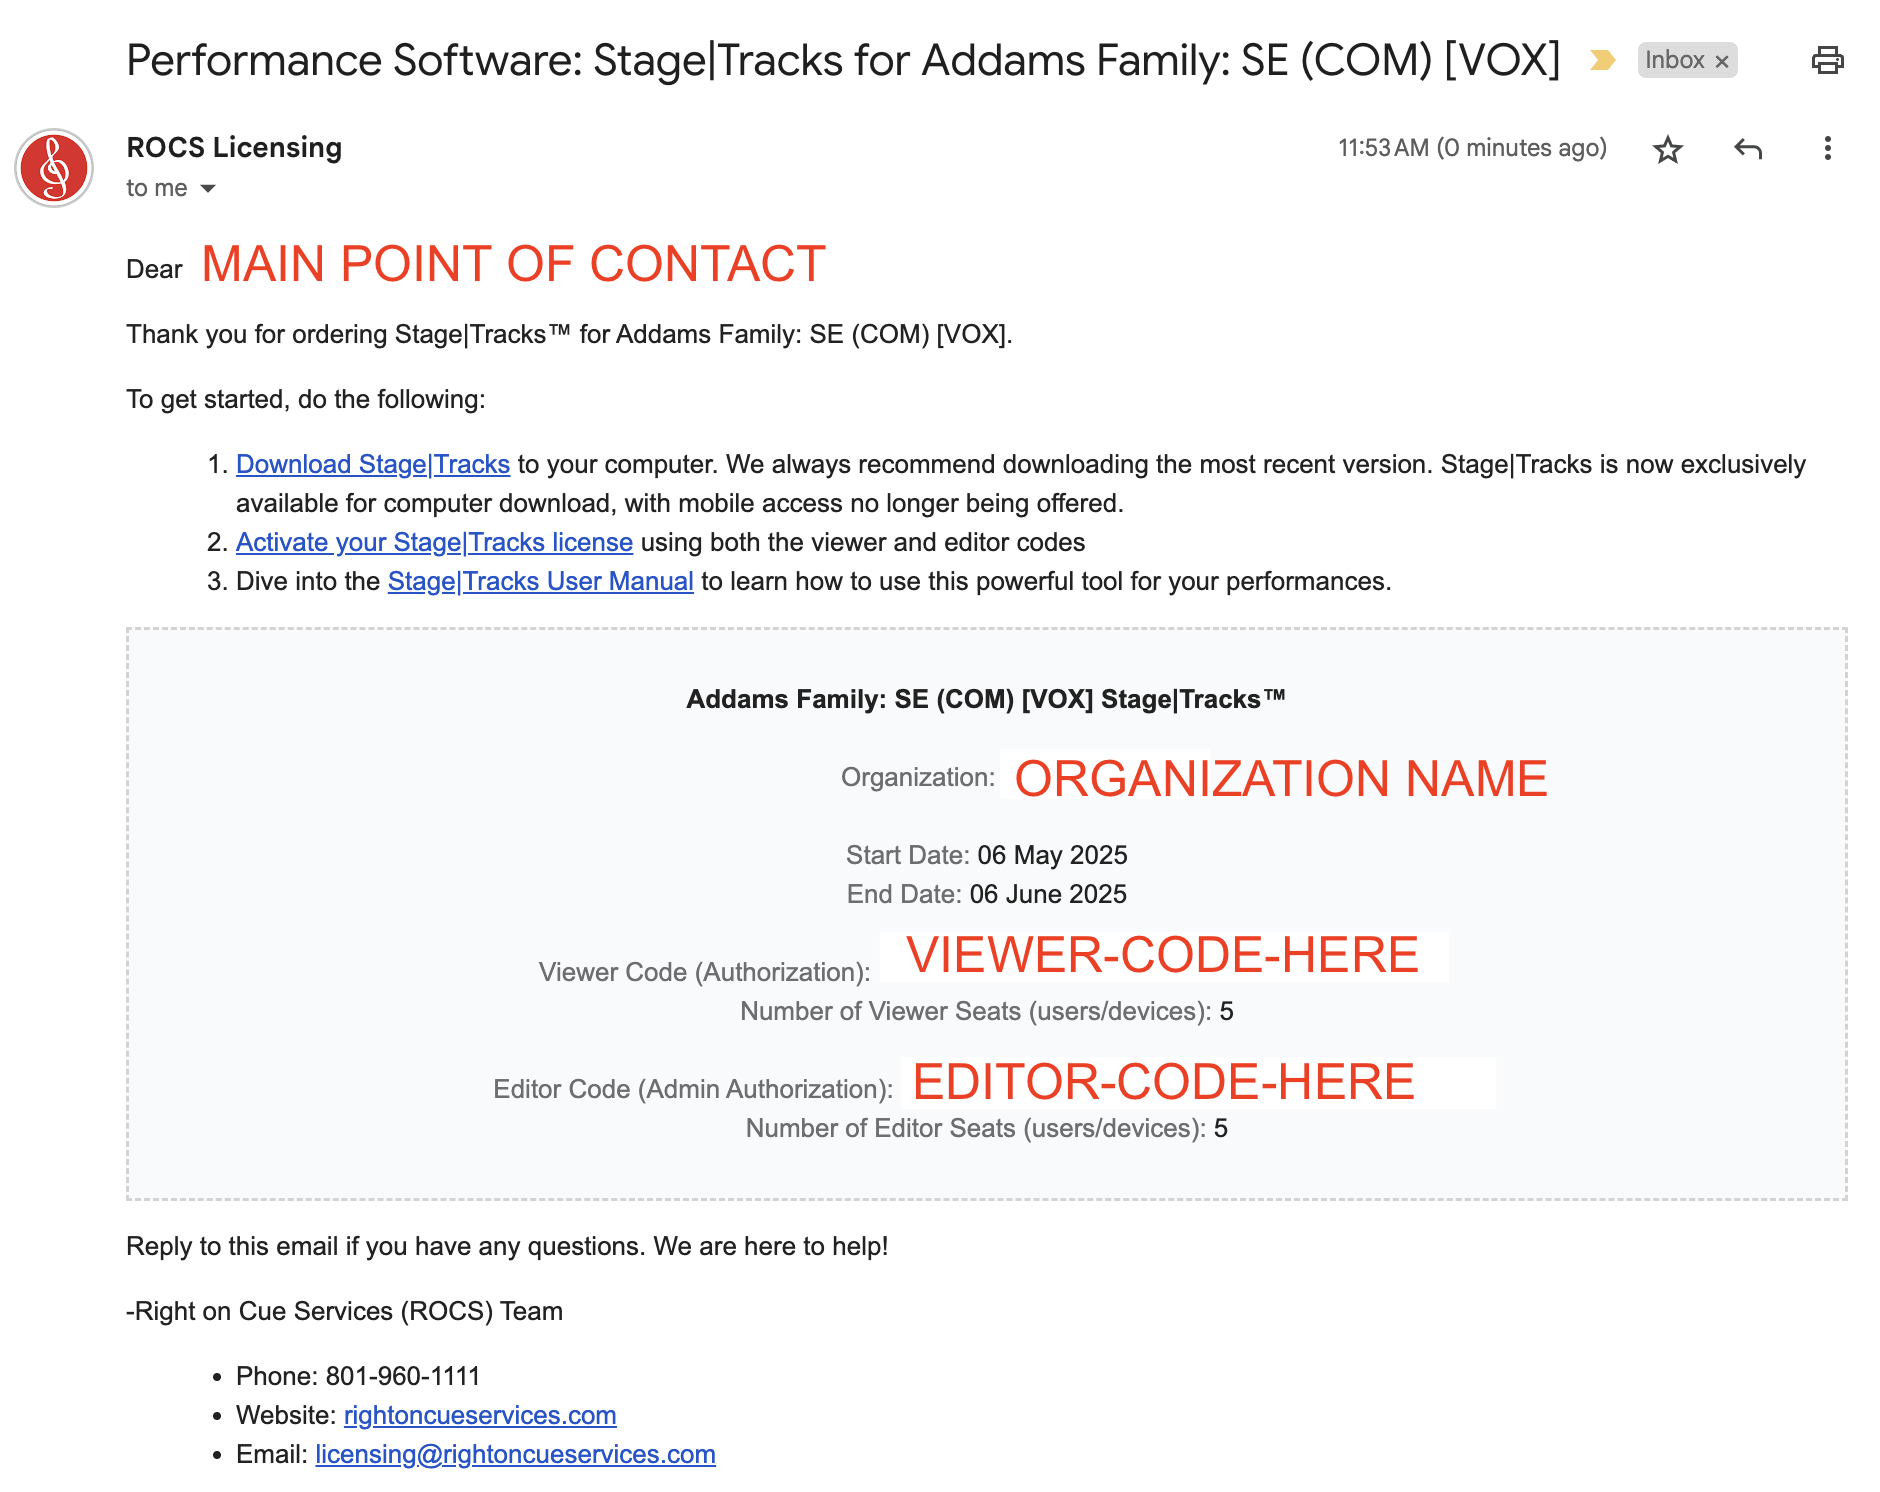
Thirty days before your opening night, Right on Cue Services (ROCS) will automatically send you the following email from licensing@rightoncueservices.com with your access codes:
Licensing Email
Once you have the codes, we recommend that you send the codes to the appropriate members of your production staff:
Send to Production Staff
- Viewer AND Editor Codes
- You have 5 viewer and editor seats for your production staff (up to 5 users/devices).
- You must input both codes to get access to the software. The Editor Code only works if you’ve already entered the Viewer Code on the same device—so every Editor uses both a Viewer & Editor seat.
- Allows your production staff the ability to play and edit the show on their computer (Mac or Windows) or tablet (iPad only).
Like Show|Ready, you will input these codes into the Stage|Tracks software to get access to your show. When your codes expire, this means that you will no longer have access to your show in the software.
The different codes might be confusing, so let’s explain how they work:
| Code | Play Access | Edit Access | For Cast Members? | For Production Staff? | Seat Count |
|---|---|---|---|---|---|
| Viewer Code | Yes | No | No | Yes | 5 |
| Editor Code | Yes | Yes | No | Yes | 5 |
If you have reached your seat limit, please reply to your licensing email with your request, and Right on Cue Services (ROCS) will be happy to assist.

We always recommend downloading the most recent version of Stage|Tracks. To download the software for MacOS or Windows (desktop or laptop):
- Go to our Stage|Tracks page for the most up-to-date software. Make sure you’re signed in as an admin to install the application.
NOTE: There is no Stage|Tracks mobile application available.

If you have a Mac, after downloading the Stage|Tracks application, do the following:
- Drag and drop the application from the left-hand side into the Applications folder.
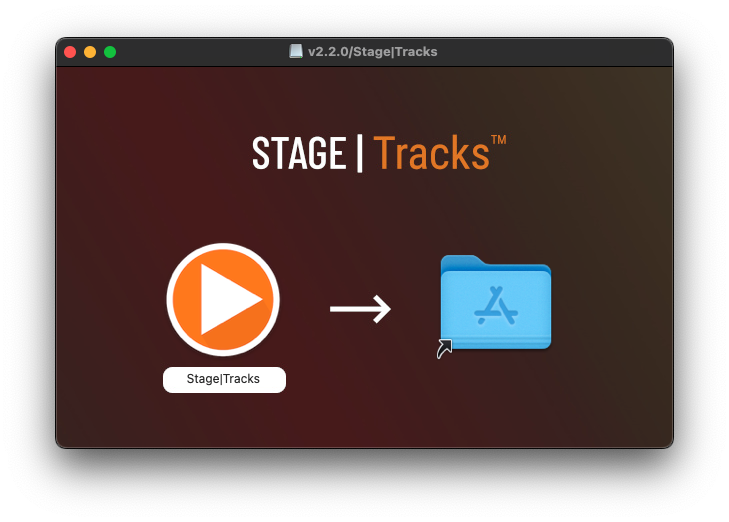
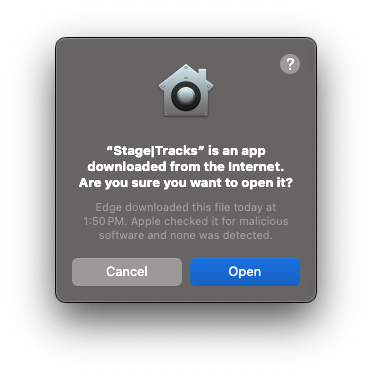
- A pop-up window will ask if you want to open this application.
- Click Open to proceed.
If you have Windows, after downloading the Stage|Tracks application, do the following:
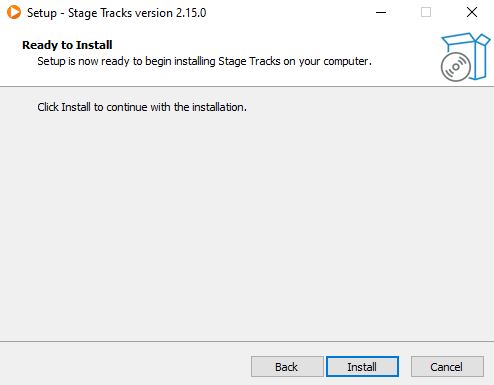
- Double-click the .exe file to begin the installation.
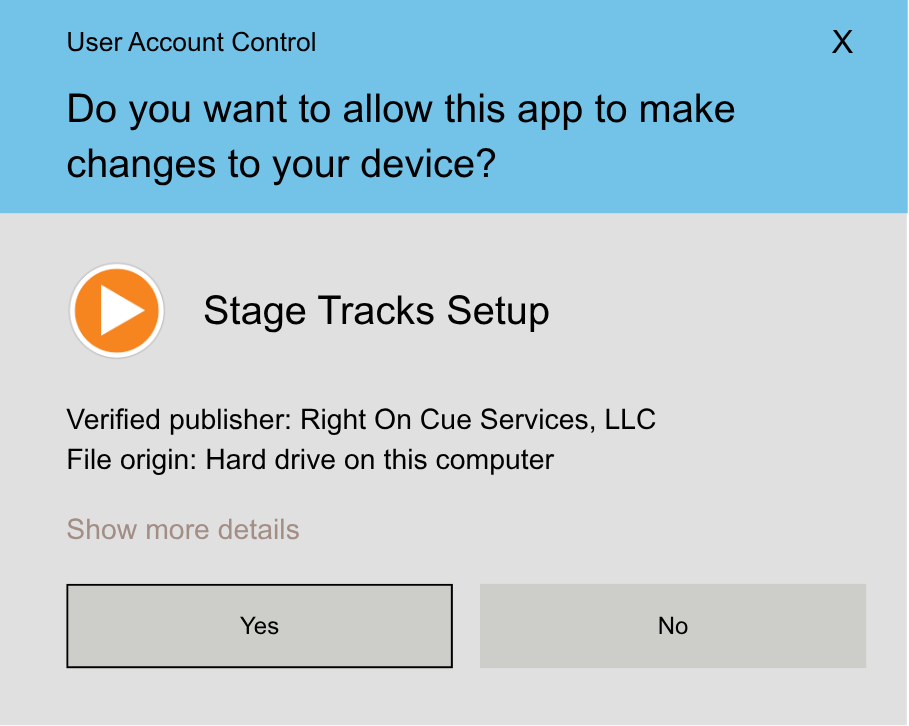
- A pop-up window will ask if you want to allow the app to make changes.
- Click Yes to proceed.
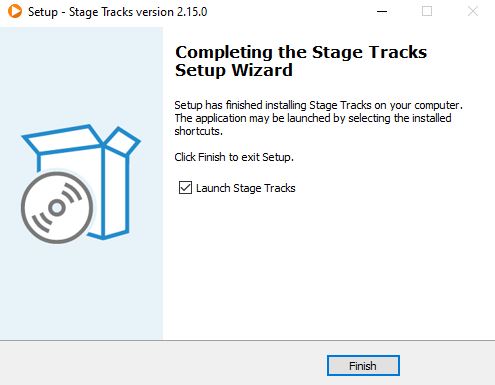
- Complete the installation process.
- Once you click Finish, the software will begin downloading.


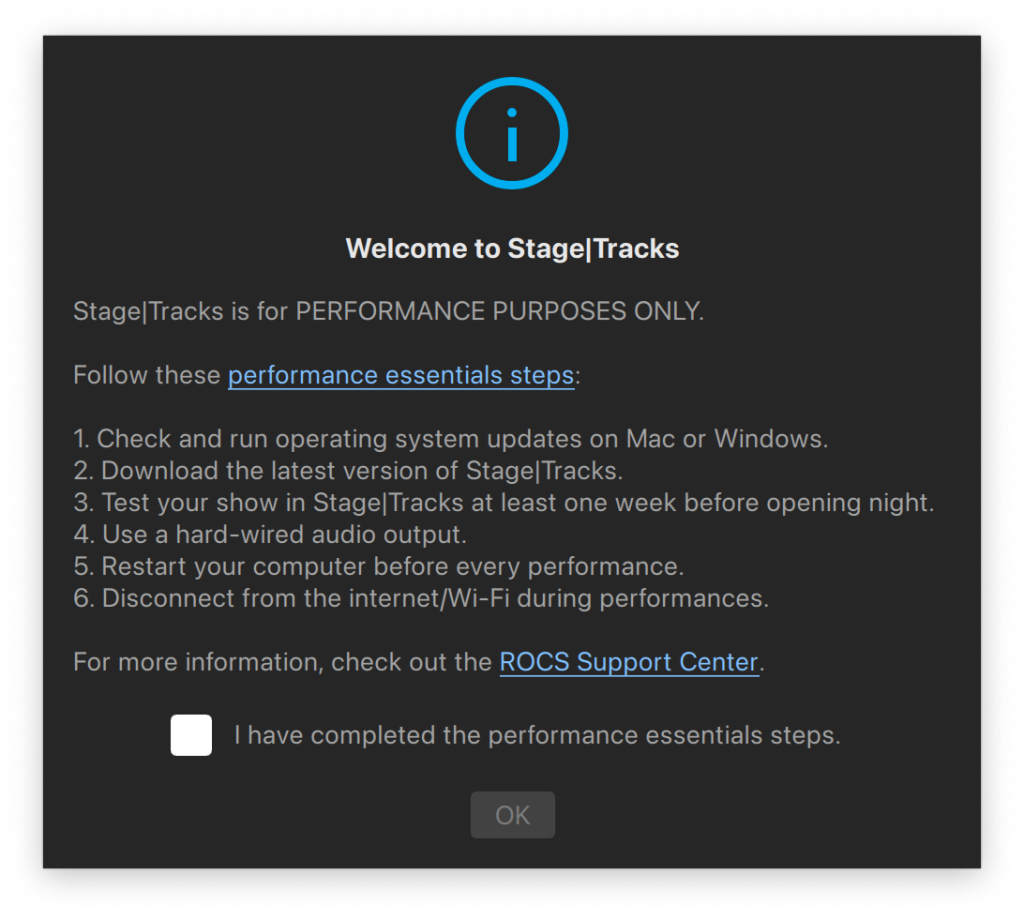
When you open Stage|Tracks on Mac or Windows, a pop-up window will appear. This notice informs you that the software is intended for use in performance purposes.
- Read through and complete all the performance essential steps.
- Click OK to close this pop-up window.
This window will appear each time you open Stage|Tracks as a reminder to complete the steps.
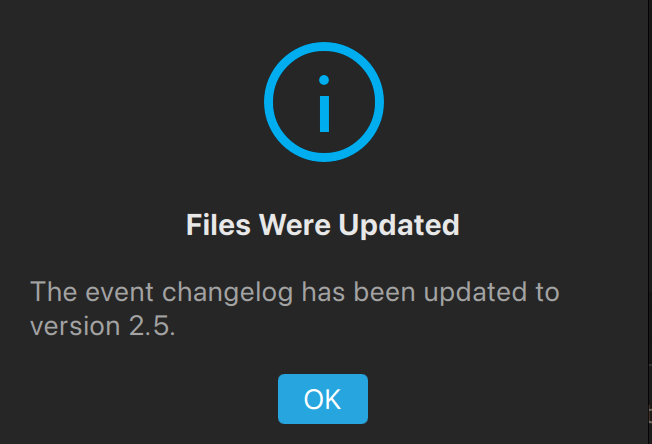
When you open Stage|Tracks on Mac or Windows, if you have recently made changes in Show|Ready or another Stage|Tracks application, a pop-up window will appear with the notification:
- Files Were Updated: The event changelog has been updated to version [number].
Activating Your Stage|Tracks License
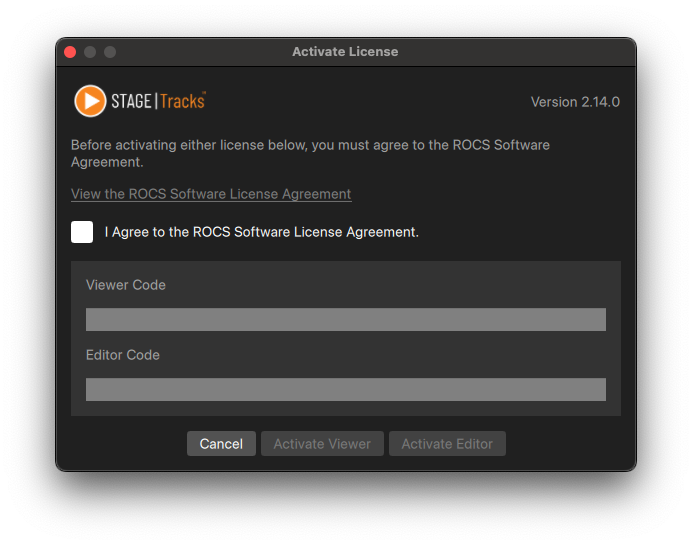
The first time you launch Stage|Tracks on Mac or Windows, a pop-up window will appear asking you to agree to the Right on Cue Services (ROCS) software license agreement and input your access codes. This notification also includes the software version number.
- Click View the ROCS Software License Agreement to review it.
- Select the checkbox next to I agree to accept the terms and conditions.
Using Your Access Codes
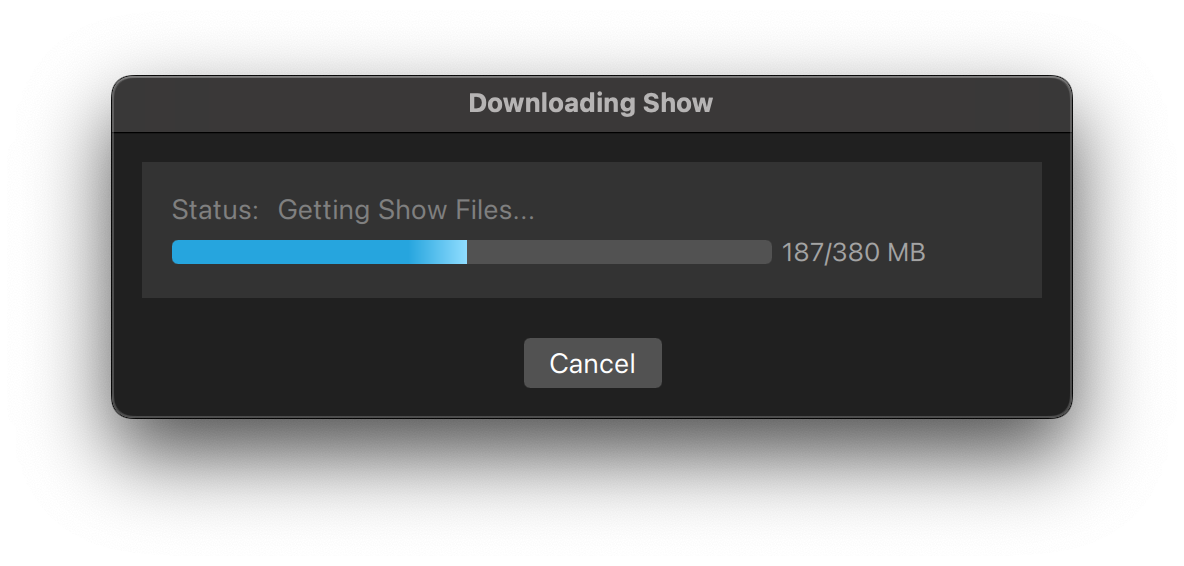
Next, paste your access codes to activate your show. Stage|Tracks will then download your show on Mac or Windows in preparation for editing and rehearsal.
To grant the director and production staff play access only, they will need to do the following:
- In the Viewer Code field, paste the access code (previously known as the Authorization Code).
- Click the Activate Viewer button, and your show will download.

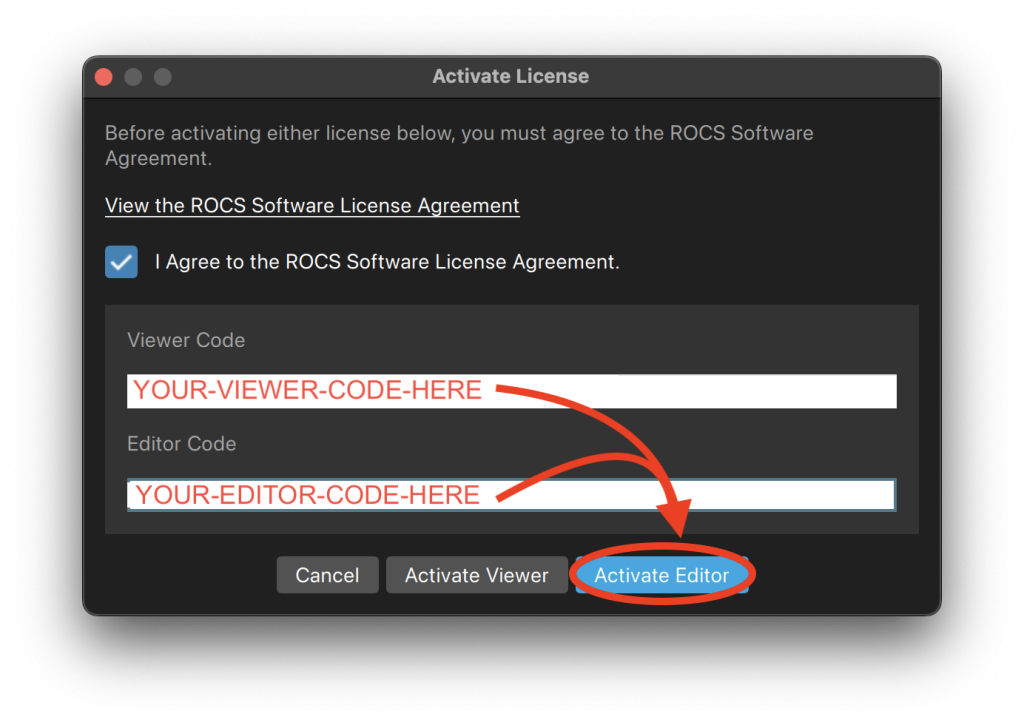
To grant the director and production staff editor access, they will need to do the following:
- In the Viewer Code field, paste the access code (previously known as the Authorization Code).
- In the Editor Code field, paste the admin code (previously known as the Admin Authorization Code).
- Click the Activate Editor button, and your show will begin downloading.
NOTE: Be aware that every time you enter the access code for the same show, it will consume one of the seats granted to your organization. If more seats are needed, please reply to your licensing email with your request, and ROCS will be happy to help.
Once you have added your codes, your show will download into Stage|Tracks.
Code Expiration Reminder Email
As a courtesy, we send an automated email reminder one week before your access codes expire. This email is designed to help you avoid interruptions to your show production. This reminder is to provide you with greater peace of mind. Your codes should expire the DAY AFTER your closing night. When your codes expire, it means that you lose access to your show in the software.
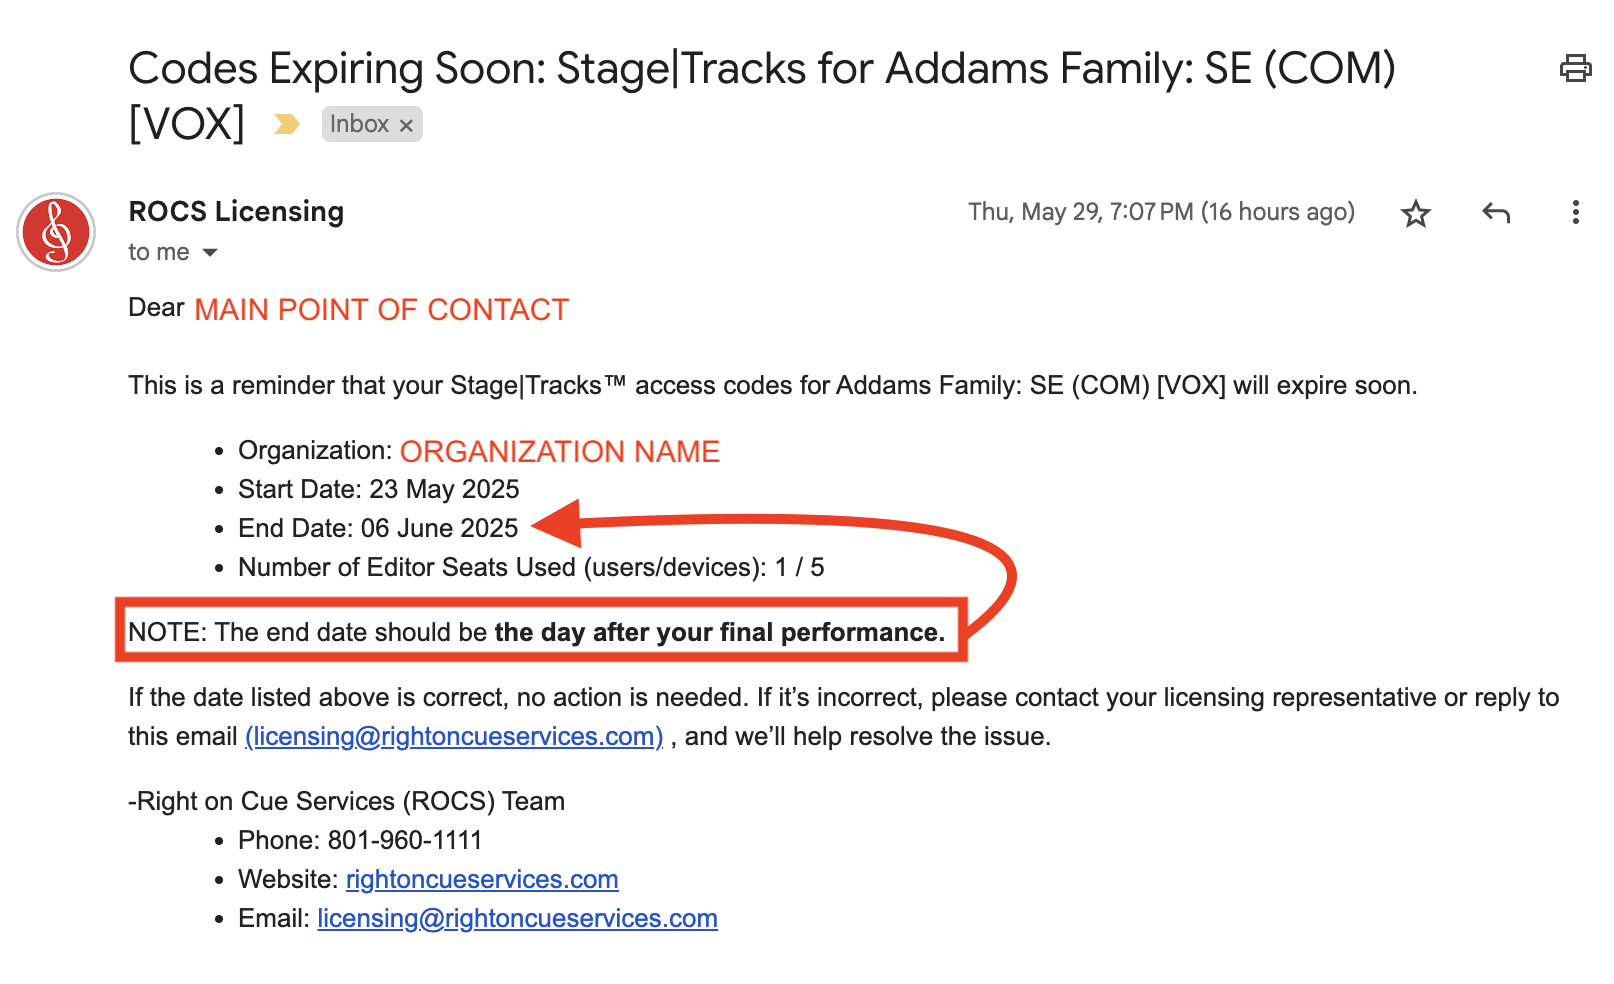
NOTE: This email is sent to the main point of contact on the account. If the date is incorrect, please reply to the email.
As ROCS moves forward with additional exciting advancements, and due to the limited capabilities of Stage|Tracks Mobile, this app is no longer available. To learn more about this change, please visit: Rebranding and Limiting Access
As we continue to develop and enhance Stage|Tracks features, you may encounter some limitations or bugs. We highly value your feedback and encourage you to submit any feature requests or report any issues. You can submit your requests here:
Regular updates with new features and bug fixes will be rolled out in the future. For more info, visit our support page:
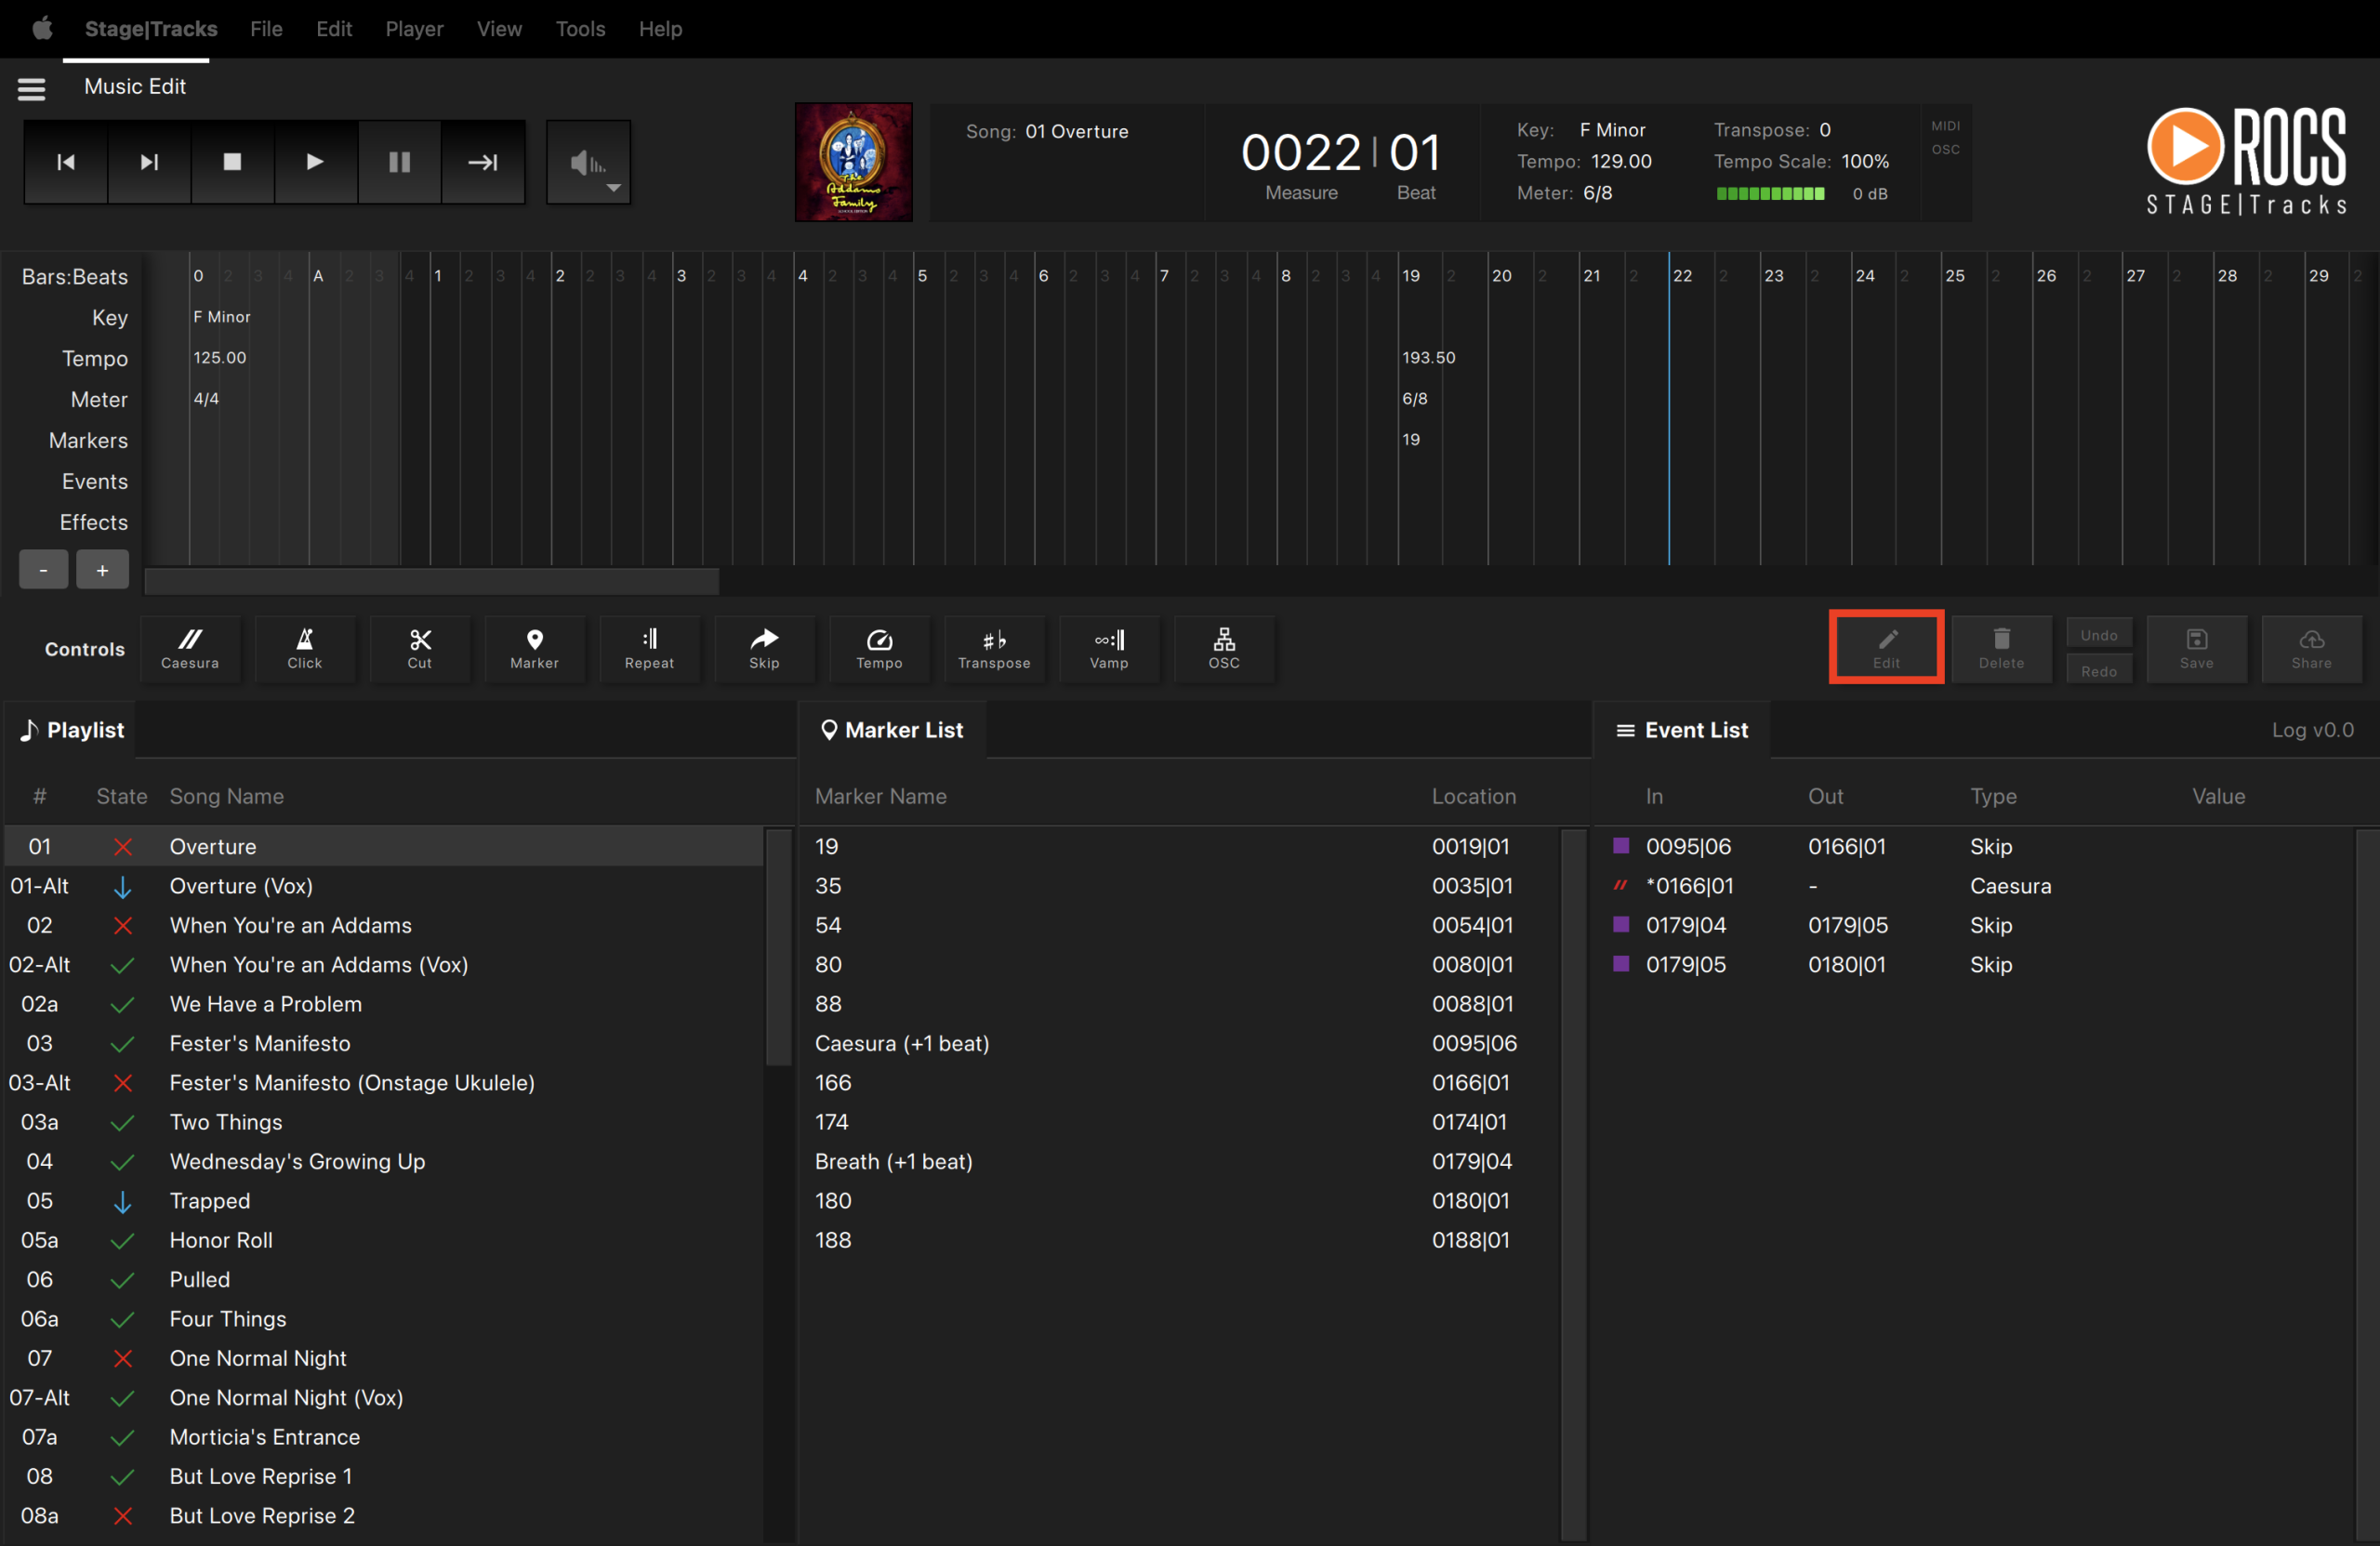
2. Navigating Stage|Tracks
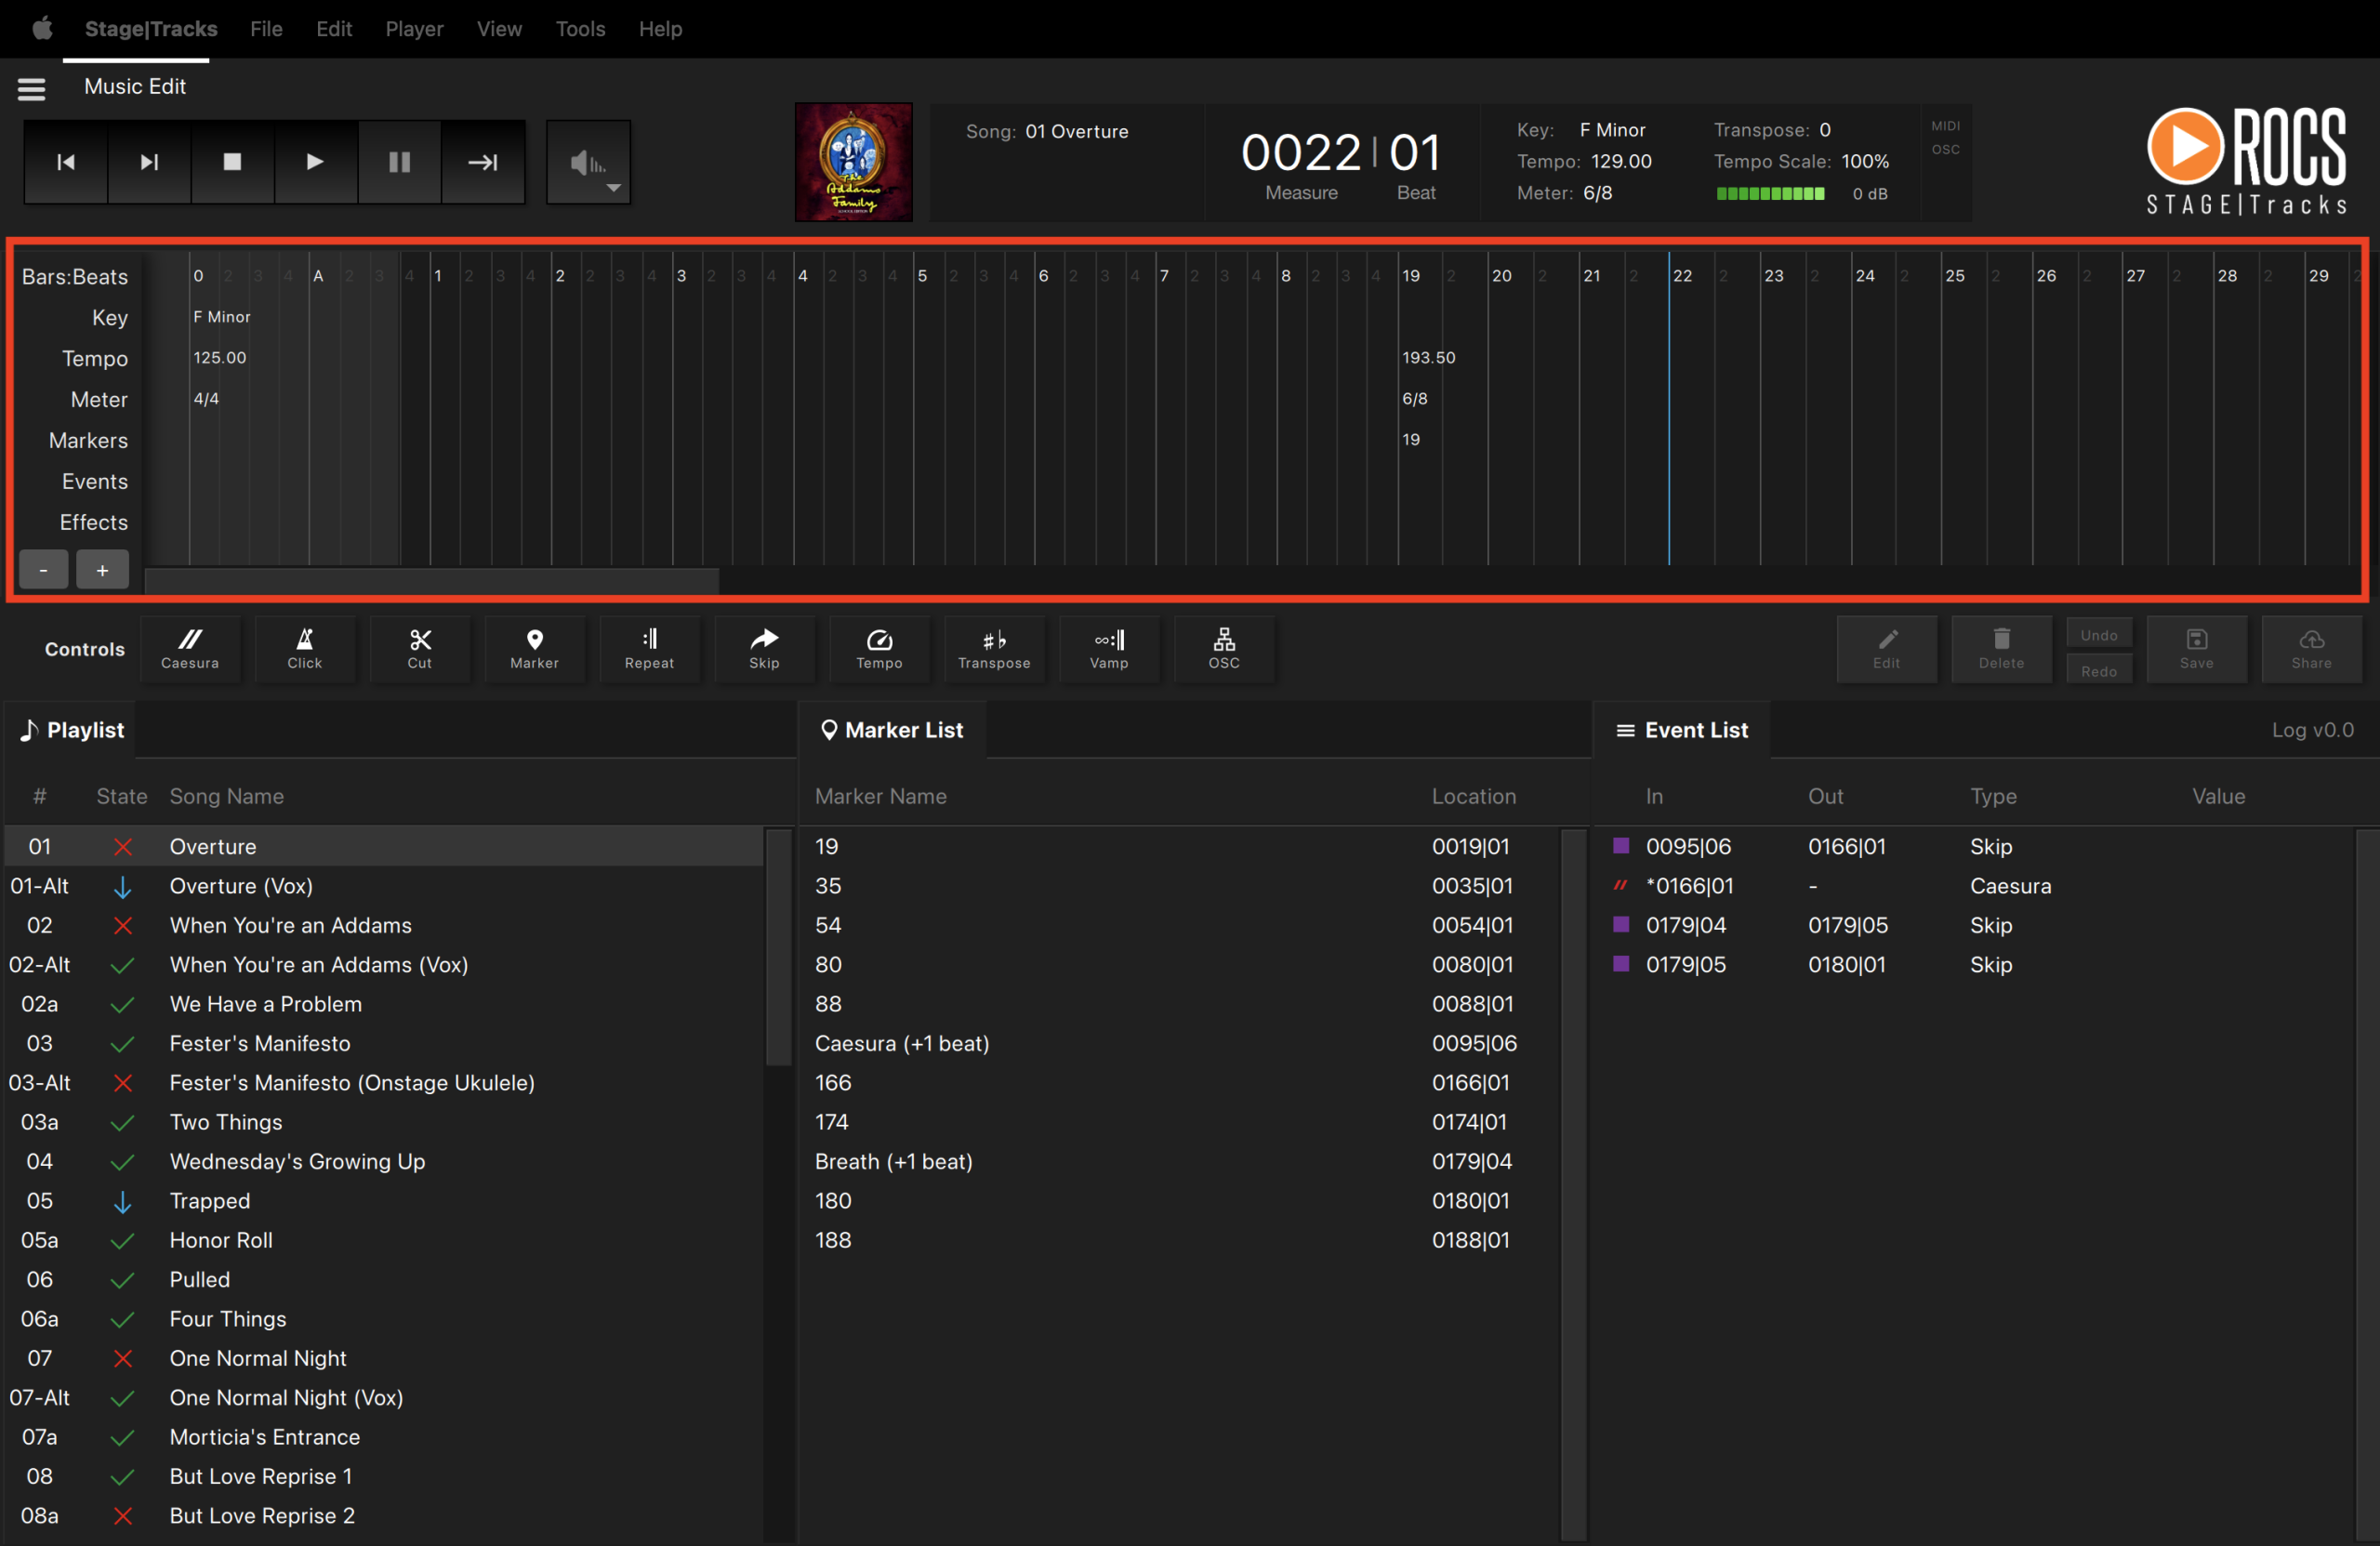
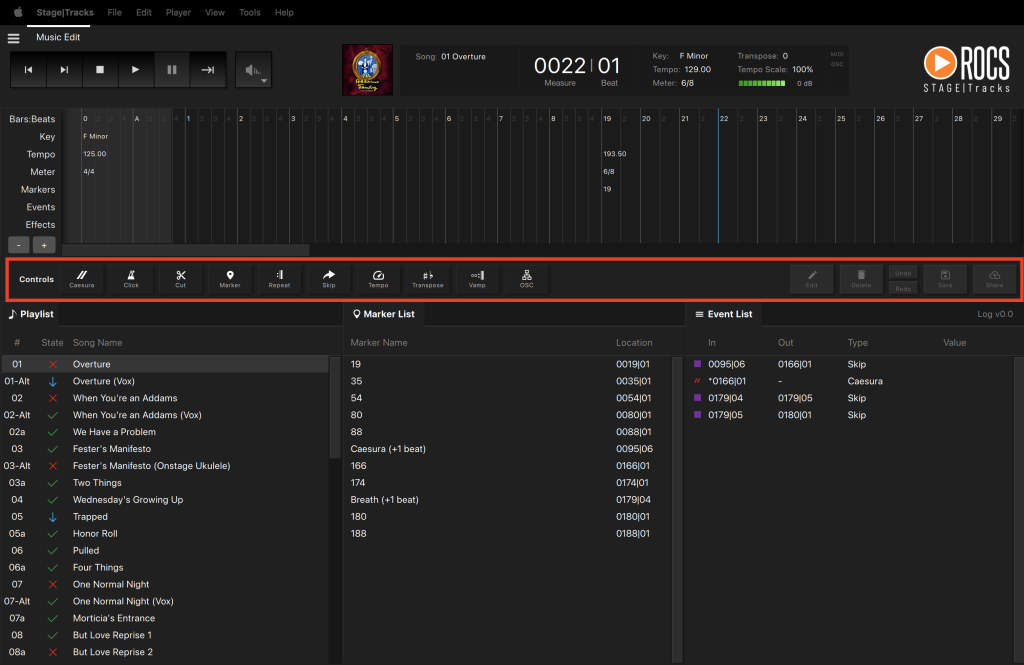
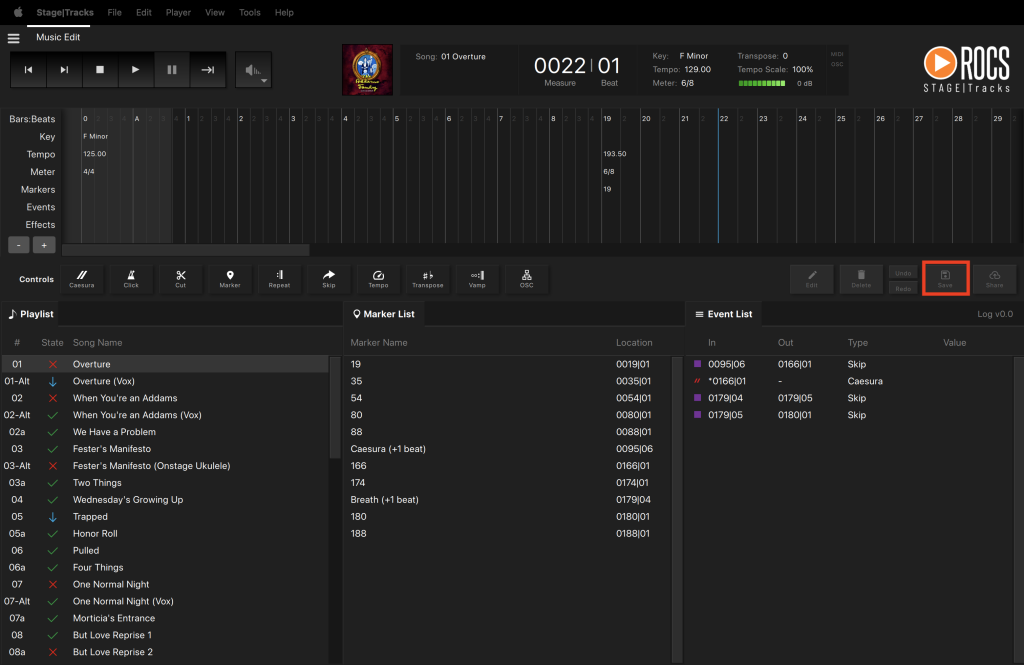
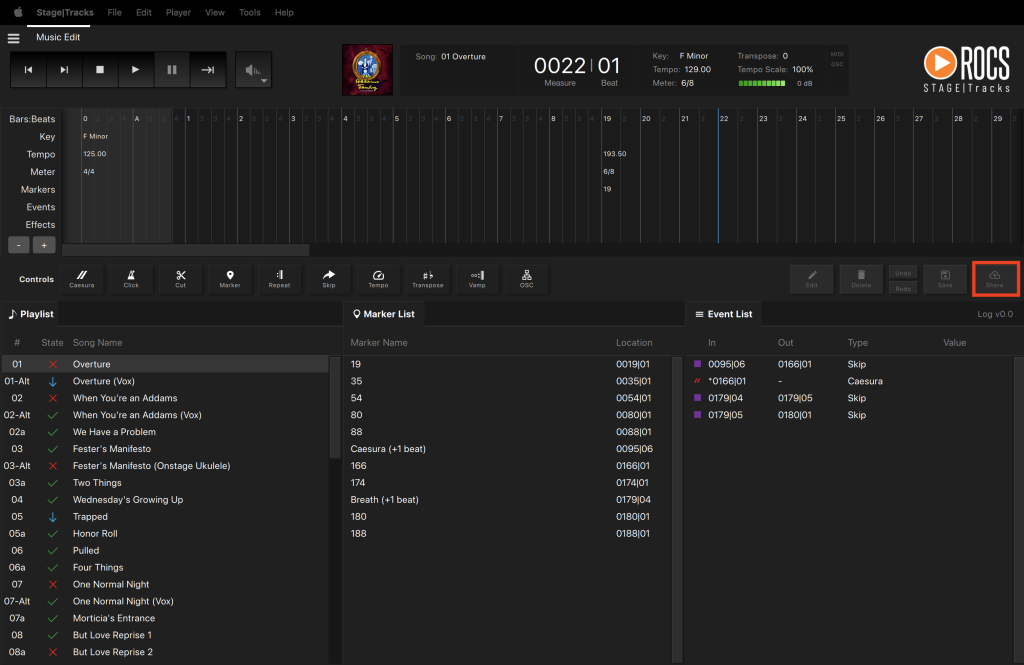
Below is the main window for Stage|Tracks. We will deep dive into each section below to learn more.
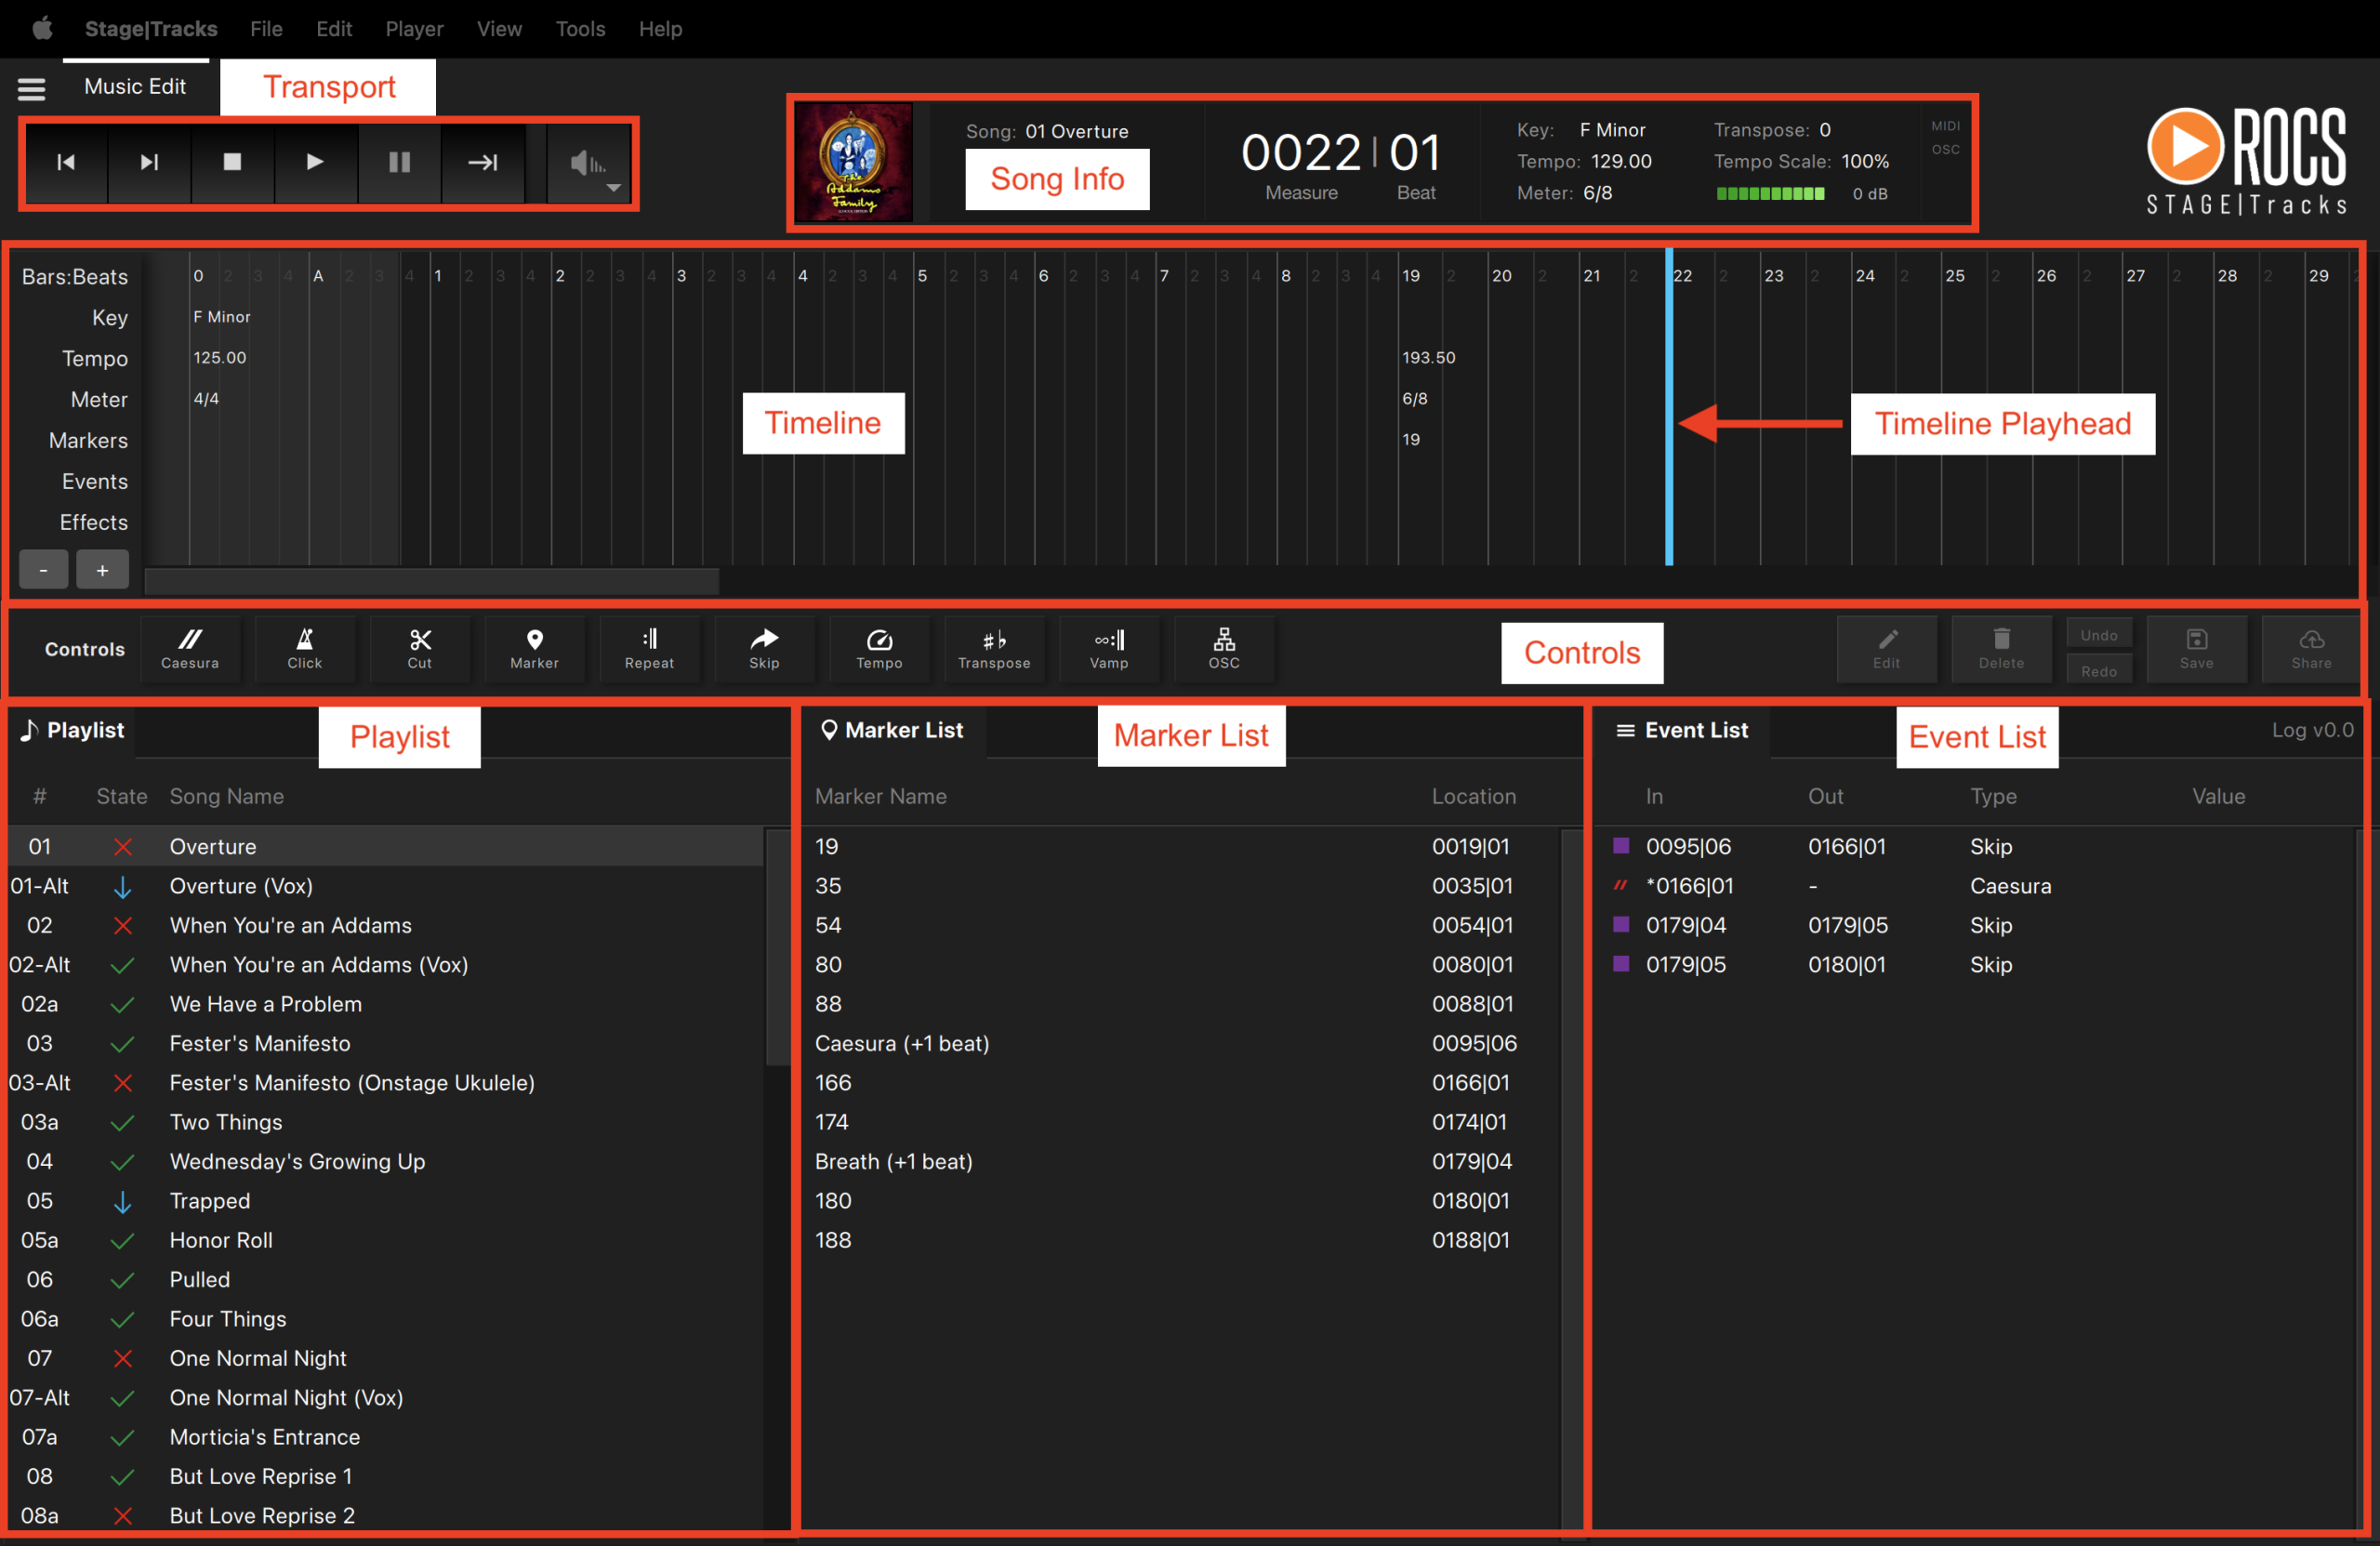
This section controls the playback of the selected song and enables easy navigation through your show. While similar to a traditional audio player, please note that some features may differ.
Transport Buttons
Here is a list of all of the Transport buttons and what they do:
- Previous Song – go to the previous song in the Playlist.
- Next Song – go to the next song in the Playlist.
- Stop – stop the music and return the Timeline Playhead to the beginning of the Timeline.
- Play – play / resume the music in the Timeline.
- Pause – pause the music and Timeline Playhead at that point in the Timeline.
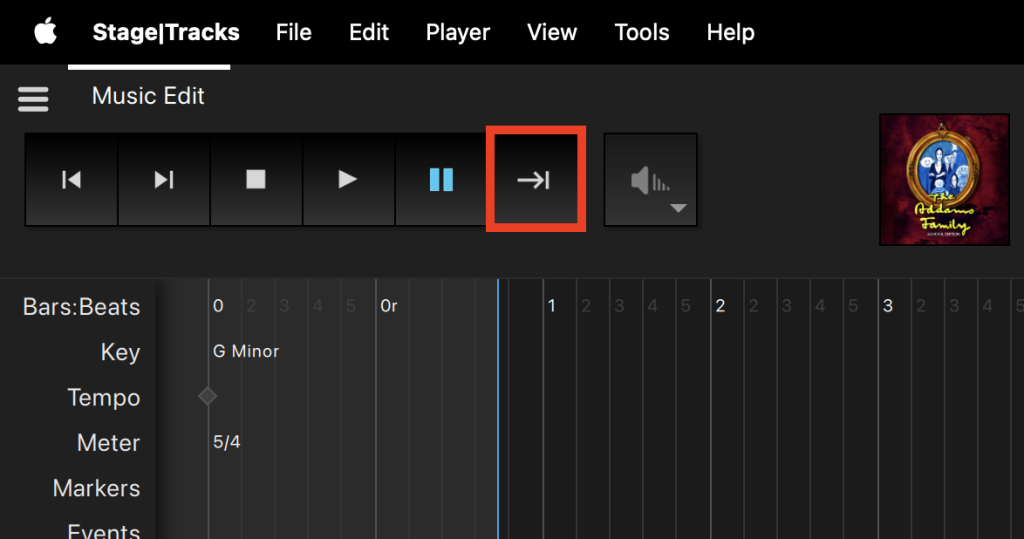
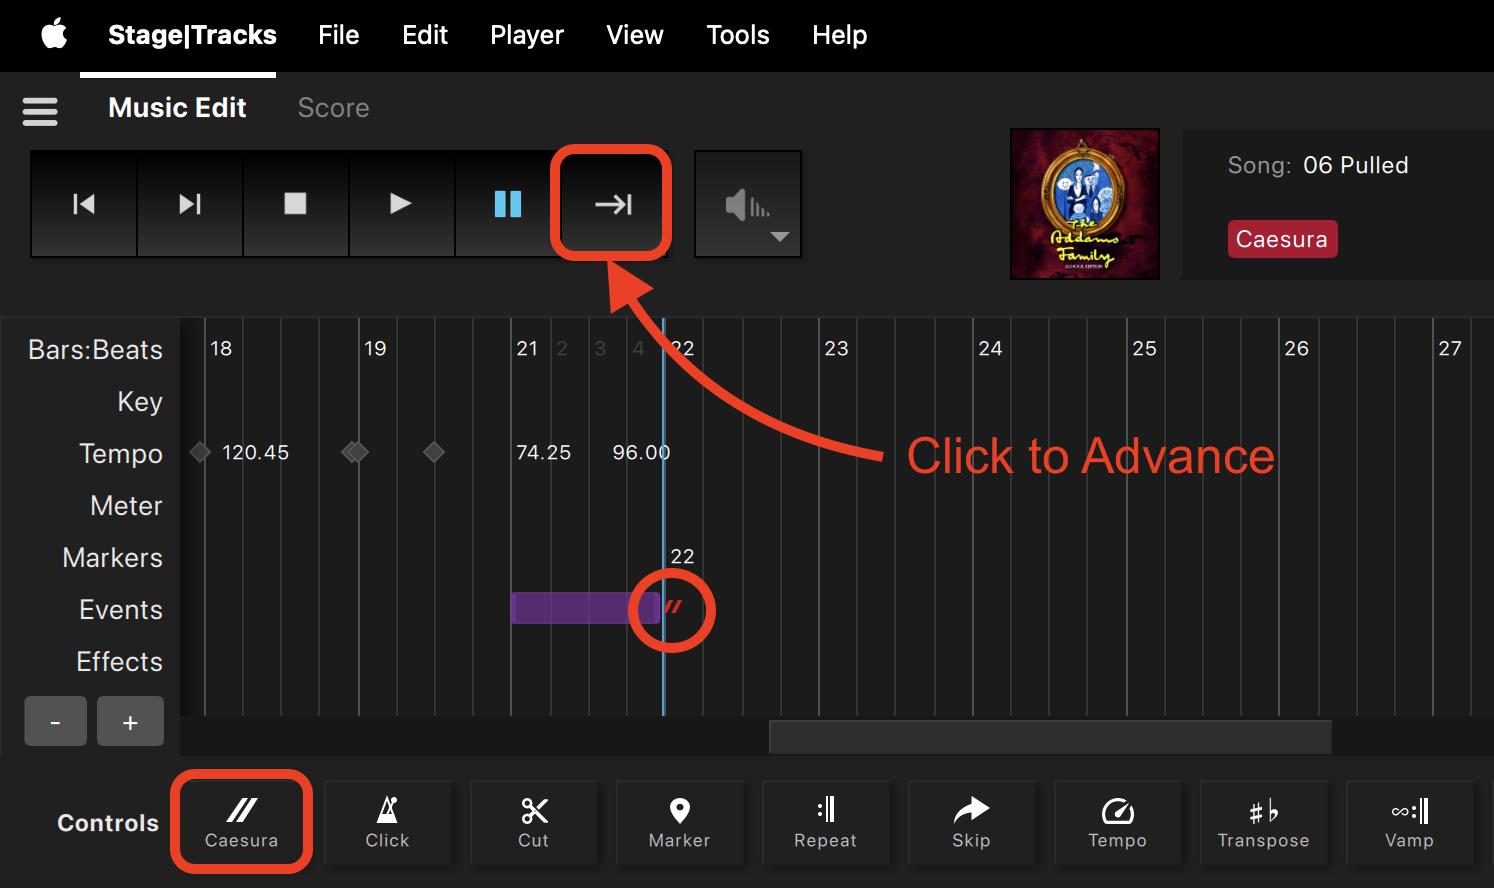
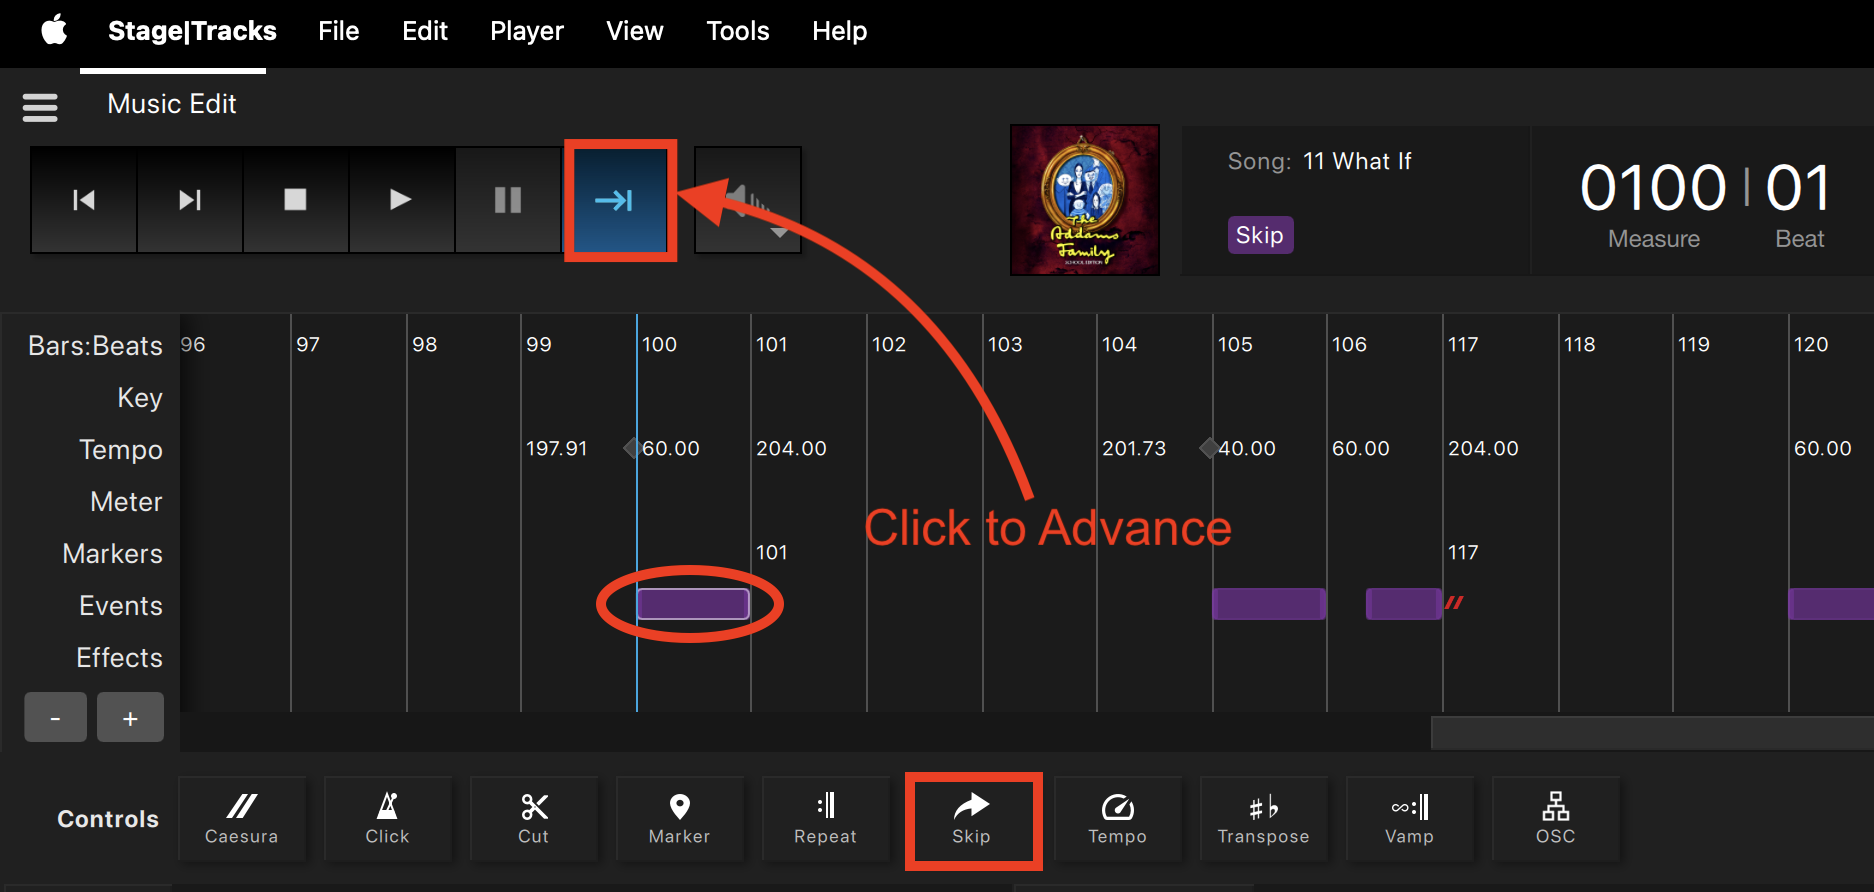
- | Advance – a multi-use button to resume playback for caesuras, skips, and vamps.
- Fade Out – fades out the music of the current song and moves to the next song.
The advance button is a manually triggered button to be used in the following situations:
- 1. Resume playback after a Caesura. If you don’t click Advance, the music will be paused indefinitely.
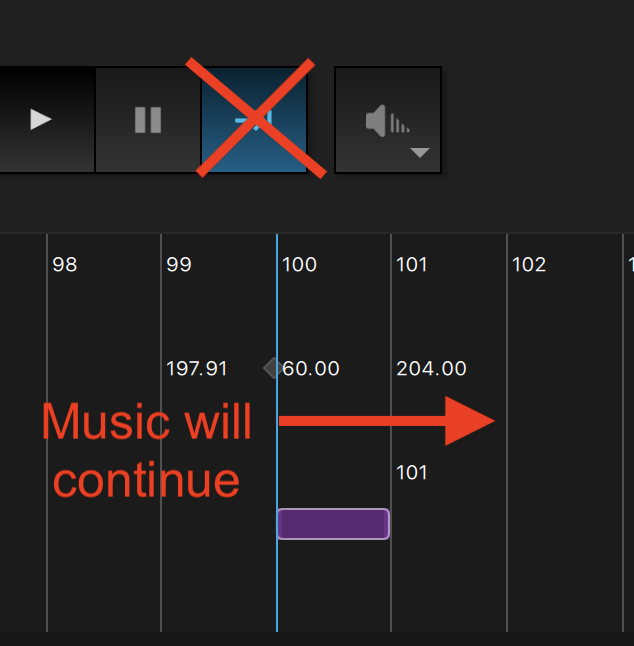
- 2. (Optional) Jump to the end of a Skip. If you don’t click Advance, the music will continue to play as usual.
- 3. Exit a Vamp. If you don’t click Advance, the music will loop indefinitely.
Advance Button
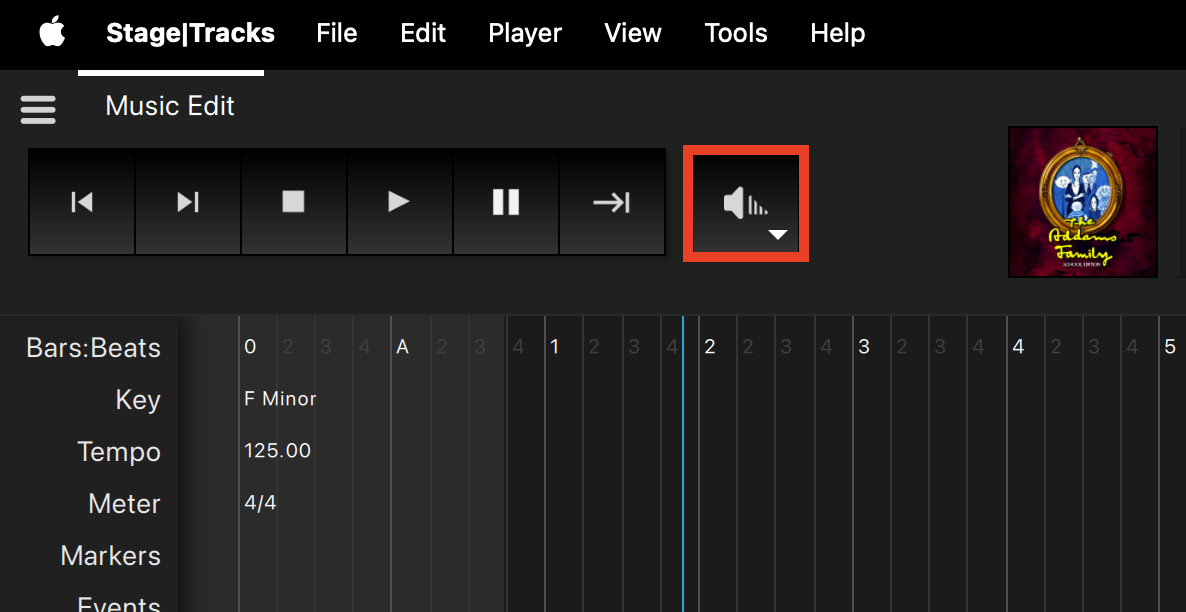
The fade out button fades out the current song’s music and transitions to the next song. This feature is only available when the music is playing. If music isn’t playing, you won’t be able to select the option. To use the fade-out feature, do the following:
- Single click- fade out default is 3 seconds
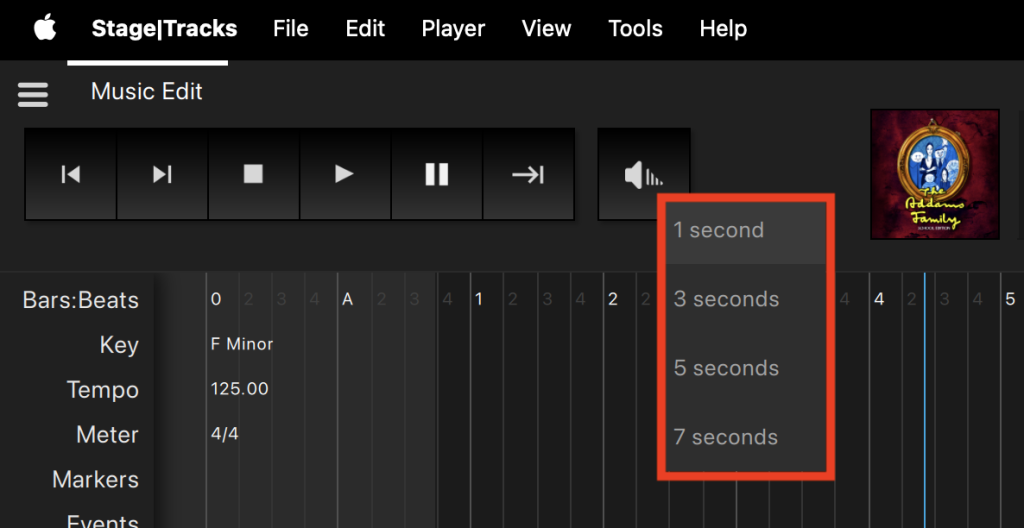
- Click and hold- 1, 3, 5, 7 seconds
Fade Out Button
Fade Out Options
Many of the buttons above have keyboard shortcuts to help you navigate more quickly. To learn more, check out Keyboard Shortcuts.
Below is the score window of the selected song. You can access it by clicking on the Score tab at the top of the page. By default, all events in Stage|Tracks match exactly as listed in the score. You can click on Music Edit to get back to the main view.
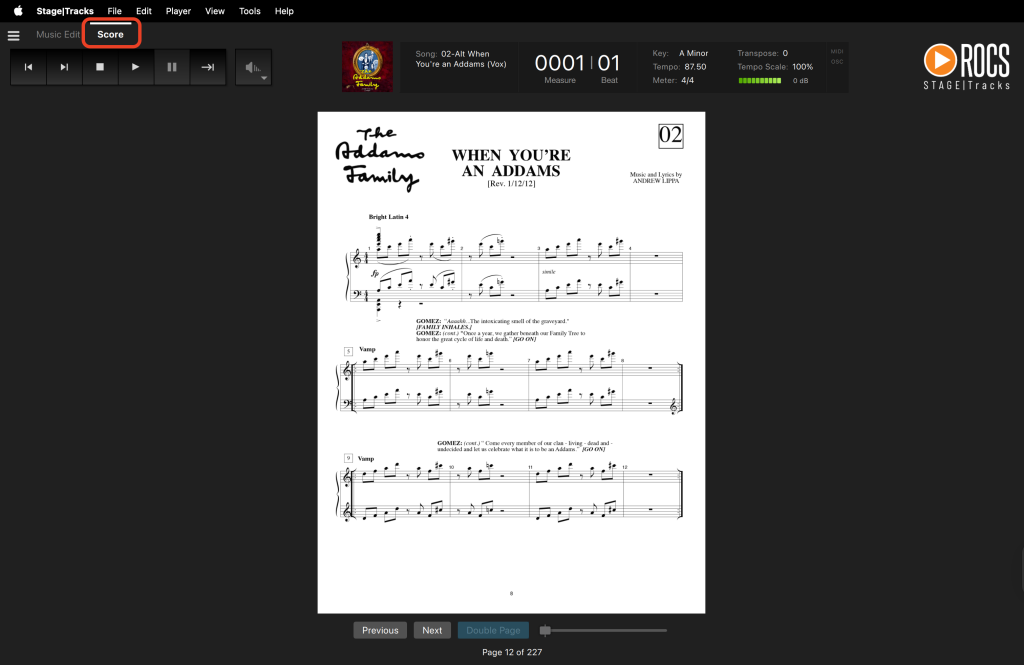
Here is a list of the Score buttons and what they do:
- Previous – go to the previous page of music.
- Next – go to the next page of music.
- Double Page / Single Page – toggle to show one or two pages.
In the Score view, the music will automatically turn the pages for you as you play it. To utilize this function, click the Play button in the Transport.
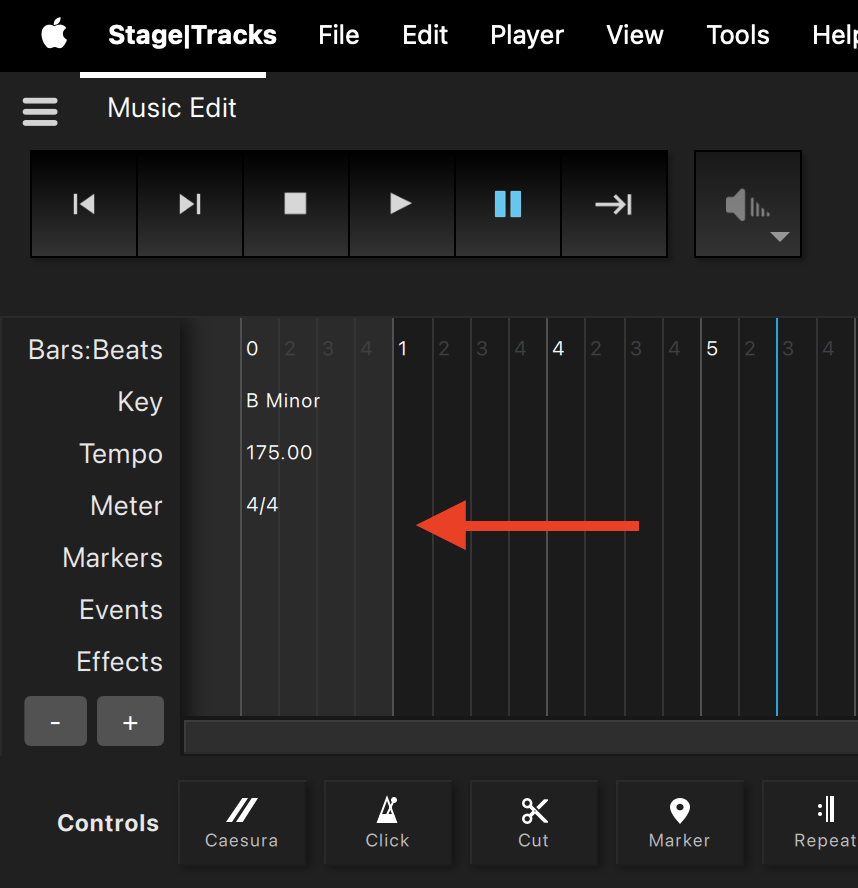
This section contains several pieces of information about the selected song. It consists of the song number, song name, measure | beat, key, any transposition, tempo, tempo scale, meter, and a volume indicator. It also includes labels for various events in the timeline. By default, all pre-programmed events in Stage|Tracks match exactly as listed in the score.
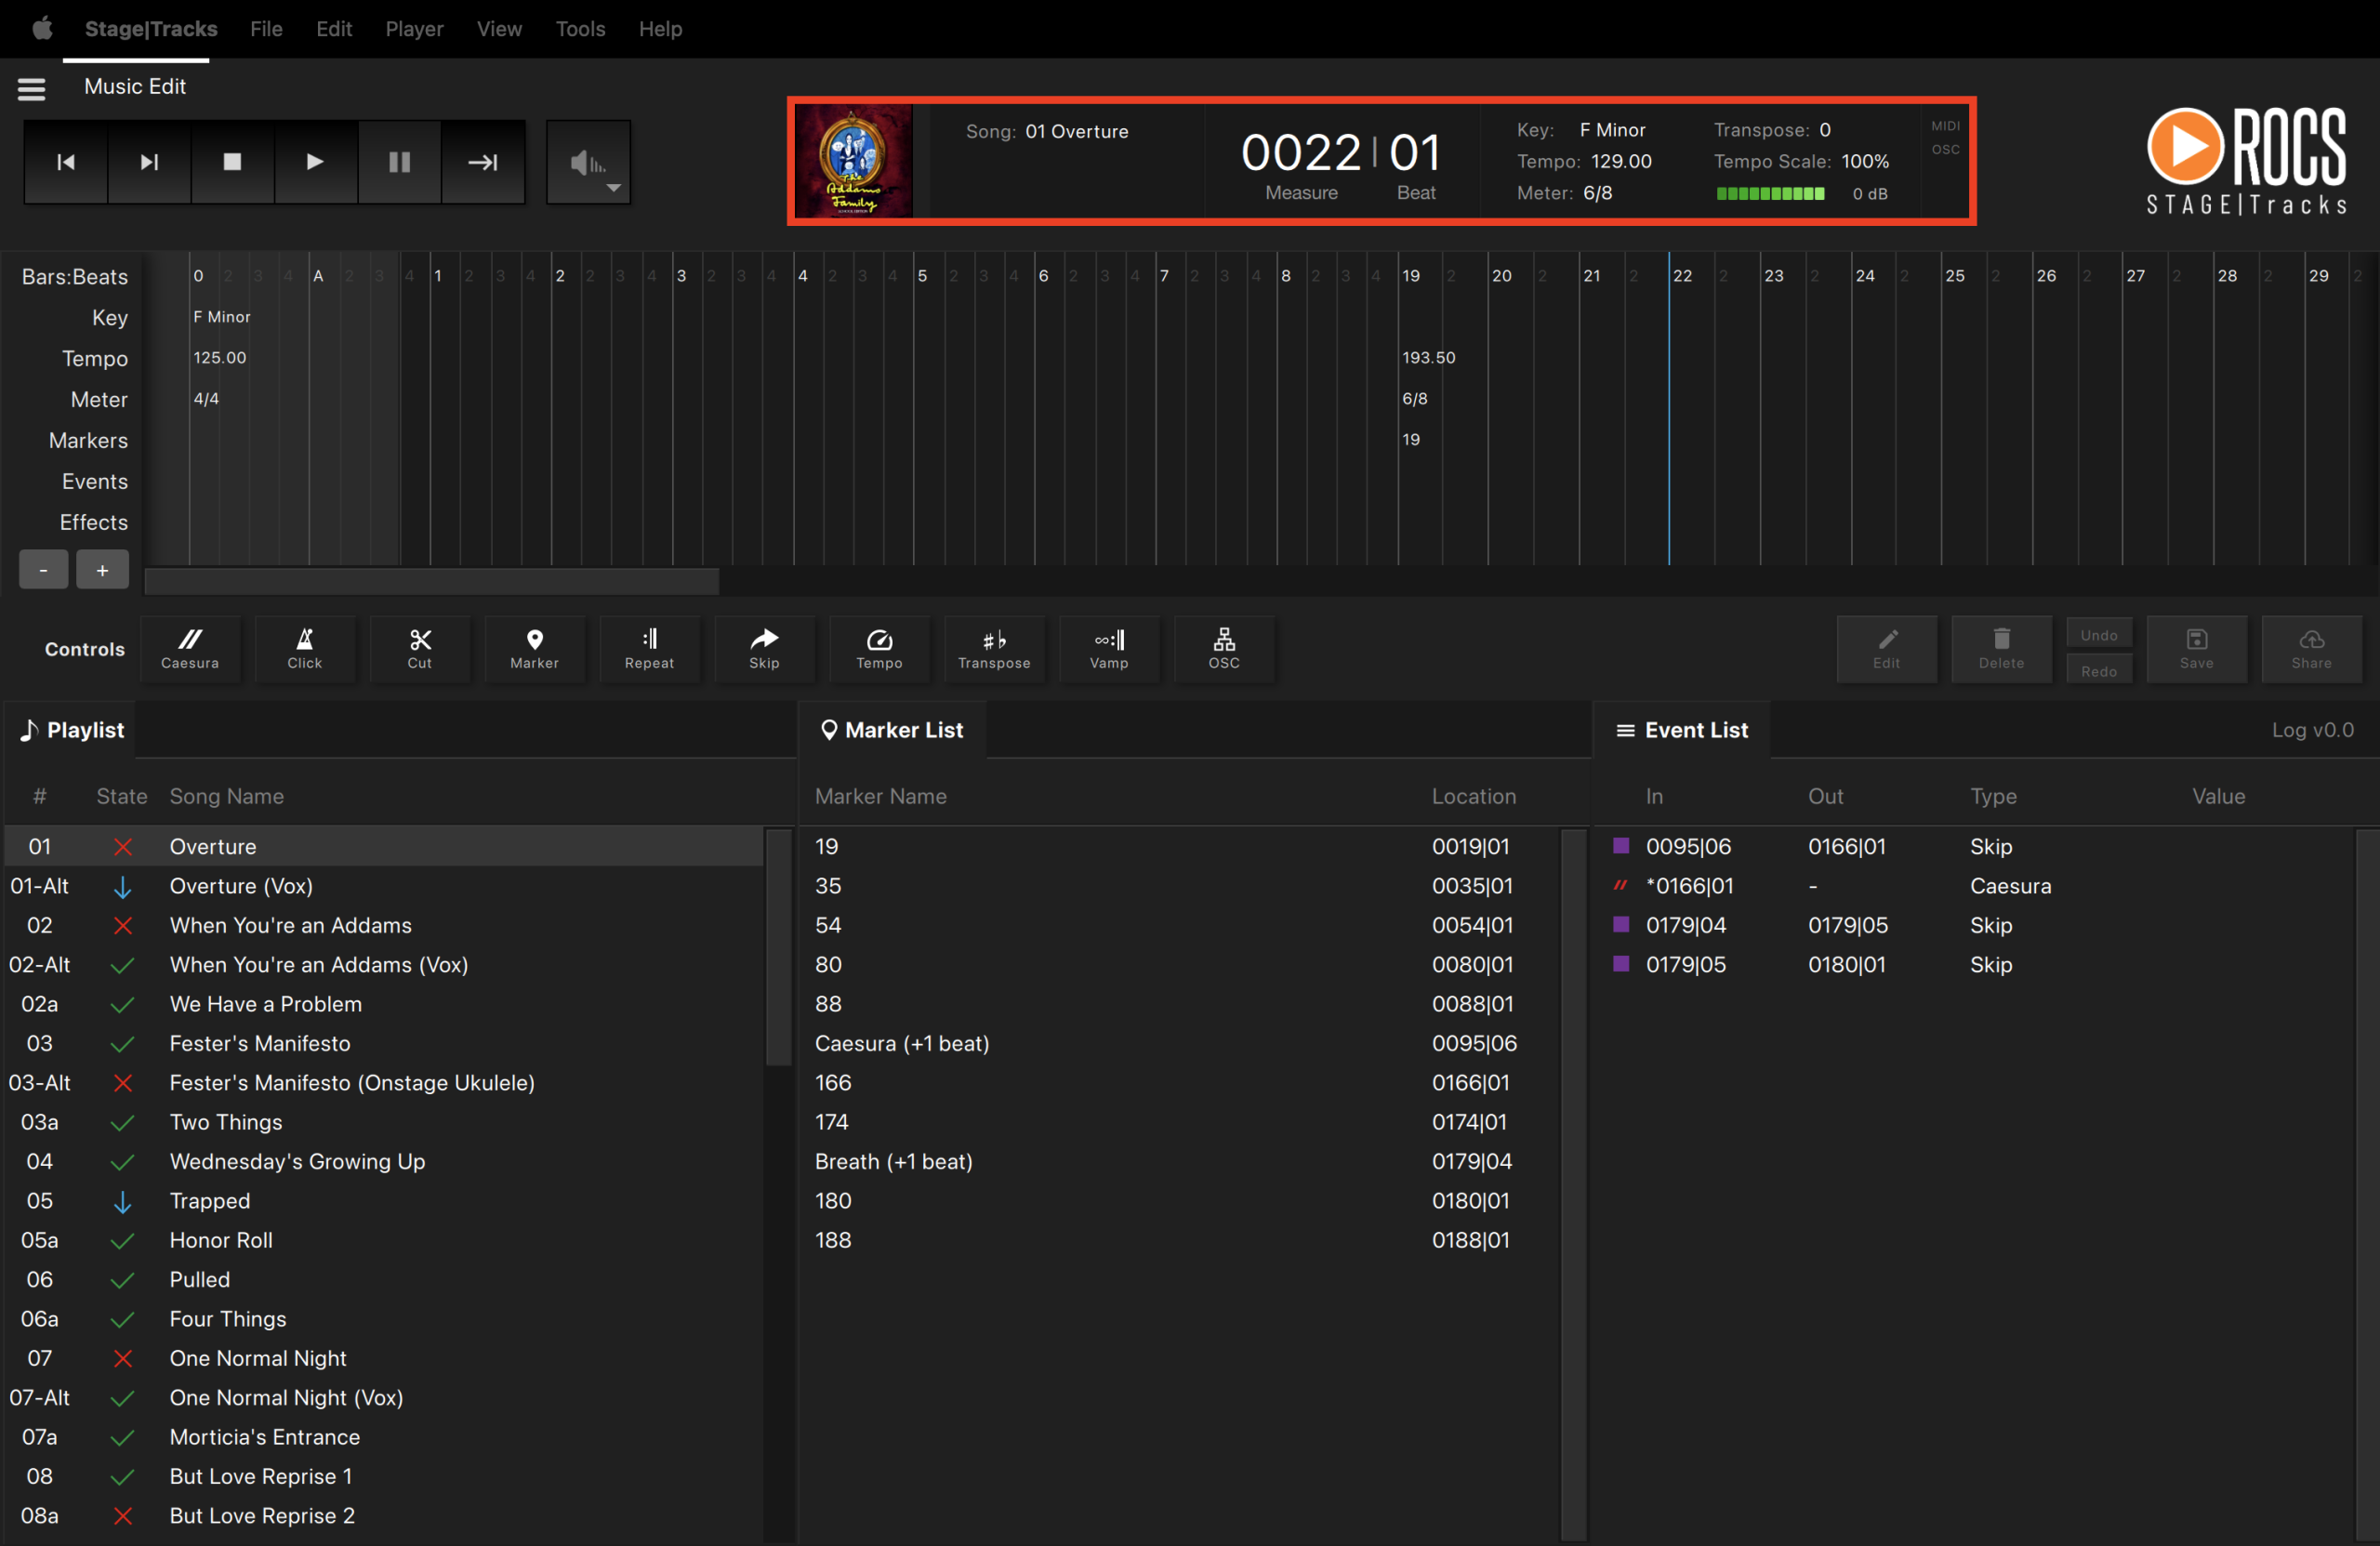

A green gradient band represents the volume. The default volume is set at 0 dB. This is the highest volume that can be achieved. This means that you cannot turn the default volume louder.
The volume ranges from 0 dB to -60 dB. To adjust the volume of a song, you must use an OSC command. For more information on how to do this, see Volume Automation Within Stage|Tracks.
- Highest volume = 0 dB (default)
- Lowest volume = -60 dB
- Off = negative
When you make changes to the transposition (key) or tempo scale, it’s reflected in the Song Info.
Score Defaults

After Edits

Here are each of the event labels that will appear in the song info:
Caesura Label

Repeat Label

Skip Label

Vamp Label

As mentioned, all events in Stage|Tracks match exactly as written in the score. However, when measures repeat in a song, those measures will be marked with an additional “r” (or “r2,” etc.), which represents “repeat,” allowing each measure in the software to have a unique number.
Repeated Measure

Song Info also contains two indicators for MIDI and OSC activity. The indicators illuminate when Stage|Tracks sends or receives a MIDI or OSC command. These commands can be sent or received by Stage|Tracks, QLab, or any other MIDI or OSC-enabled device. This indicator can aid in troubleshooting to identify errors in the MIDI or OSC signal.
MIDI and OSC Activity Indicator

NOTE: The activity indicator will only light up when receiving OSC from Stage|Tracks via an OSC-enabled device or software, such as QLab. It will not light up when sending OSC from Stage|Tracks.
This section represents every event in the show in chronological order. By default, all pre-programmed events in Stage|Tracks match exactly as written in the score.
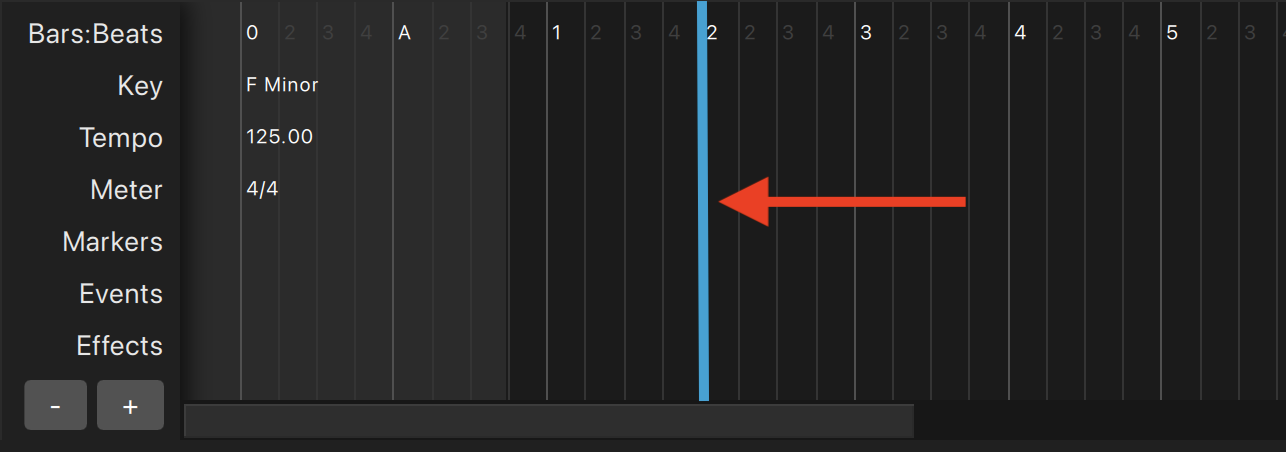
The Timeline Playhead shows the software’s current position in the song, represented as a vertical cyan band in the Timeline.
Timeline Playhead
Timeline Zoom Buttons
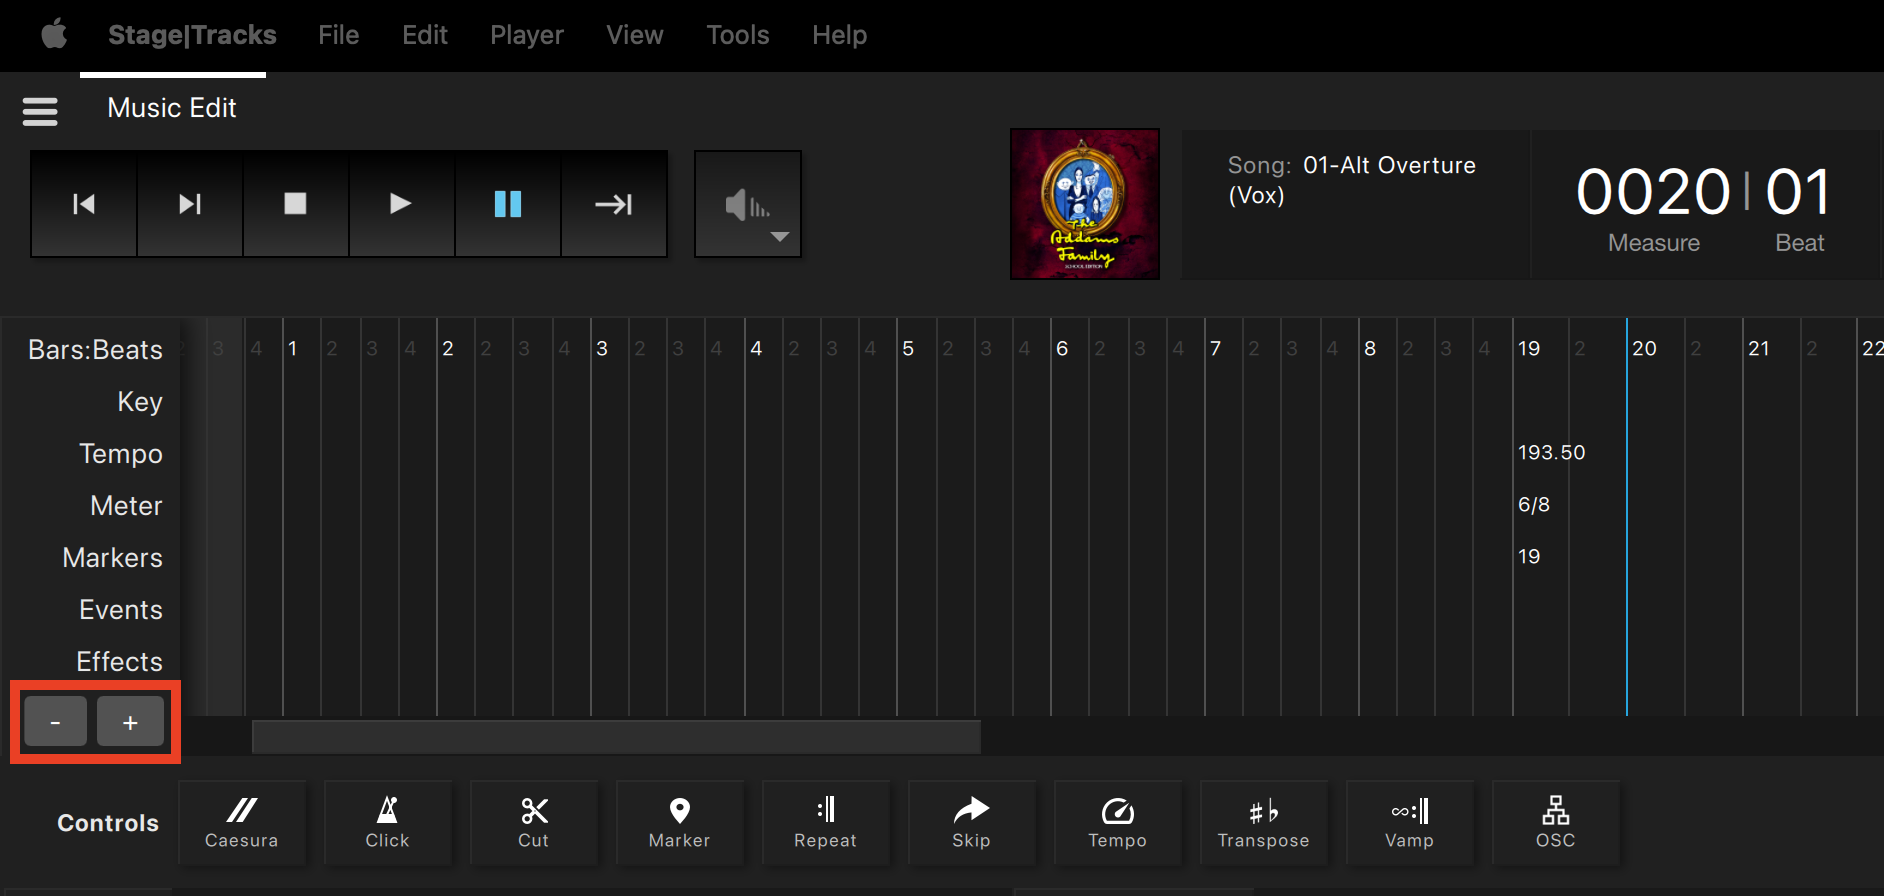
Here are the Timeline Zoom buttons and what they do:
- + allows you to zoom in
- In the timeline, click the + button.
- Press the Plus on your keyboard.
- – allows you to zoom out
- In the timeline, click the – button.
- Press the Minus on your keyboard.
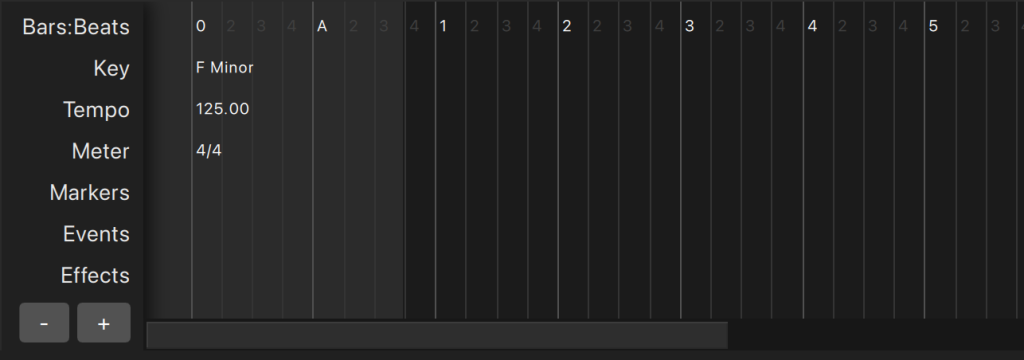
Within the timeline, you may notice a light gray area, typically at the beginning of songs. This is known as the silent zone, indicating a section where no audio plays. Silent zones may exist because of extra space at the beginning of a song, an a cappella section, or other similar reasons.
You will also notice a light gray gradient at the end of songs. This represents the reverb tail or natural audio decay at the end of the song, as the music fades out.
This section contains all the buttons an editor will need to customize their show. Adding or modifying events is restricted to anyone with the Editor Code. When editors make changes using the Event Controls, they can share the changes with their production staff and cast members.
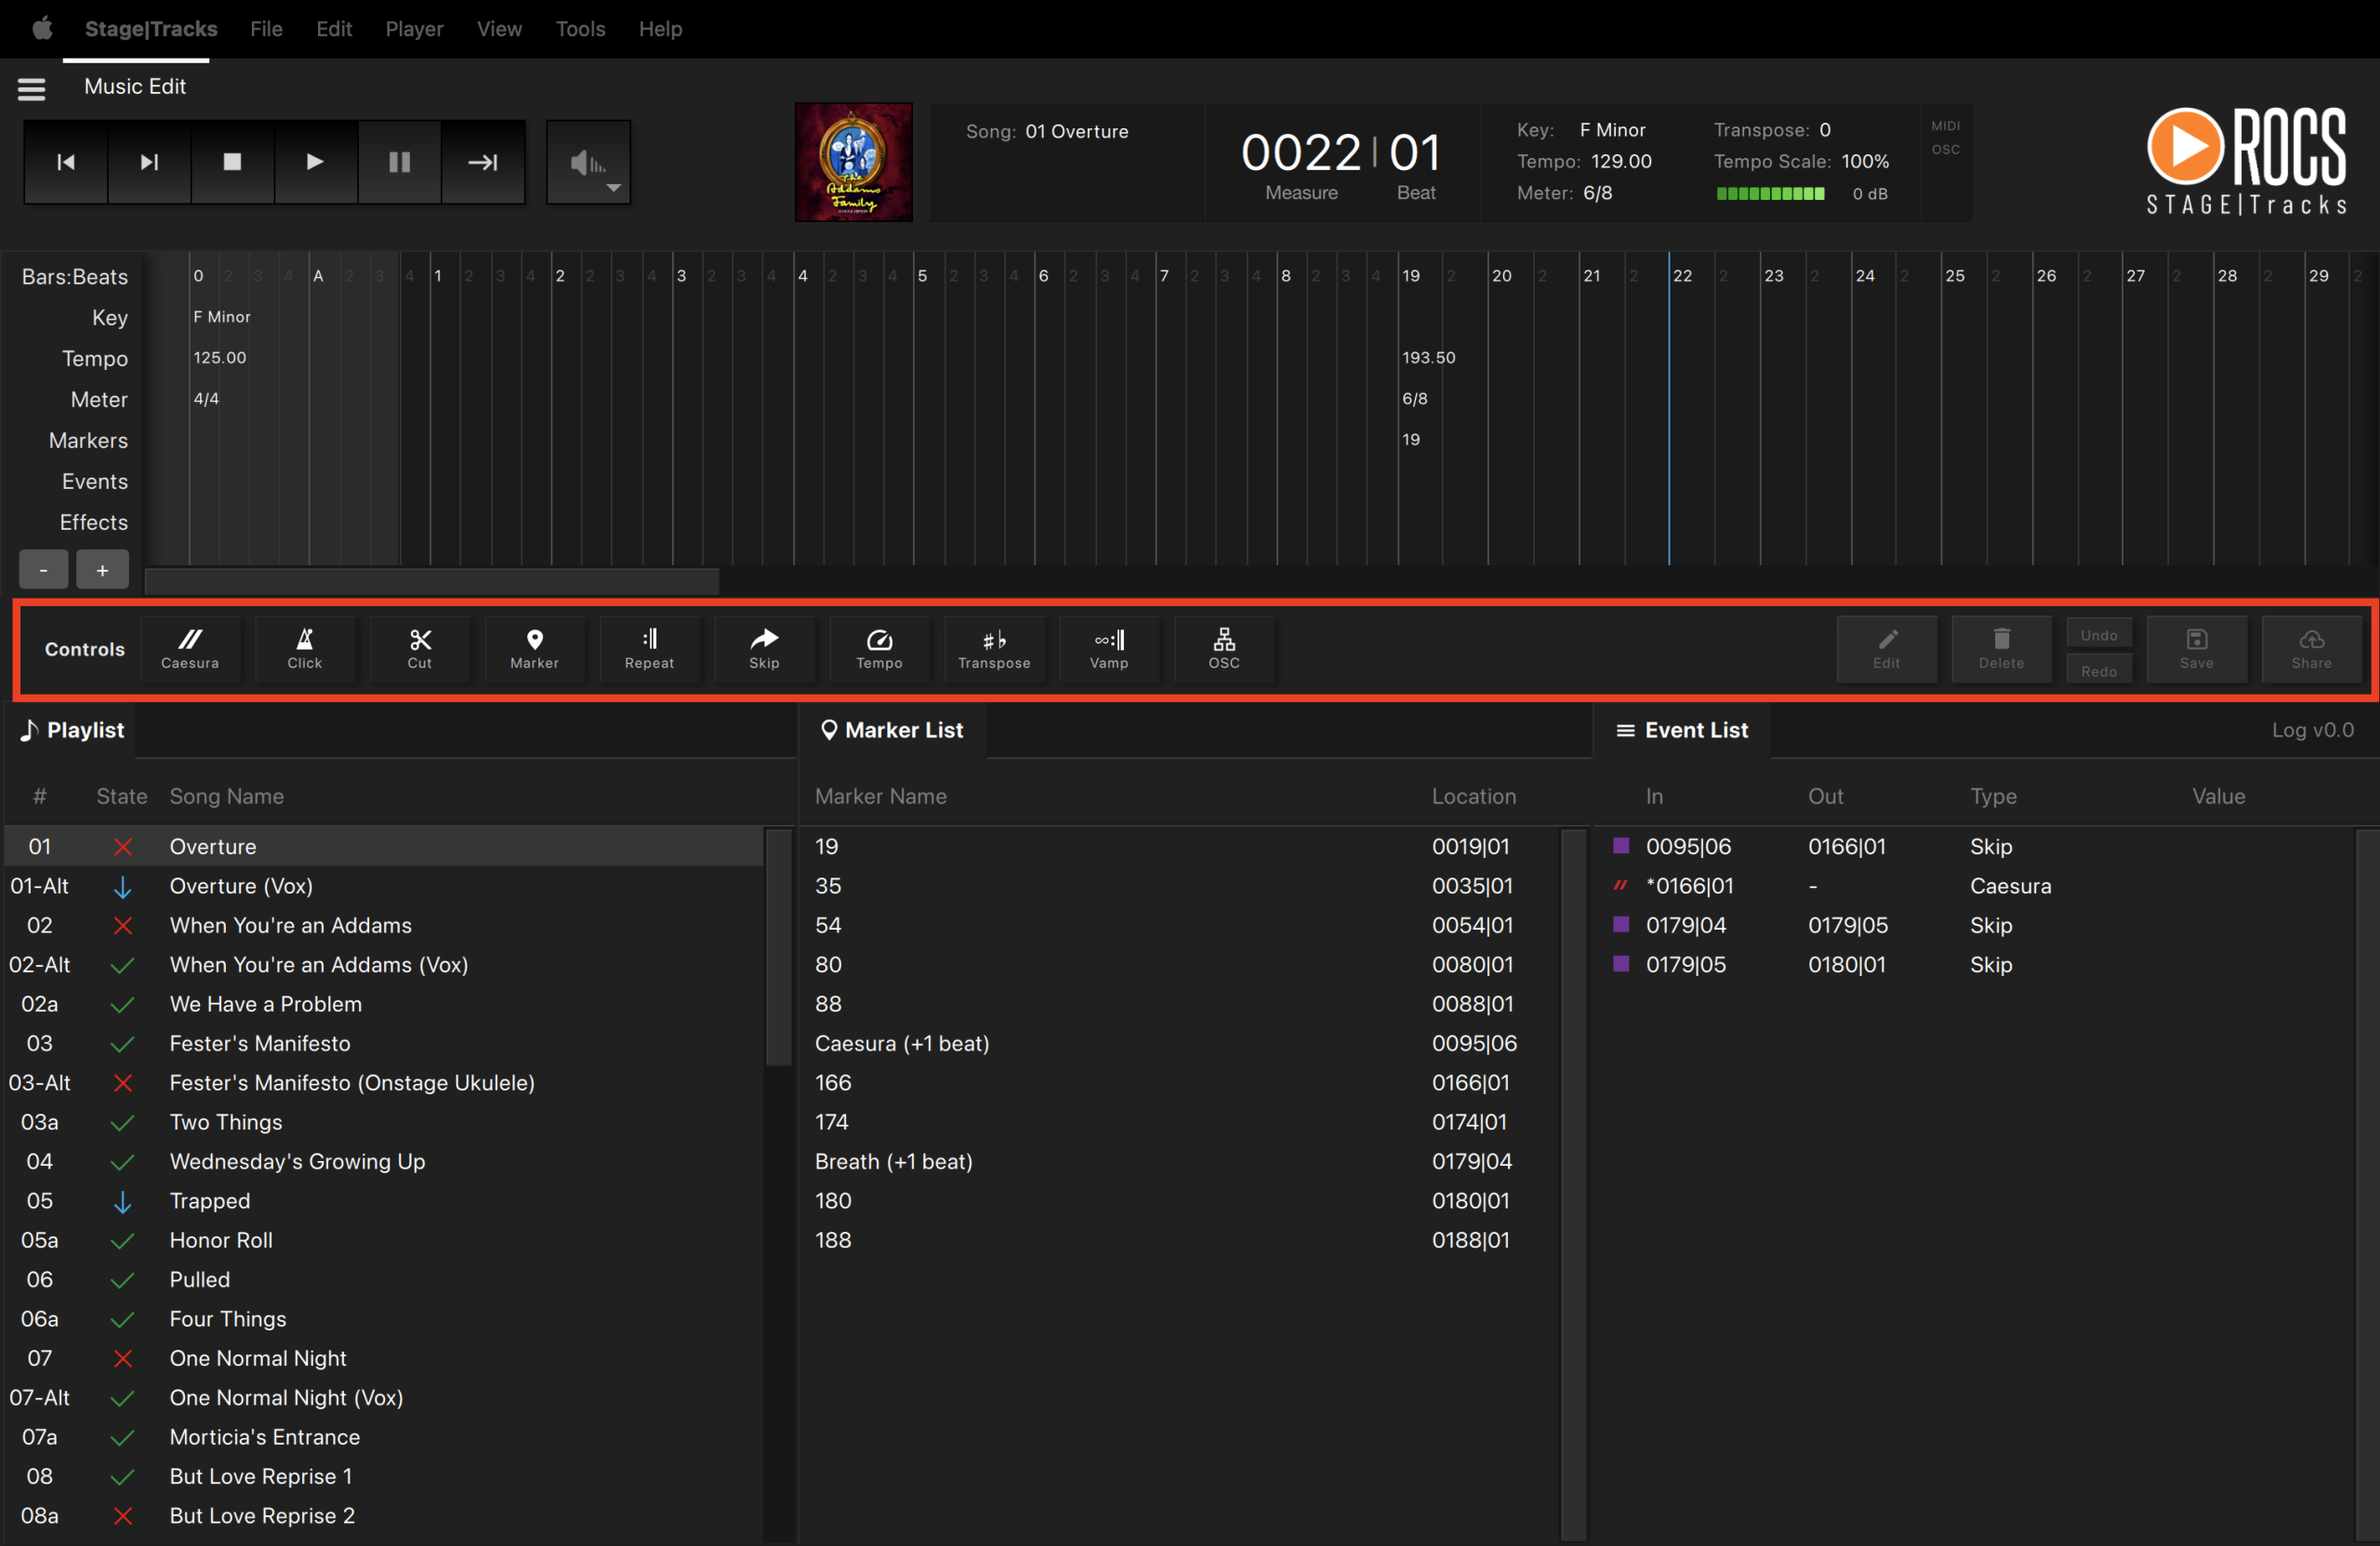
Event Controls


Here is a list of Event Controls and what they do:
- Caesura– Adds a pause at a specific point in the timeline. Continue playback using the Play or Advance button.
- Click – Changes the subdivision of the click track in a section of the timeline. While there is no audible click track present in Stage|Tracks, this change alters the resolution of where you can place events in the timeline, allowing for more precise editing. Also, any edits you make to “click” in Stage|Tracks will affect the click track in Show|Ready.
- Cut– Removes a section from a song during playback.
- Marker – Adds a comment in the timeline for reference. Pre-programmed markers match the score. You can add additional markers for your own comments.
- Repeat – Defines a section of the timeline to repeat a fixed number of times.
- Skip – Creates an area where you can skip to the end of a section in the timeline using the Advance button.
- Tempo– Scales the speed of a section in the timeline.
- Transpose – Changes the key of a section in the timeline.
- Vamp – Defines a section of the timeline to repeat indefinitely, until you trigger to exit the vamp using the Advance button.
- OSC – Uses Open Sound Control commands to send show control messages to software or devices. It allows you to adjust the volume within Stage|Tracks and connect Stage|Tracks with QLab.
- Edit – Modifies any existing event.
- Delete – Deletes any existing event.
- Undo – Removes the most recent event(s) changes.
- Redo – Reverts the most recent event(s) changes.
- Save – Saves the changes to your local device without sending the changes to your cast members or production staff.
- These changes are NOT sent to the cloud (ROCS server) and will NOT upload to another Stage|Tracks or Show|Ready system. Saving changes without sending means that there is no backup if your device crashes. If this happens, any edits you have made to your show will be lost.
- Share – Uploads the changes to the cloud (ROCS server) and sends them to all other Stage|Tracks and Show|Ready systems which share your license codes. Sending changes saves a backup to the cloud (ROCS server), providing peace of mind in case your device crashes.
For more information on how to use these event controls, check out:
This section displays the name and number of each song. It includes information about the playback state. By default, all song names in Stage|Tracks match exactly as listed in the score, except for some descriptions and/or possible punctuation differences due to the limitation of characters in file names.
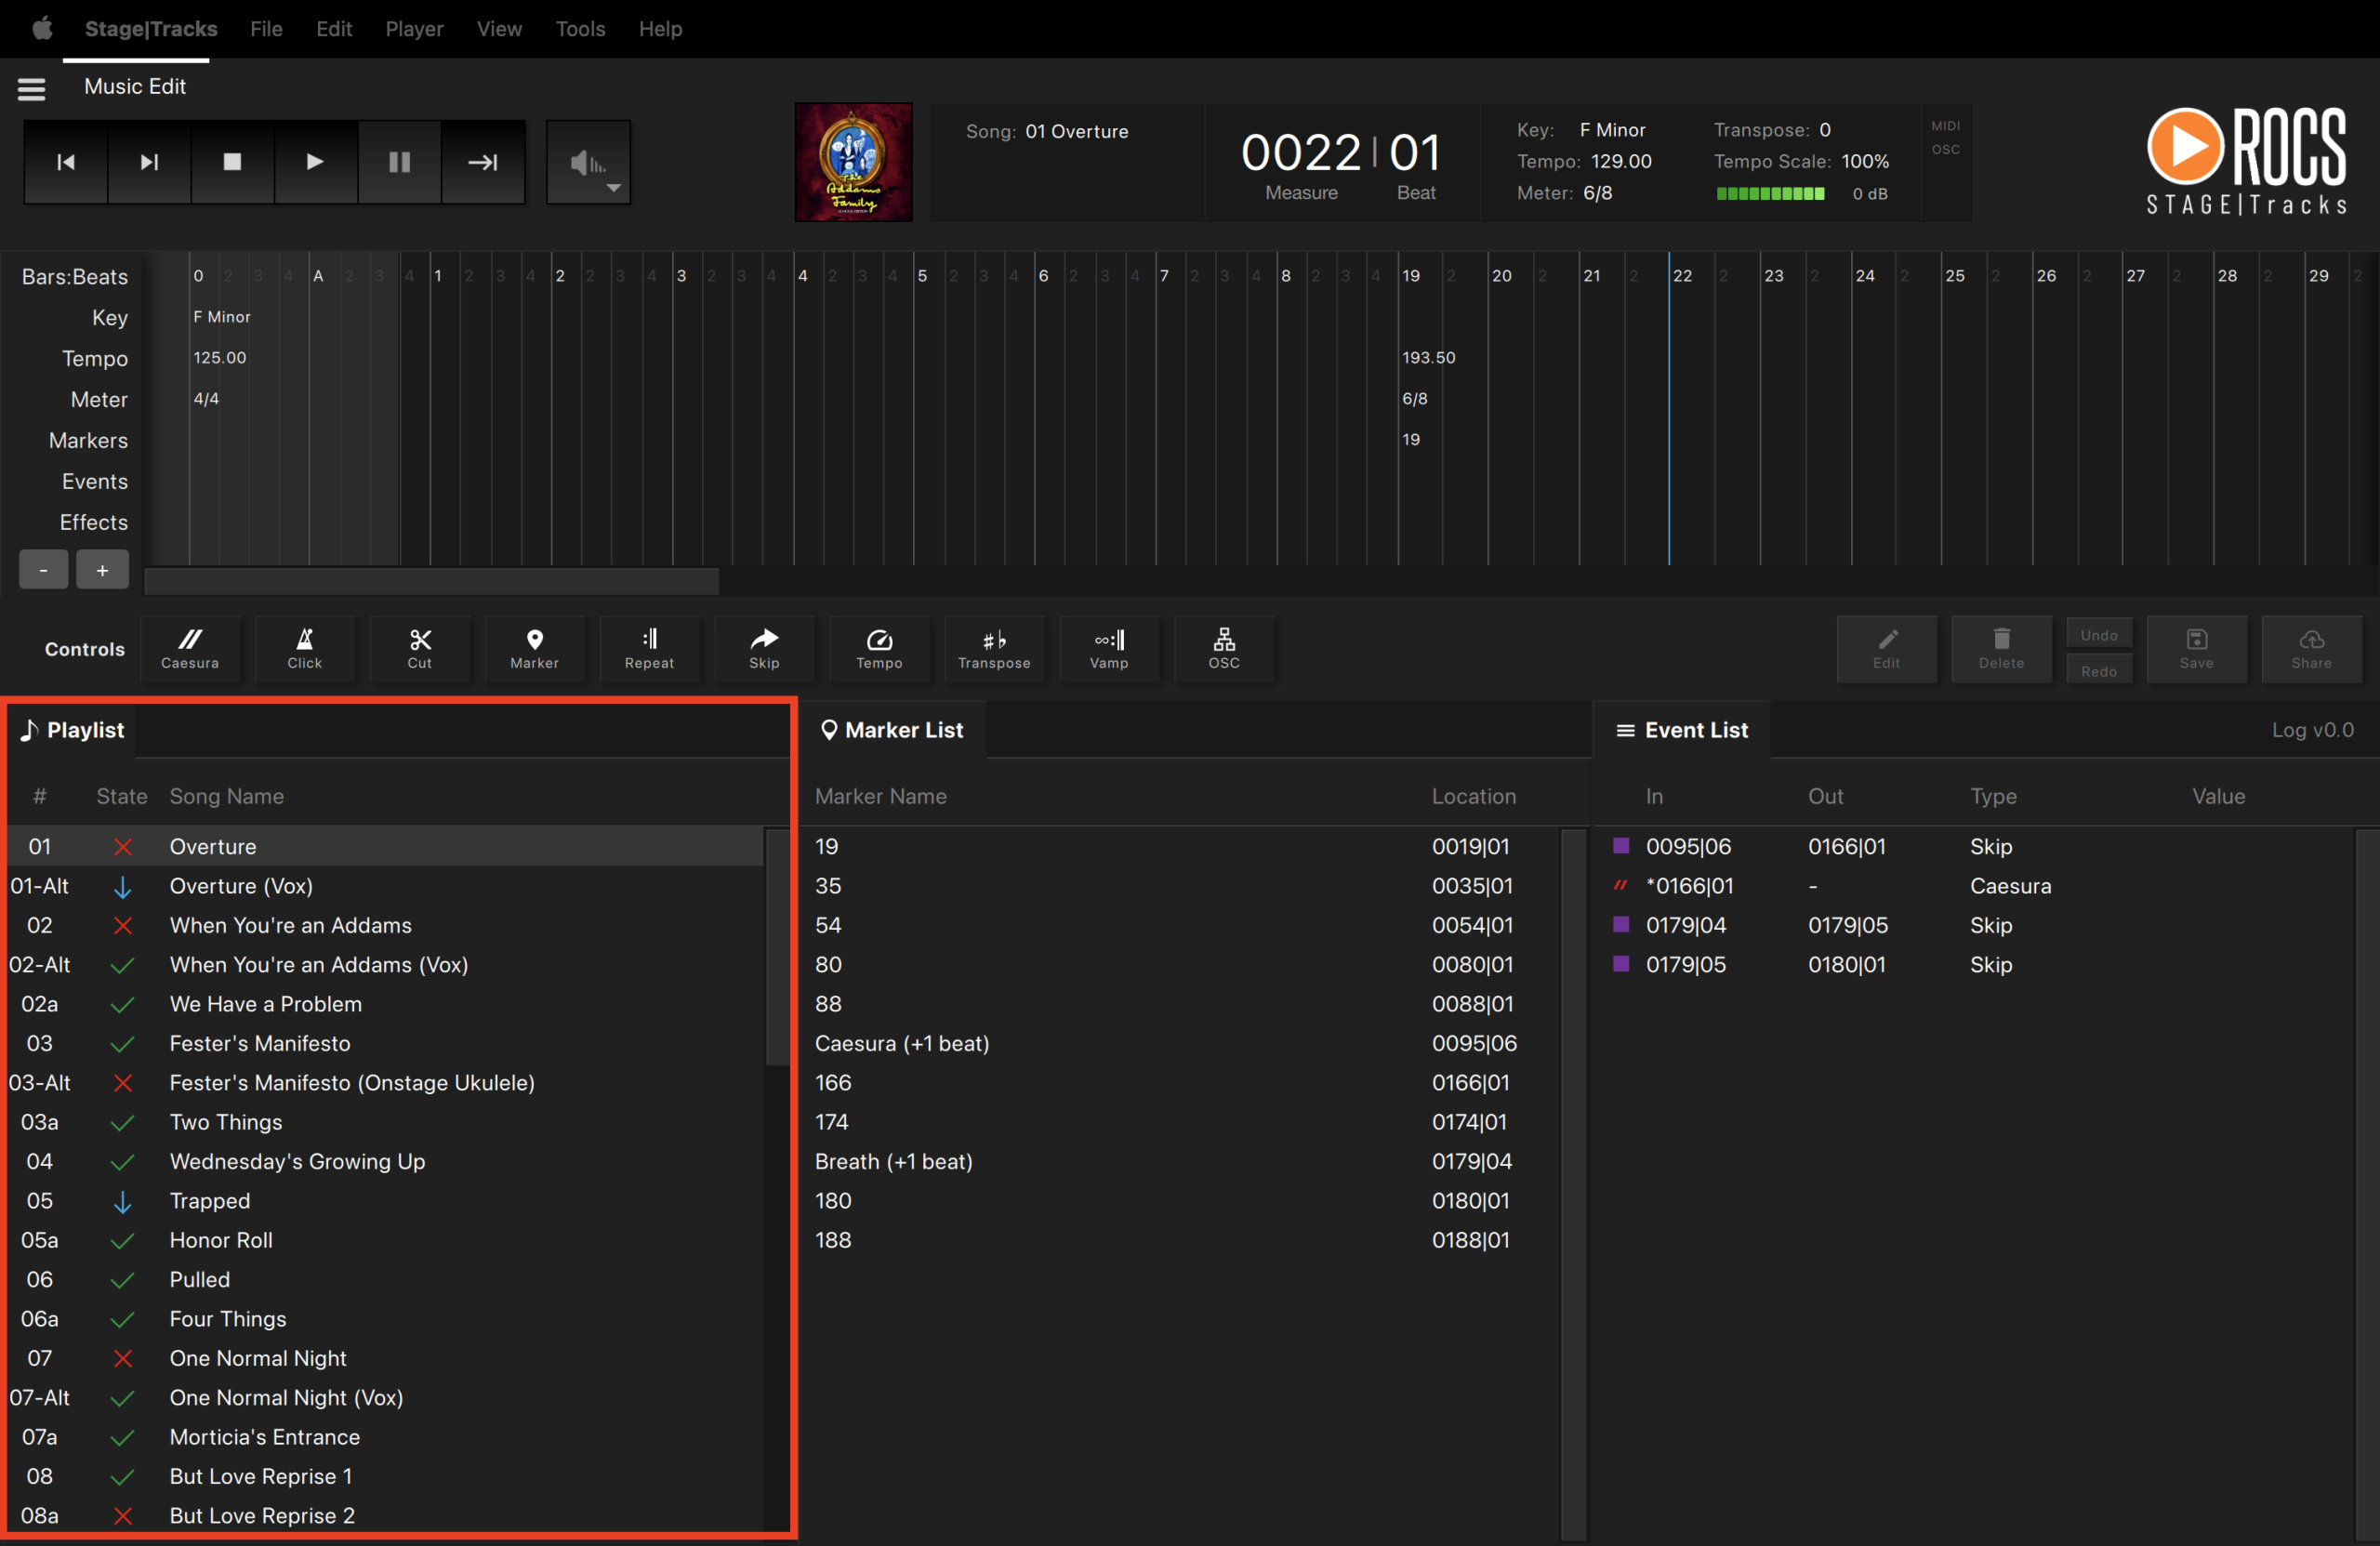
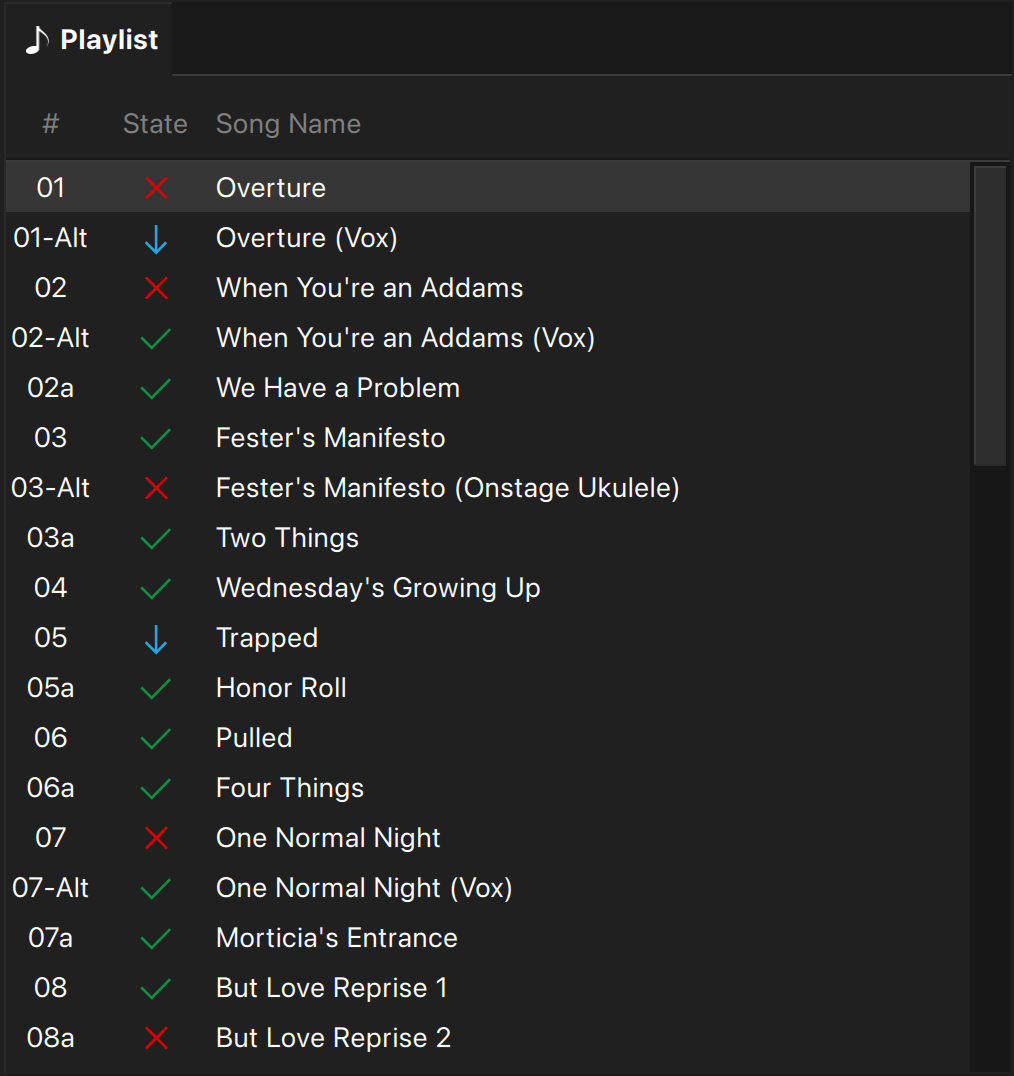
The Selected Song indicates it is loaded for playback, represented as a highlighted gray band. Between the song number and song name are symbols that show the Playback State. These symbols determine the behavior of which song loads next or if playback continues automatically. To utilize this function, click on the symbol in the Song List to change the playback state.
Playback State
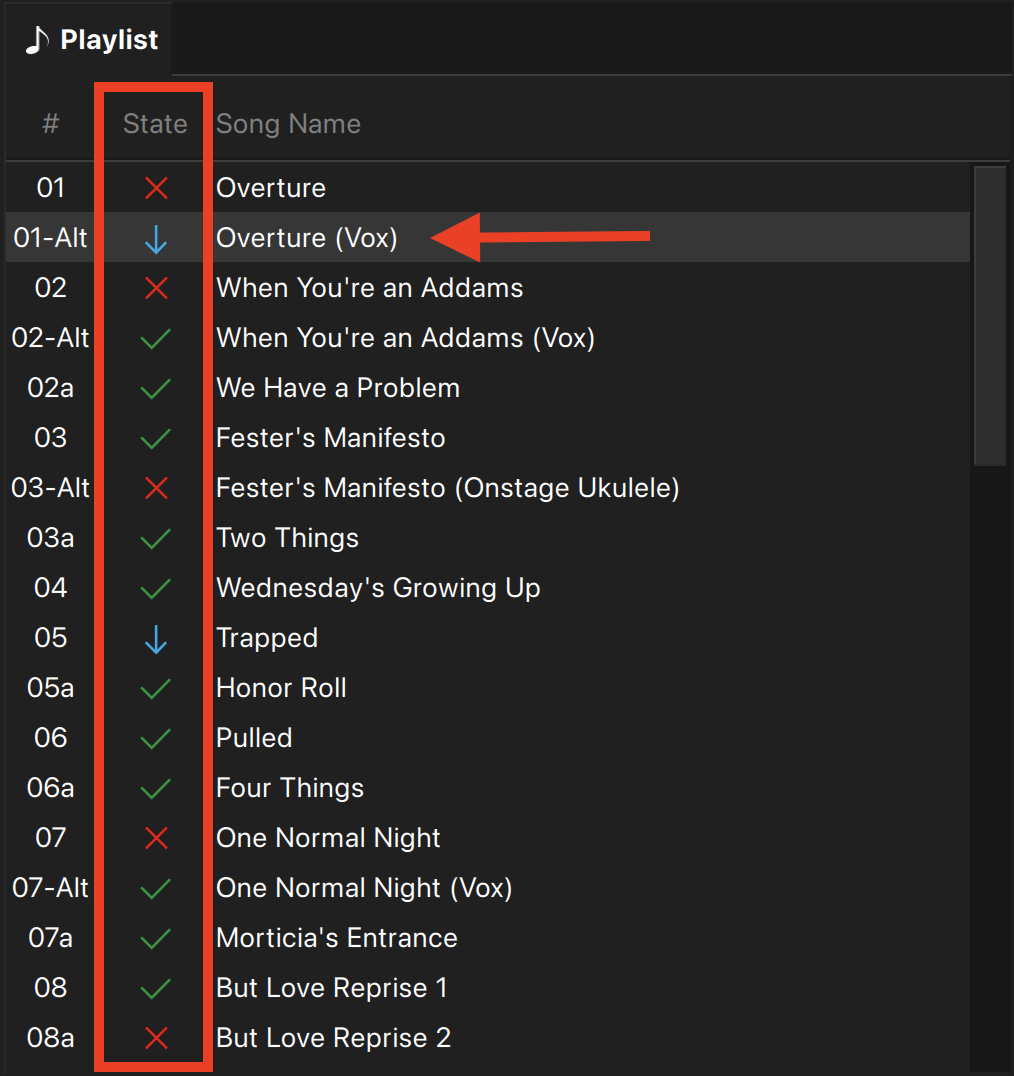
Here is a list of the Playback State Symbols and what they do:
- – Automatically plays the next song (segue/attacca) at the end of the current song.
- – The song is skipped.
- – Queues the next song, and you need to trigger the song to play.
If you have a show that includes alternate songs, you will change the playback state accordingly so that it plays the desired song. All alternate songs are labeled with “Alt” in the playlist.
This section displays comments for the selected song. Each marker includes its name and bar | beat location. By default, all markers in Stage|Tracks match exactly as listed in the score.


The marker list allows you to jump to that location in the song. To utilize this function, double-click on a specific marker within the list. Doing so will automatically move the Timeline Playhead (vertical cyan bar) to that location on the Timeline.
Jumping to a Marker
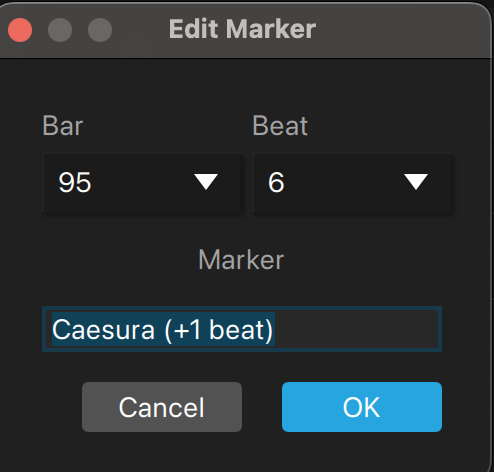
To edit a marker, you will do the following:
- In the Marker List, double-click the marker OR click the Edit button from the Event Controls.
- In the pop-up window, type any changes in the text field.
- Click Ok to save.
Editing a Marker
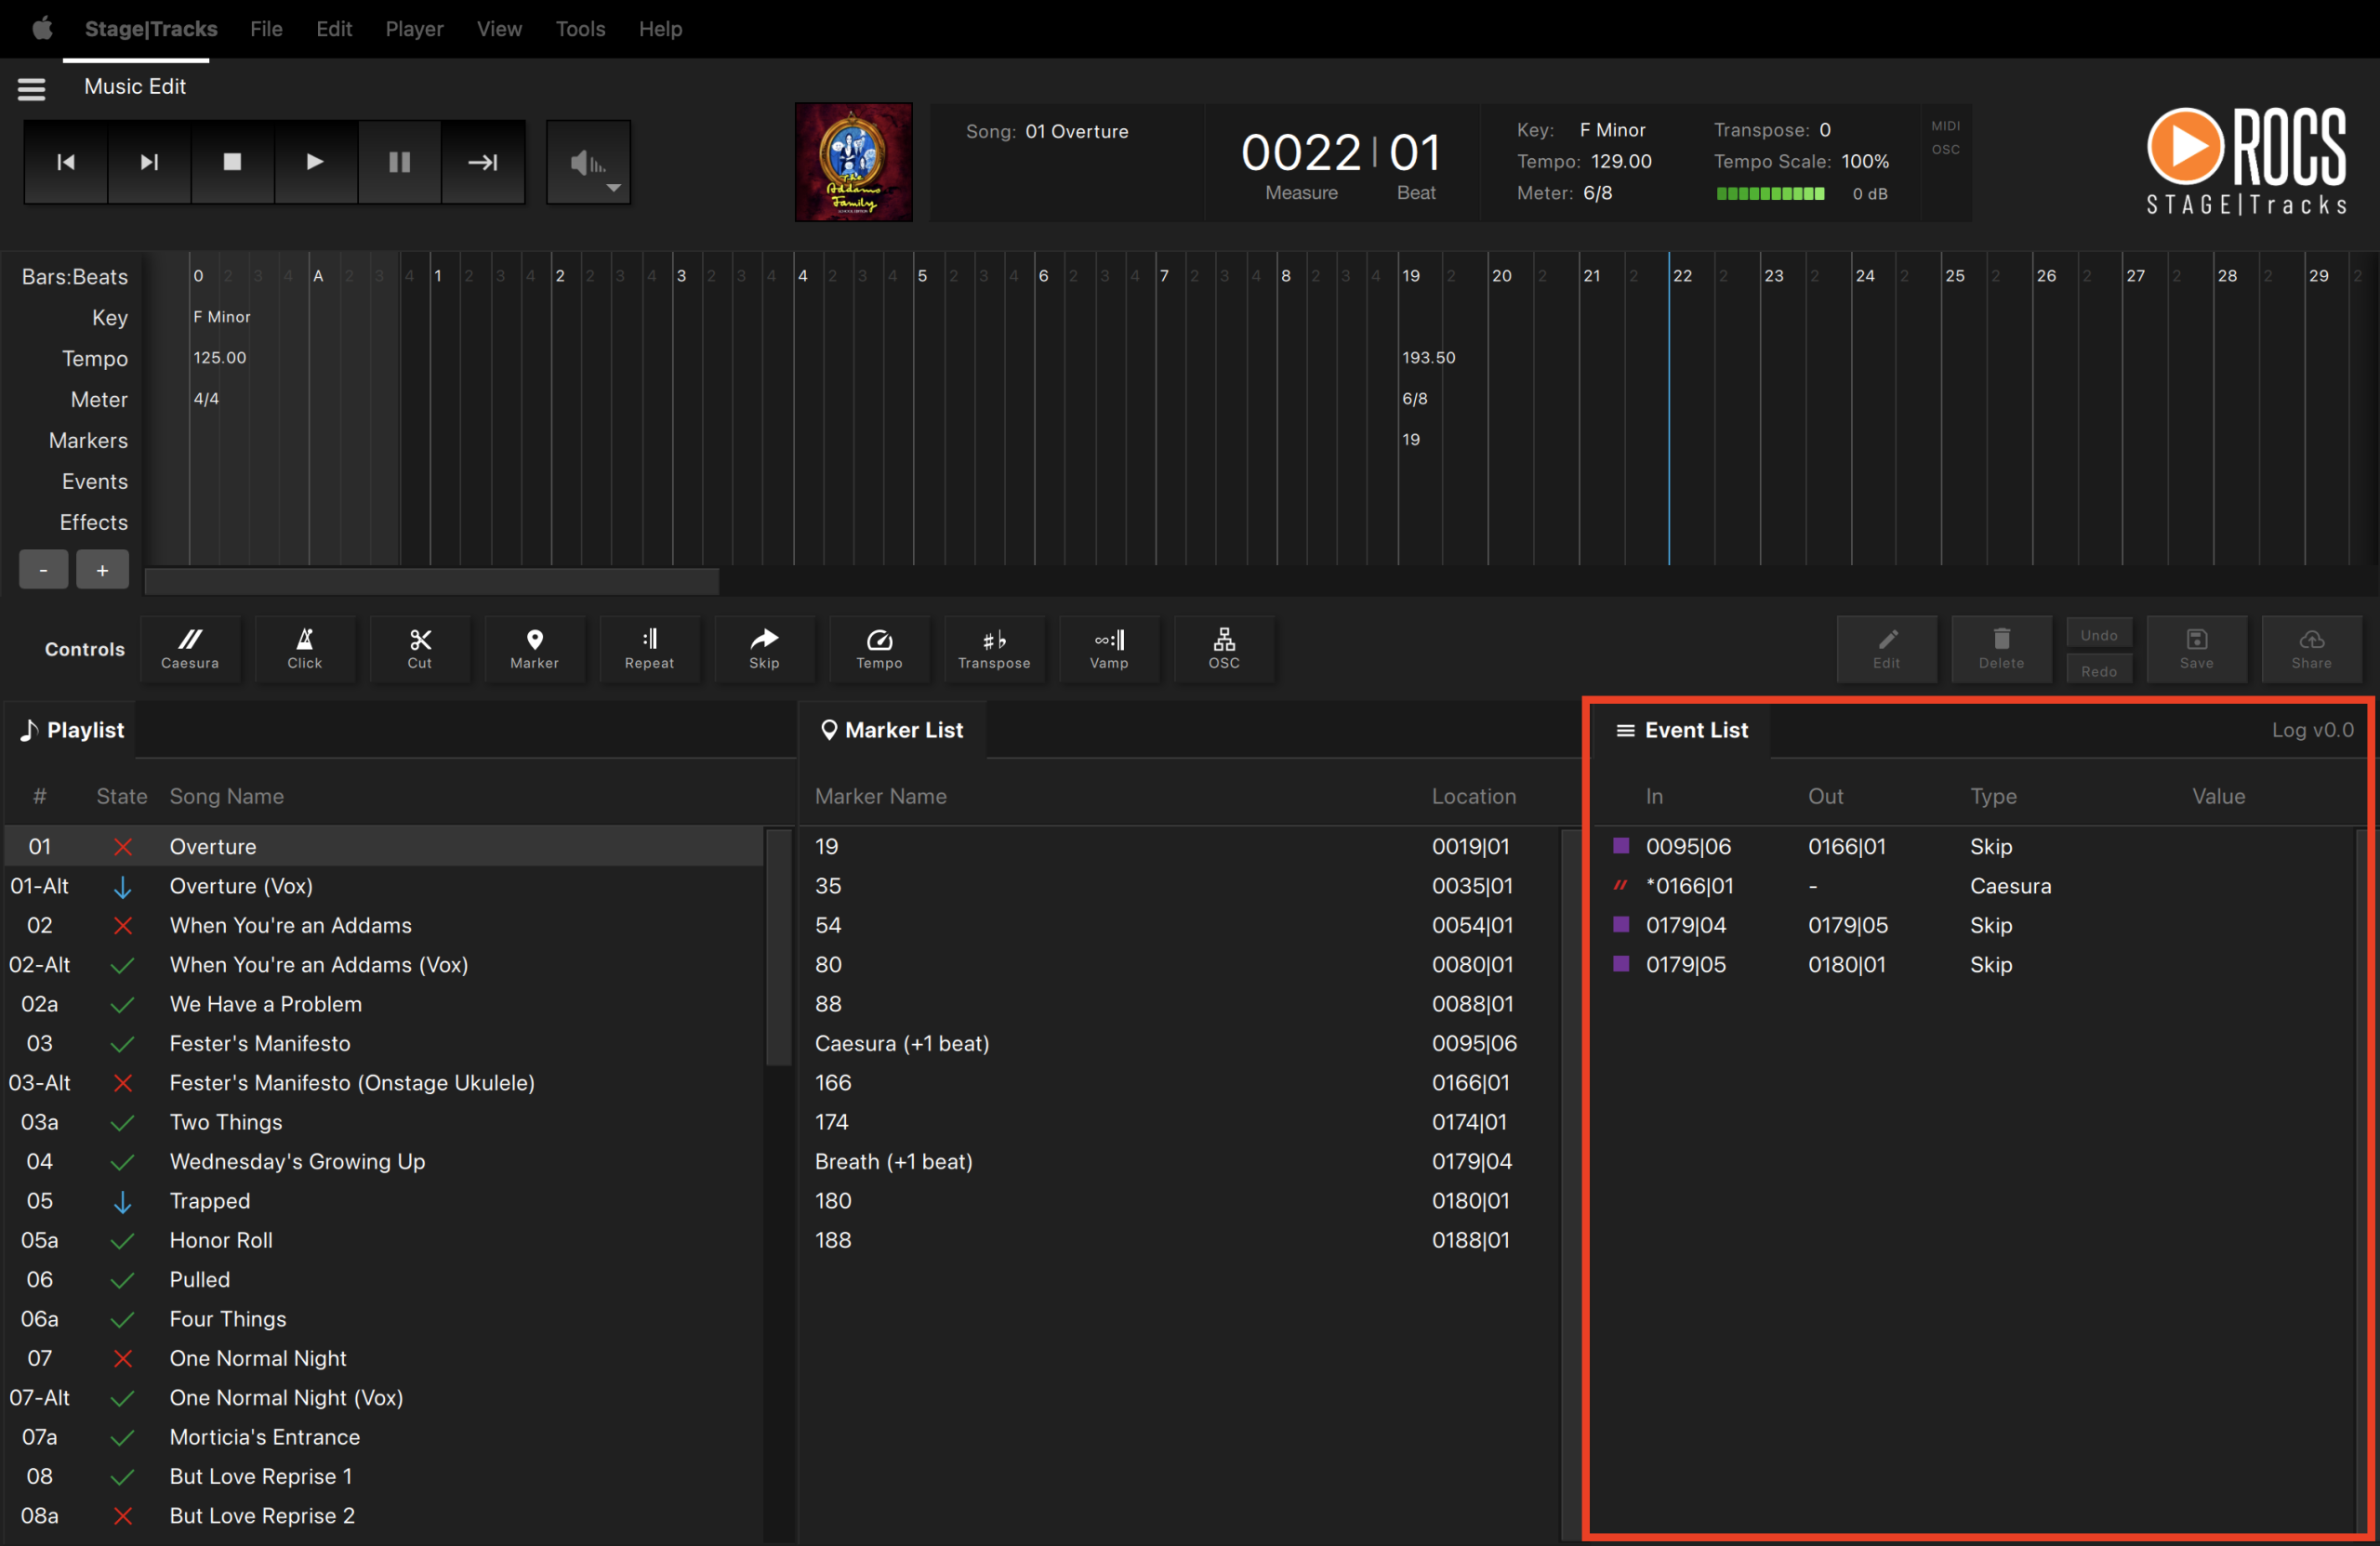
This section displays a list of each event within the selected song. Each item has several pieces of data, including the in bar, out bar, event type, value (if applicable), and event color in the timeline. By default, all pre-programmed events in Stage|Tracks match exactly as written in the score.
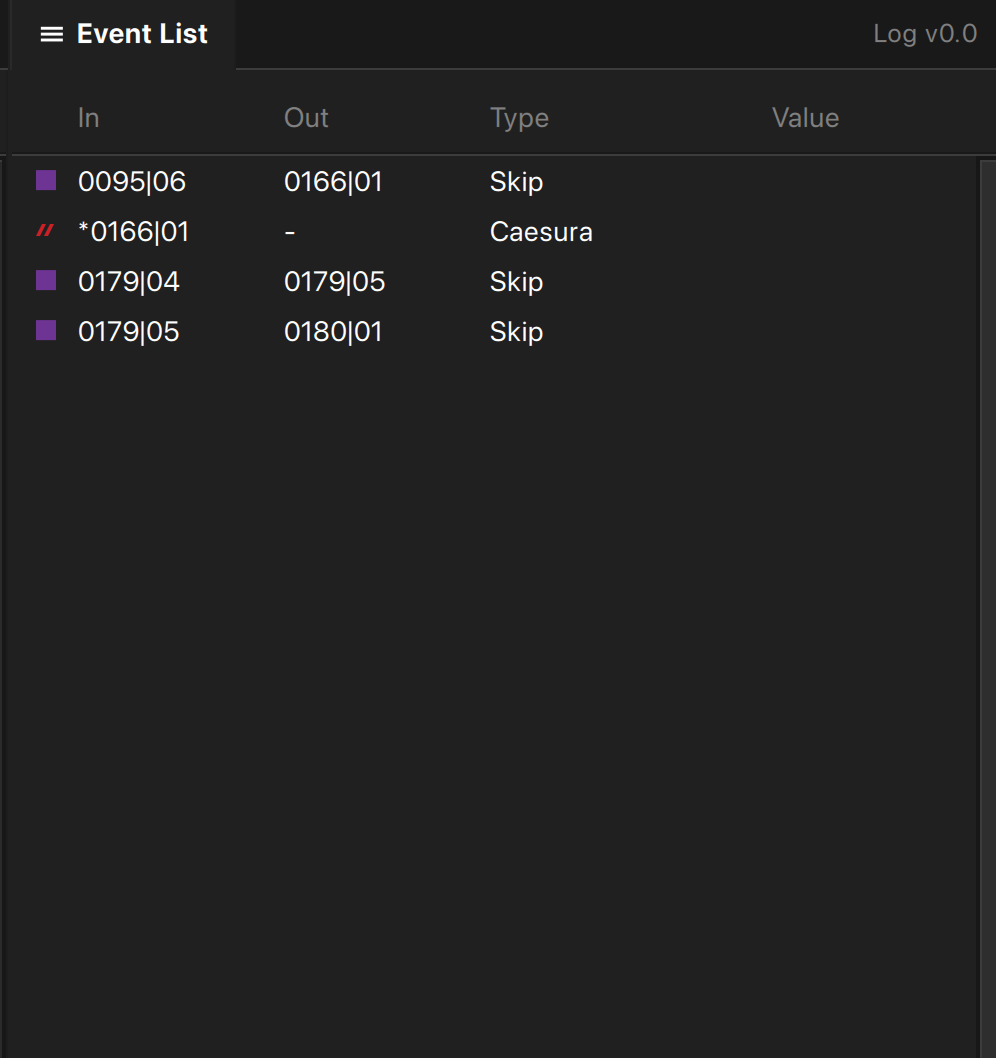
The event list also contains the log number. Every time changes are saved or shared, a new log number is automatically generated, starting with Version 0.0 and incrementing sequentially.
Save Button and Updated Log
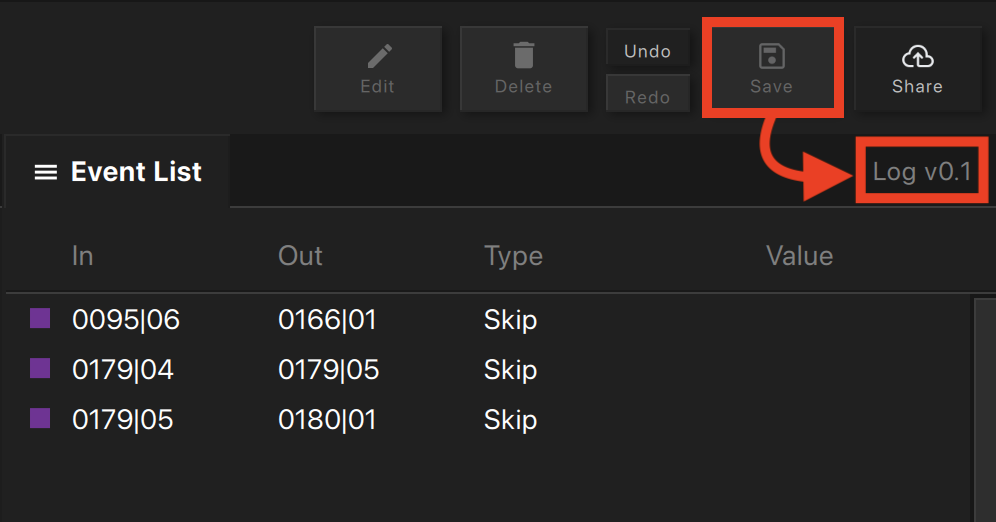
When you click the Save button, you will receive this notification that your changes are only saved to the local device. They will not be distributed to your cast members. Your log will increase by one decimal number.
Share Button and Updated Log
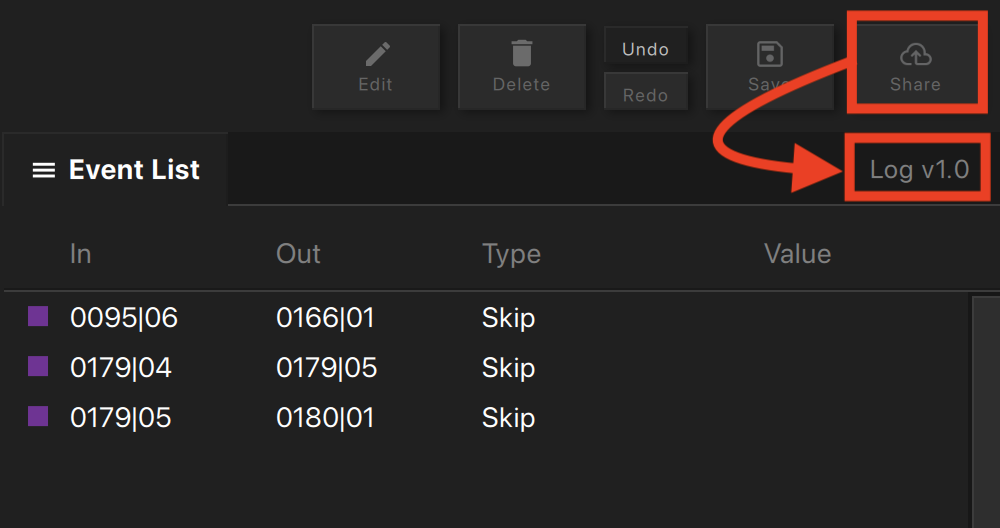
When you click the Share button, you will receive this notification that your changes have been distributed to your cast members. Your log will increase by one whole number.
NOTE: If multiple people are working on edits in different instances of Stage|Tracks, it can create a conflict or overwrite changes. Therefore, we recommend that only one person make edits at a time and click the “share” button to upload their changes.
3. Editing Overview in Stage|Tracks
Sometimes, when activating your Stage|Tracks license, you might have only used the viewer code to download your show. Using the viewer code means you have play access, but can’t edit your show. This means that the Event Controls are locked (grayed out), so you can’t customize your show.
Grayed Out Event Controls

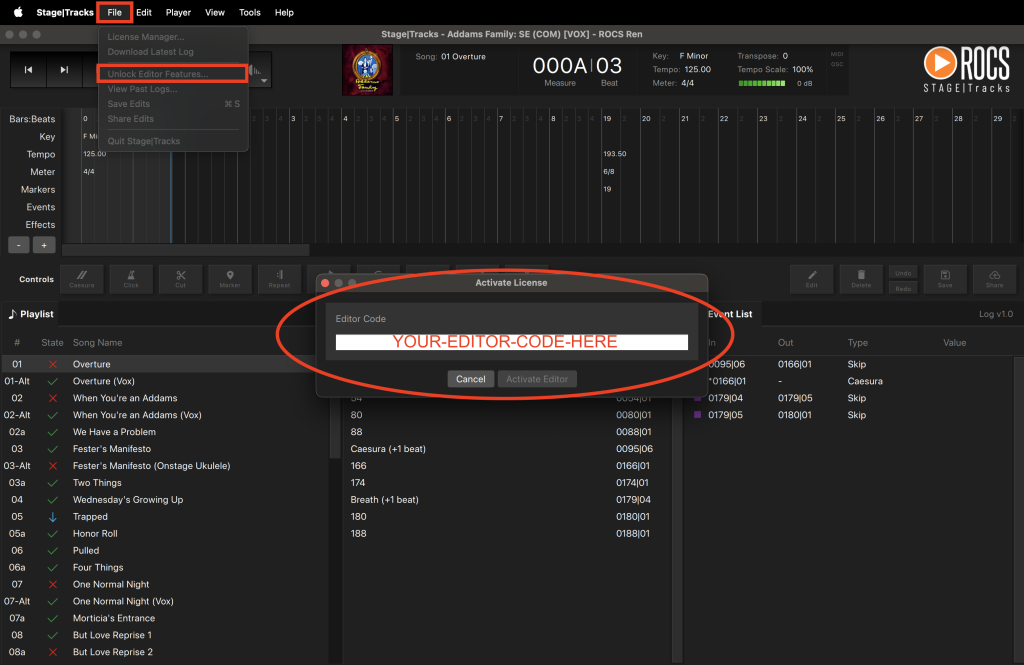
To unlock the editor features, do the following:
- Go to File on the top menu toolbar.
- Click on Unlock Editor Features in the drop-down menu.
- In the pop-up window, click Add License.
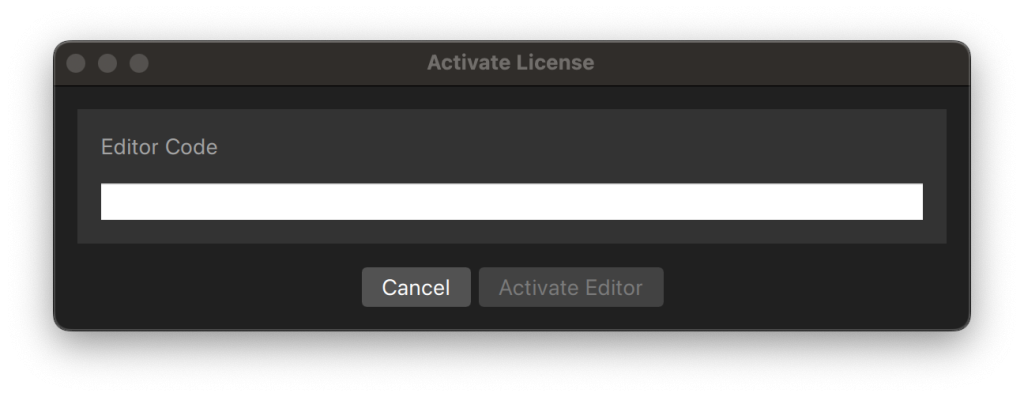
- In the Editor Code field, paste the editor code (previously known as the Admin Authorization Code).
- Click the Activate Admin button, and you will now have editor access.
Using the License Manager to Add Another Show
Sometimes, two different productions might be happening at the same time, so you need to switch between shows in Stage|Tracks.
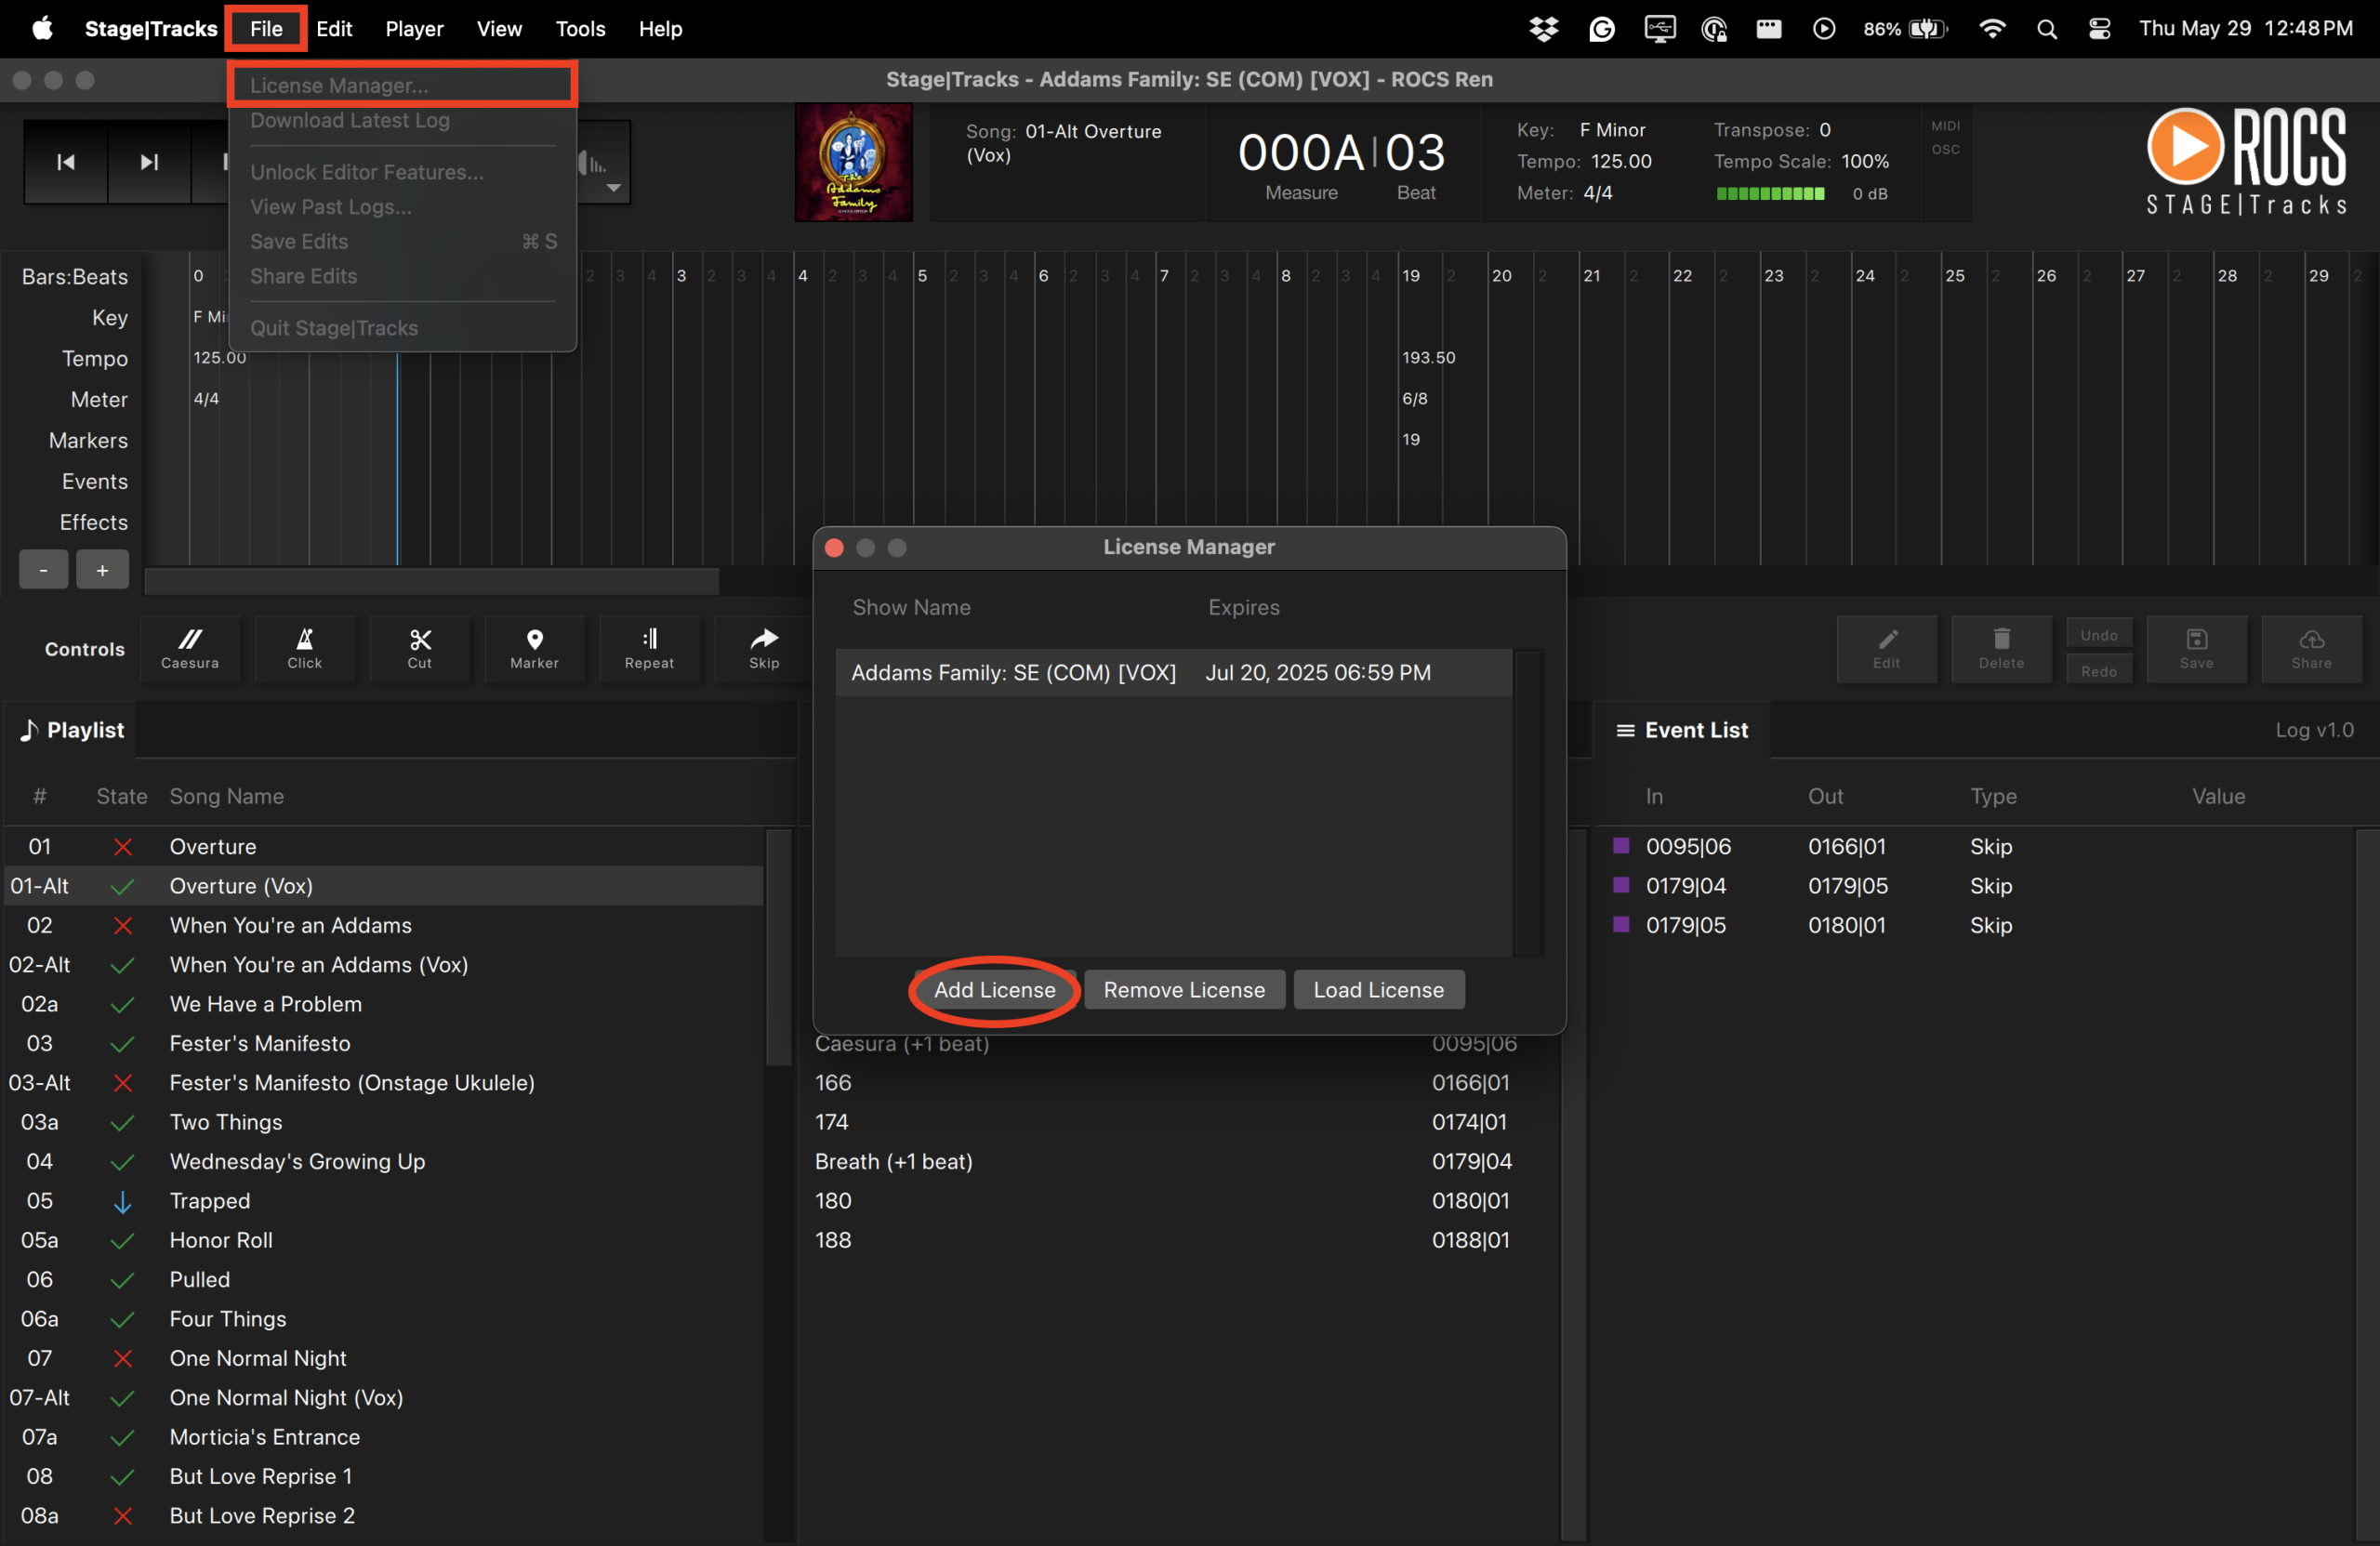
To add another show to Stage|Tracks, you will do the following:
- Go to File on the top menu toolbar.
- Click on License Manager in the drop-down menu.
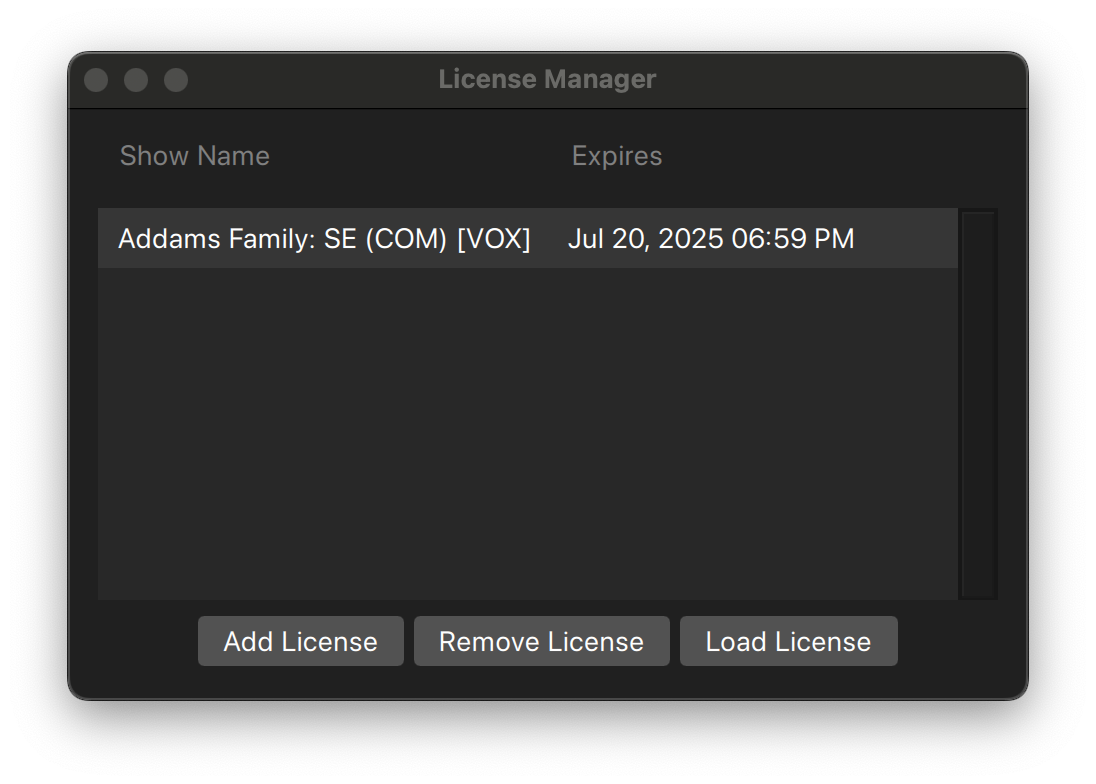
- In the pop-up window, click Add License.
Once the show code is loaded, you can always return to the License Manager to select and load a previous show.
When playing audio from Stage|Tracks, the sound defaults to the system audio (the audio selected in the OS settings). However, Stage|Tracks also allows you to change the audio output.
To change the audio output, do the following:
- Click Tools in the top menu bar.
- Click on Audio Manager in the drop-down window.
- The Audio Manager will appear as a pop-up window. Select your desired audio output in the drop-down menu.
- Click OK to close.
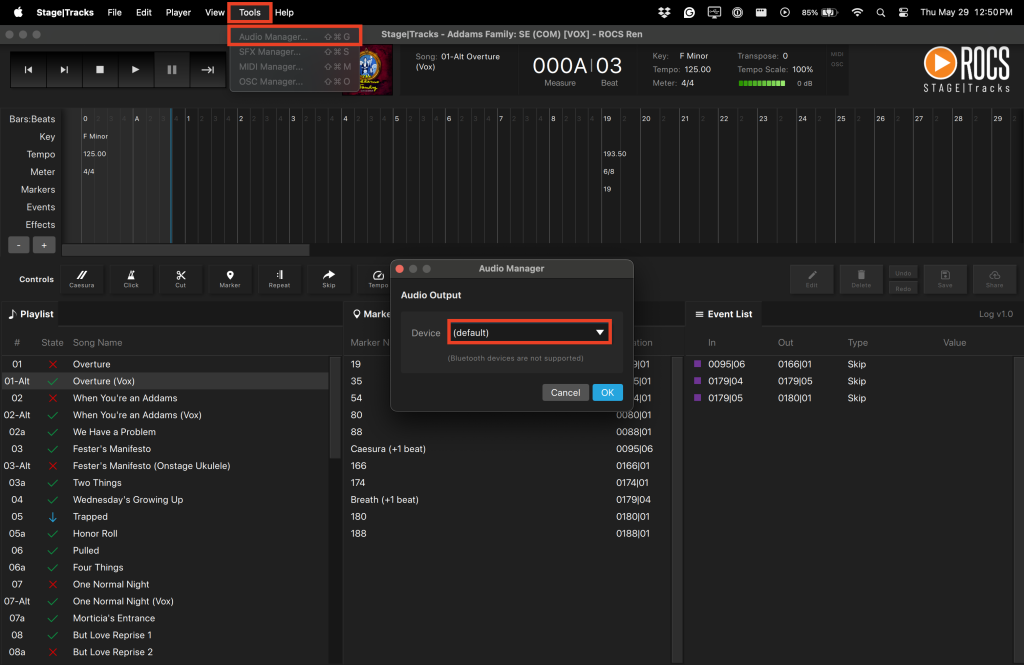
NOTE: Stage|Tracks doesn’t support Bluetooth speakers. Adding or removing the audio device while the application is running may cause stability issues, which can result in the application crashing.
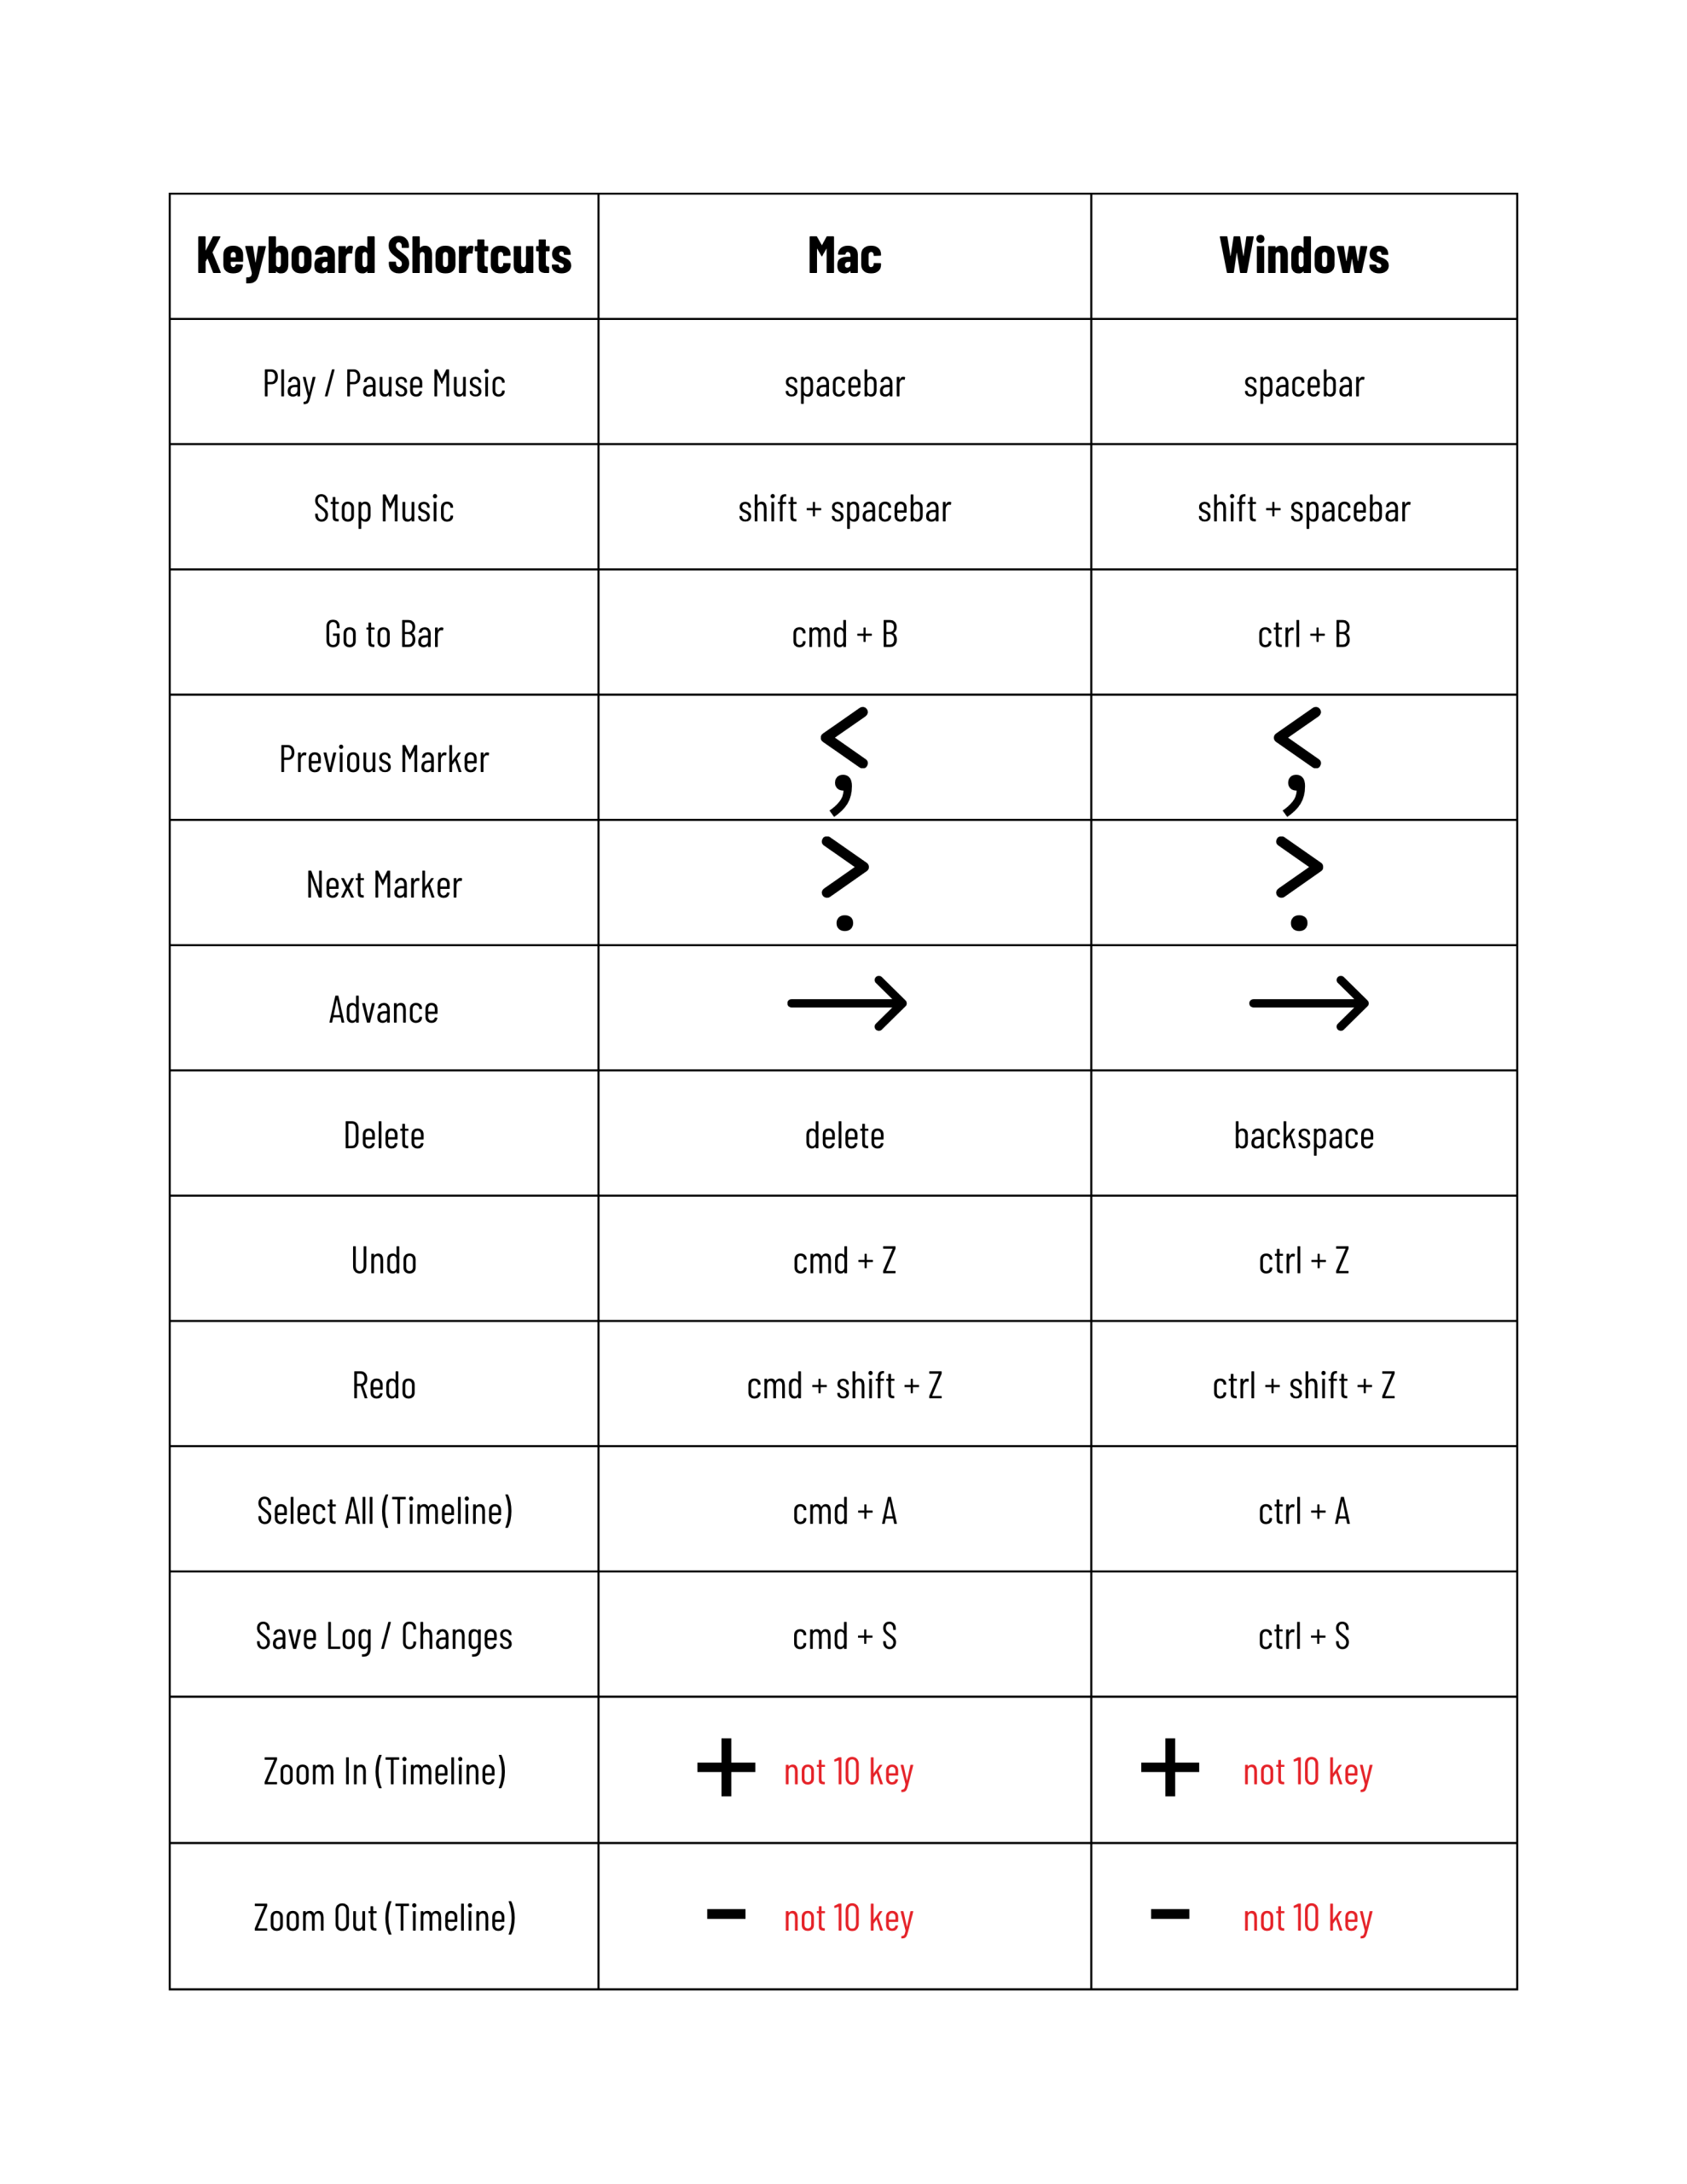
Here is a list of keyboard shortcuts to help you quickly navigate or add edits.
For easy reference, we have provided examples of the Mac and Windows keyboards, listing all the keys mentioned above.
Mac Keyboard
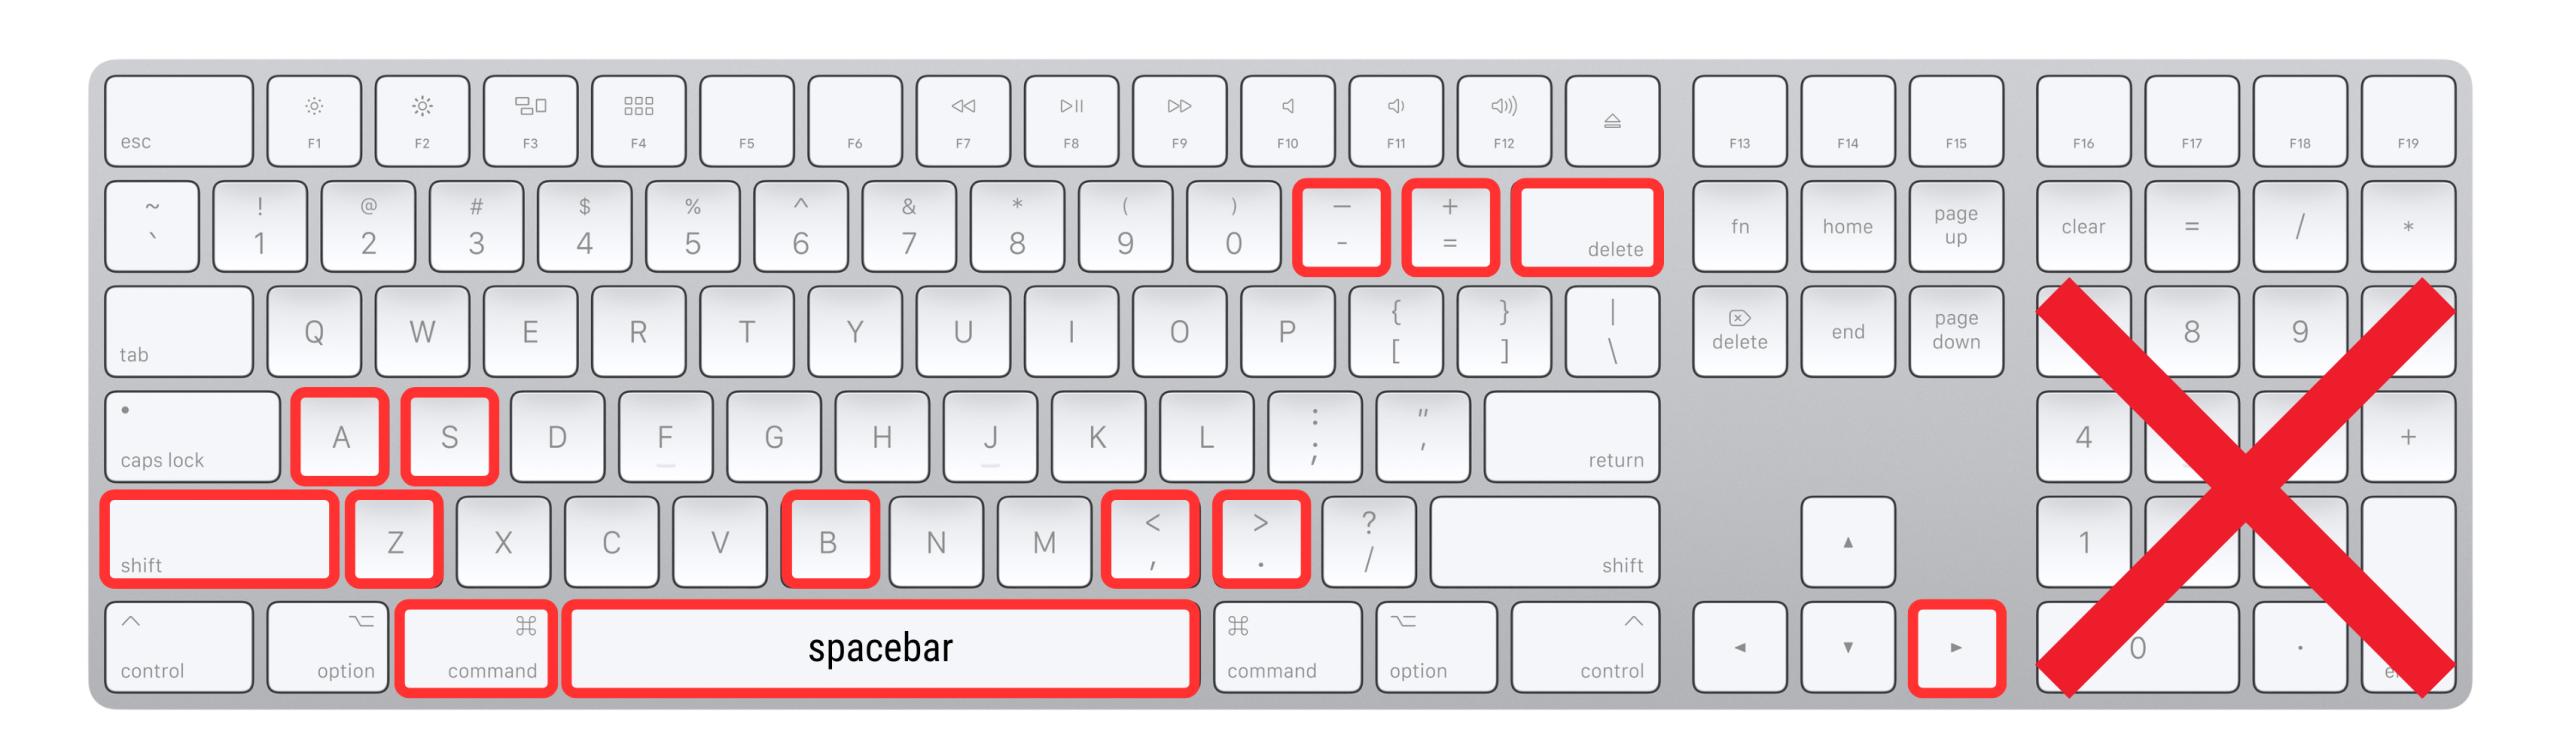
Windows Keyboard

NOTE: Your keyboard may differ from what is pictured above.
In the Song Info section, the Go to Bar feature lets you instantly jump to a specific bar within the selected song, rather than scrolling through the Timeline. When you use this the Timeline Playhead (vertical cyan bar) will automatically move to that specific bar in the Timeline.
Go to Bar
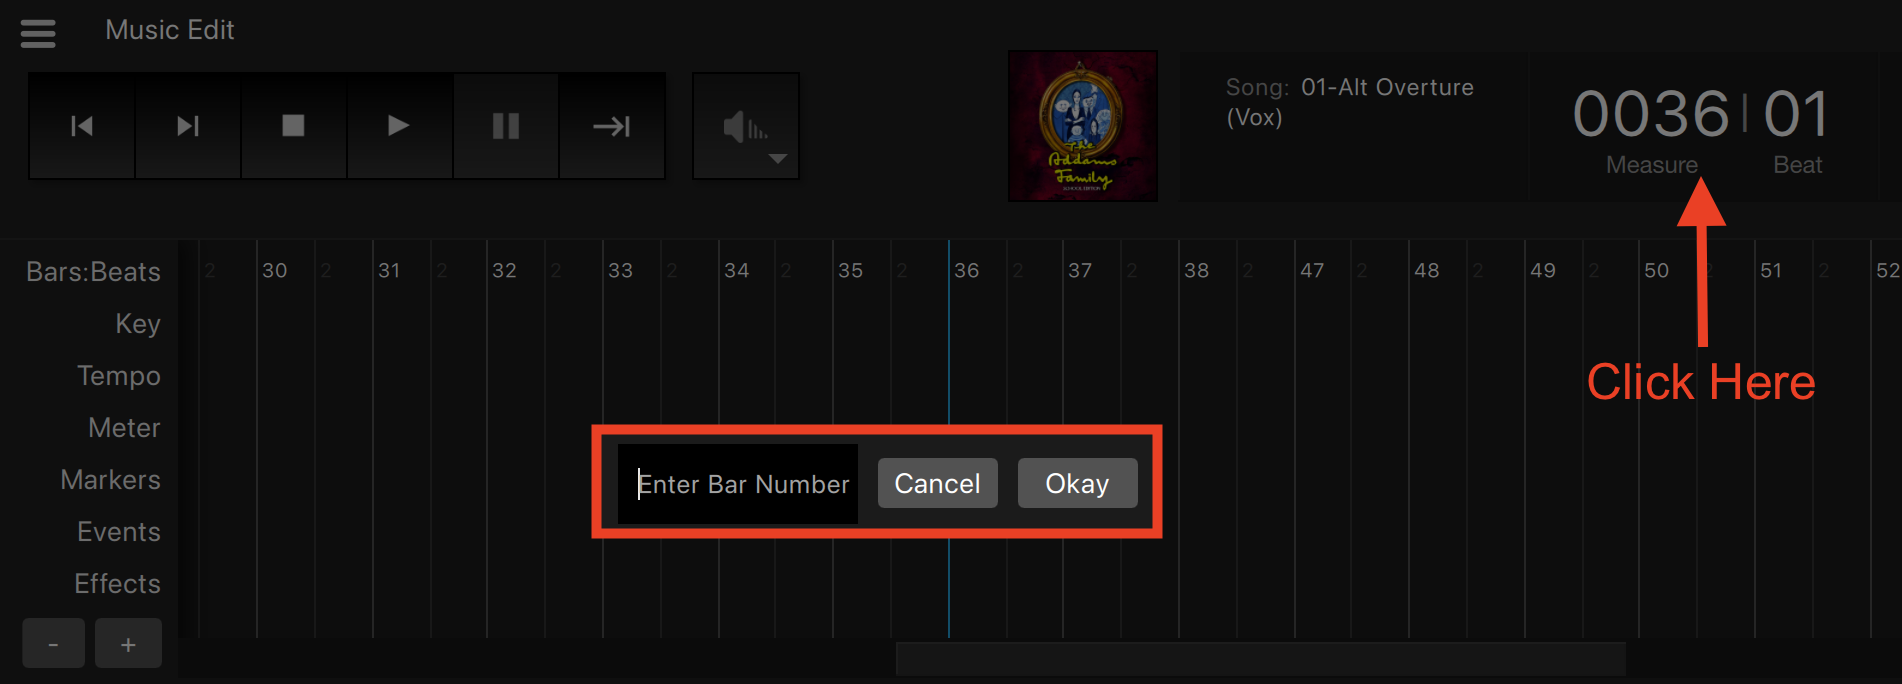
To use the Go to Bar function, you will do the following:
- In the Song Info section, click the Measure | Beat numbers.
- Mac: Command + B
- Windows: Ctrl + B
- A pop-up window will appear. Type the measure in the Enter a Bar Number text box.
- Click Go OR press Enter on the keyboard.
The Event Controls enable editors to add events to customize their show, allowing them to share it with their production staff and cast members immediately (as opposed to Temporary Modifications in Show|Ready, which are not saved or shared). By default, all pre-programmed events in Stage|Tracks match exactly as listed in the score.
Here is the list of Event Controls. To learn specifics of each event, click on the links below:
To add a new event, you can do so in the following ways:
- Click on the desired location or highlight a section of the Timeline.
- Click one of the Event Controls (see list above)
- Select from the various event options.
- Press Ok.
When you click on the Event Controls, a pop-up window appears. While each button will have its specific settings, you may see some of the following options:
- In Bar – The measure of where you want the event to start.
- In Beat – The beat of where you want the event to start.
- Out Bar – (If applicable) The measure of where you want the event to end.
- Out Beat – (If applicable) The beat of where you want the event to end.
- Select All – (If applicable) Select the entire song.
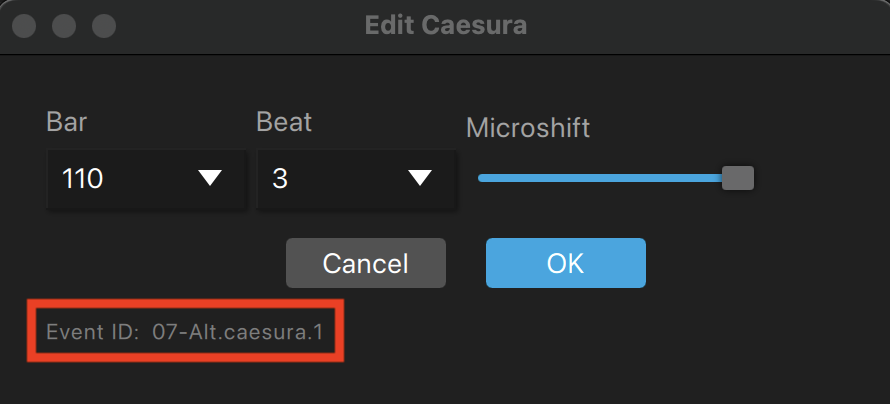
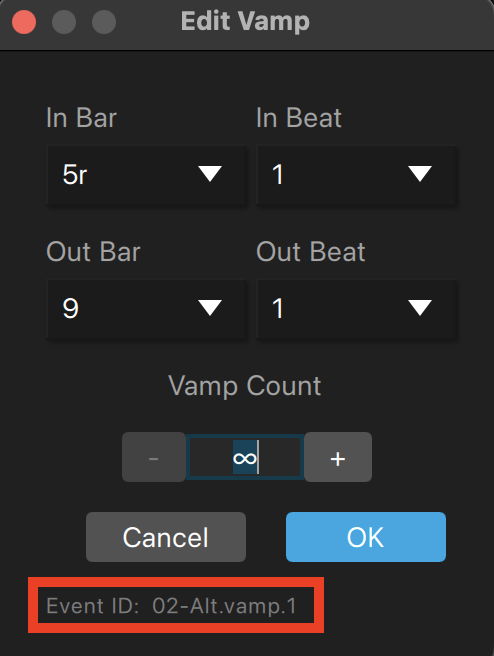
Event IDs are unique identifiers assigned to specific Stage|Tracks events within your show. The event ID is the unique identifier that tells the OSC command which event to trigger in Stage|Tracks. The only events in Stage|Tracks that have event IDs are the following:
The event ID can be found by doing the following:
- Find the event in the Event List OR Timeline.
- Click the Edit button OR double-click to open the pop-up window.
- Find the event ID at the bottom of the window.
- Click on the name of the event ID to copy it to the clipboard.
Event ID
To modify an existing event, you can do so in the following ways:
- Click and drag the existing event inside the Timeline.
- Double-click an event in the Timeline or Event List and change the event options. Click OK OR press Enter on the keyboard.

To delete an existing event, you can do so in the following ways:
- Click an event in the Timeline or Event List, and click the Delete button in the Event Controls to remove it.
- For Mac, click an event in the Timeline or Event List, and press the Delete key on your keyboard.
- For Windows, click an event in the Timeline or Event List, and press the Backspace key on your keyboard.

To undo recent event changes you just made, you can do that in the following ways:
- Click the Undo button in the Event Controls.
- For Mac, press command + Z on your keyboard
- For Windows, press ctrl + Z on your keyboard.
Undo removes the last event change you made from the Timeline and Event List.

To redo recent event changes you just made, you can do that in the following ways:
- Click the Redo button in the Event Controls.
- For Mac, press command + shift + Z on your keyboard
- For Windows, press ctrl + shift + Z on your keyboard.
Redo will add back the last event change you made to the Timeline and Event List.
Saving Changes to Local Device
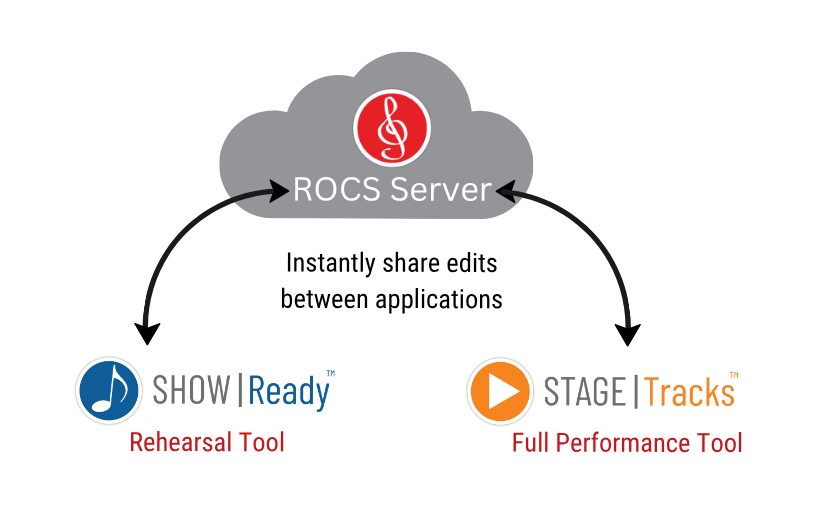
As you make changes, you can save them locally to your device. However, we always recommend that you upload the changes to the cloud (ROCS server) by clicking the Share button instead. Sharing changes ensures that your cast members also have the latest version. You can always return to Stage|Tracks or Show|Ready to make further edits later.
Saving changes locally on your computer can be done by doing the following:
- In the Event Controls section, click the Save button.
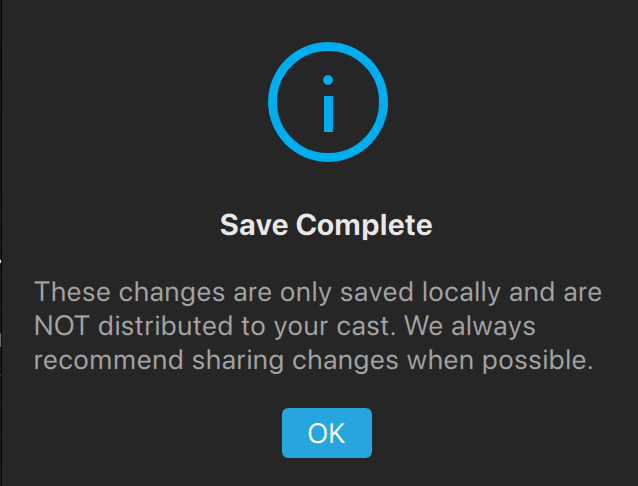
- A pop-up window will appear notifying you that your changes are saved locally and therefore are not shared with your cast.
- Click OK to continue.
NOTE: Instead of only saving locally when you’re done making changes, we recommend uploading the changes to the cloud (ROCS) by clicking Share. Clicking Save will only save the changes to your local computer and will NOT instantly send those changes to your cast members or production staff. Changes won’t be uploaded to the cloud (ROCS server), so if your device crashes, there will be no backup.
Sharing Changes with Show|Ready and Cast
If you want to share your edits, you can send those changes to your cast instantly via the cloud (ROCS server). You can always return to Stage|Tracks or Show|Ready later to make further edits. When you send your edits, they upload to both Stage|Tracks and the rehearsal tool Show|Ready, keeping your production staff, cast members, and anyone else involved with your show on the same page.
Send changes instantly to your production staff in Stage|Tracks and cast members in Show|Ready by doing the following:
- In the Event Controls section, click the Send Changes button. This will also automatically save your changes.
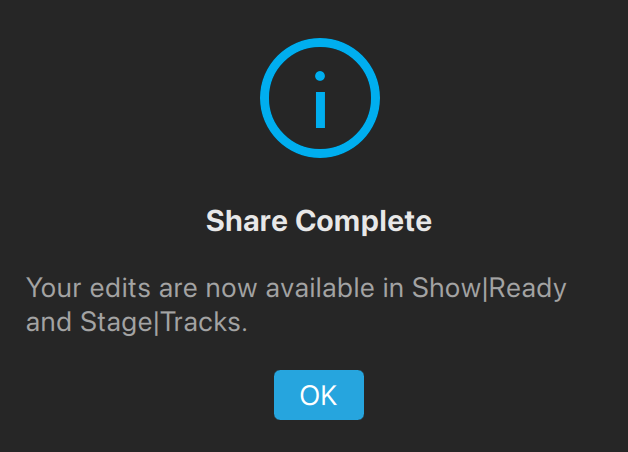
- A pop-up window will appear notifying you that your changes have been sent.
- Click OK to continue.
The next time you log into Stage|Tracks or Show|Ready, a pop-up message will appear with the notification: Files Were Updated: The event changelog has been updated to version [number].
Reverting to Previous Event Log
Sometimes it may be necessary to revert to a previous version of your event log. Be careful, as all changes made since that specific log version will be lost when you make edits and save again. If you load a previous log and then start making changes, you can save/share those changes, and it will update the log number. You can always return to a previous log if needed, but be aware that any new edits will not be included.
To go back to a previous event log, you will do the following:
- Click File in the menu bar.
- Click on View Past Logs from the drop-down menu.
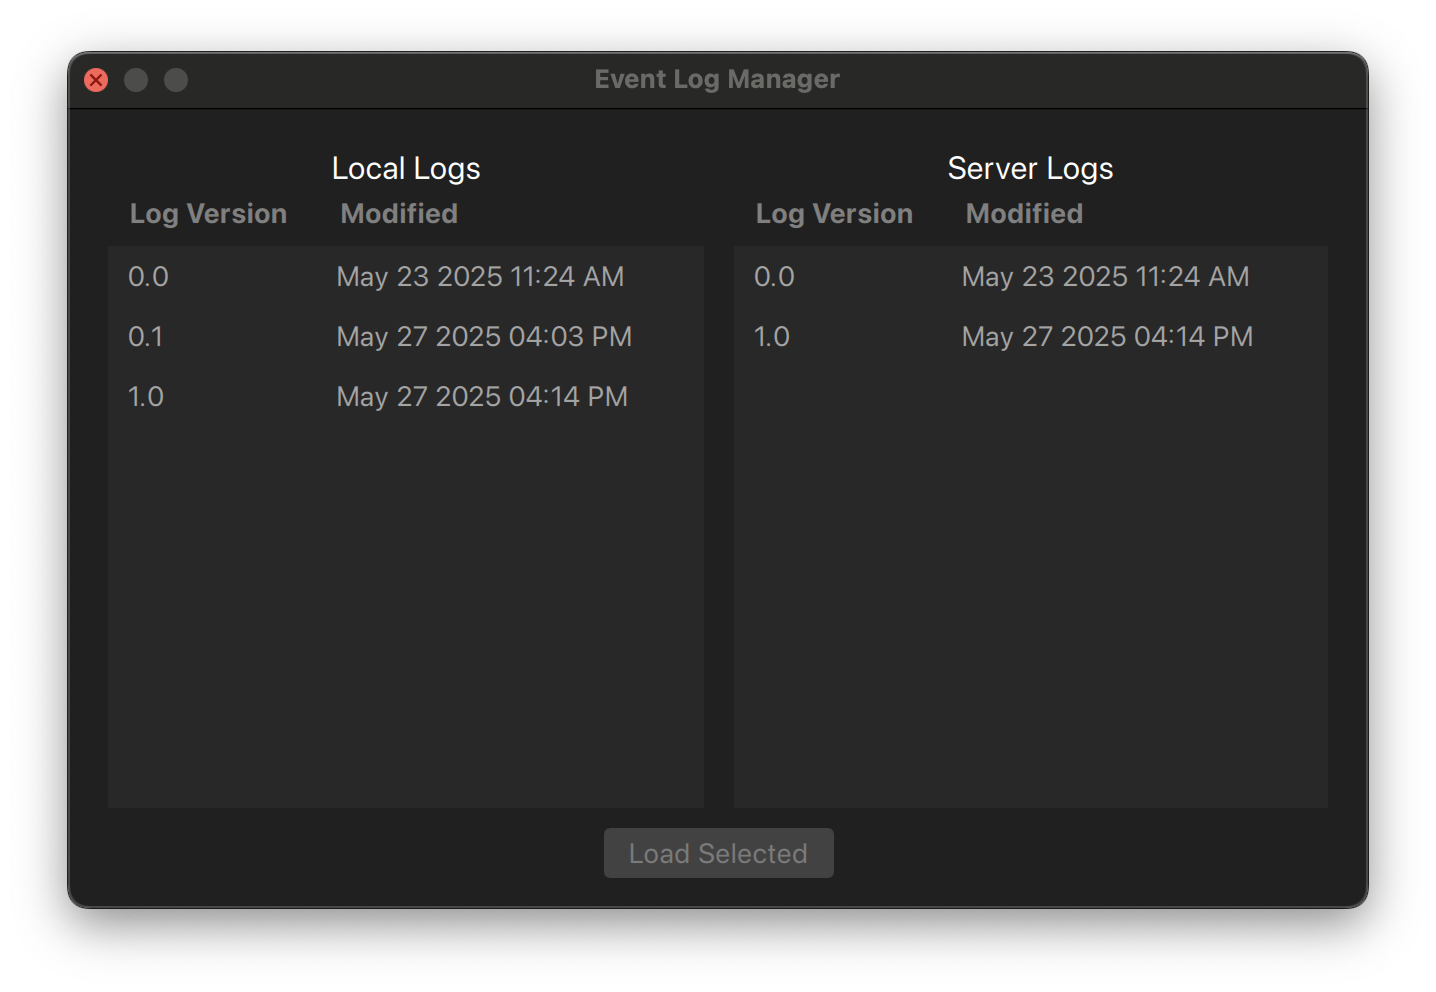
- In the pop-up window, select the desired log and click Load Selected.
- Once you have loaded the previous event log, you can continue making edits as usual. Click Save in the Event Controls to save the log locally. When you’re ready to send the changes to your cast members and production team, click Share in the Event Controls.

The differences between the types of logs you can restore:
- Local logs– Located on the local computer only. These logs are created when you click the Save button.
- Server logs – Located on the ROCS servers and distributed to other Show|Ready and Stage|Tracks systems. These logs are created when you click the Share button.
If you would like a copy of your event log for future reference, you can easily export it to PDF.
To export your event log, you will do the following:
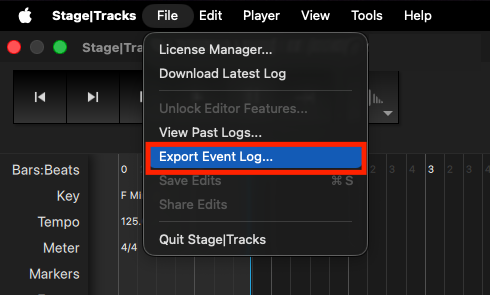
- Click File in the menu bar.
- Click on Export Event Log from the drop-down menu.
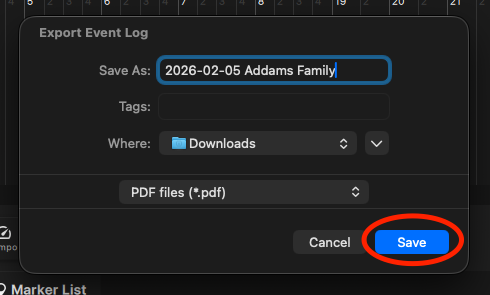
- In the pop-up window, type the name you want to give the file.
- Select the save location.
- Click Save to export the PDF.
4. Making Specific Edits in Stage|Tracks
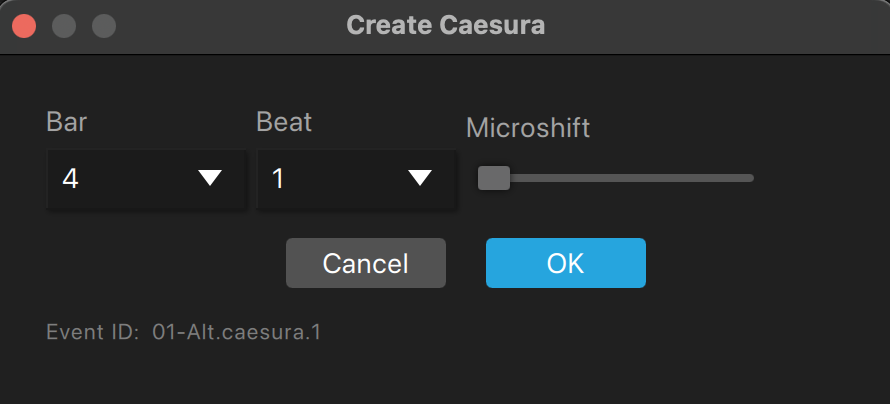
Caesura adds a pause in a song, perhaps for additional dialogue time or another break in the action. Caesuras are reflected in the Timeline and Event List. You will also see a Caesura label in the Song Info.
To add a caesura, you will do the following:
- Go to the Timeline and select the bar where you want to add a caesura.
- Click on the Caesura button in the Event Controls.
- Verify the In Bar and In Beat are correct OR type in the specific numbers.
- Click OK, OR press Enter to save changes.
- The caesura is represented in the timeline as two red slanted bars.
Adding a caesura will automatically pause playback indefinitely until you trigger it to continue. To resume playback after a caesura, you can do so in the following ways:
- Once the Timeline Playhead is at a caesura, click the Advance button (|).
- Click play in the Transport.
- Press the Right Arrow () on your keyboard.
- Press the Spacebar on your keyboard.
Creating a Caesura
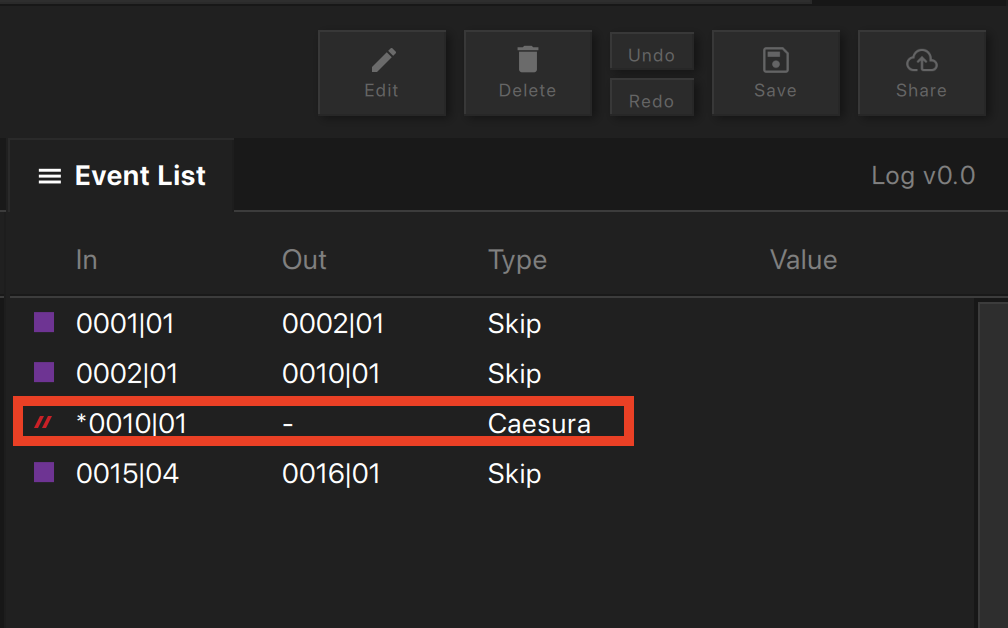
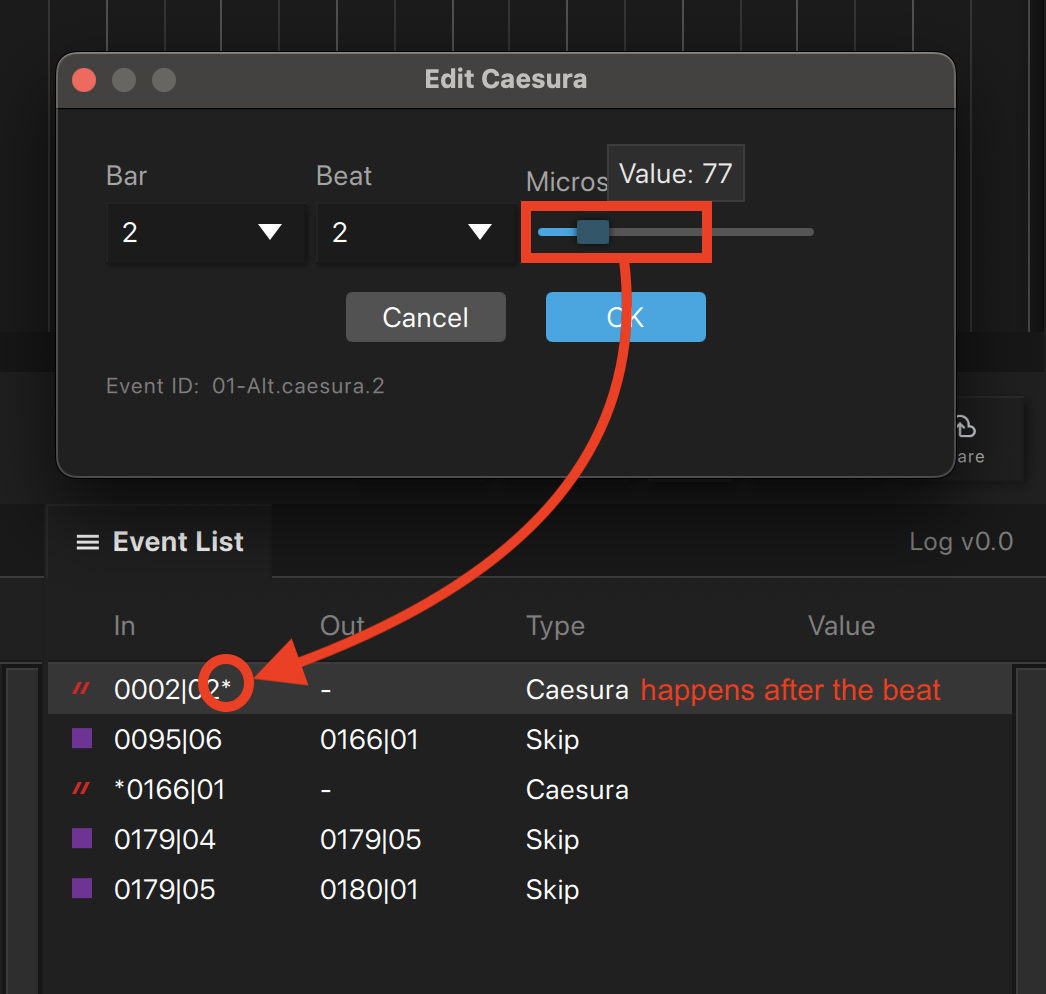
You will notice that caesuras in the Event List with an asterisk (*) are not placed exactly on the beat. The asterisk notifies you that the “in” display value of the Event List has been rounded to the nearest beat. These caesuras are created by ROCS to facilitate very specific pauses written in the score.
Special Caesura
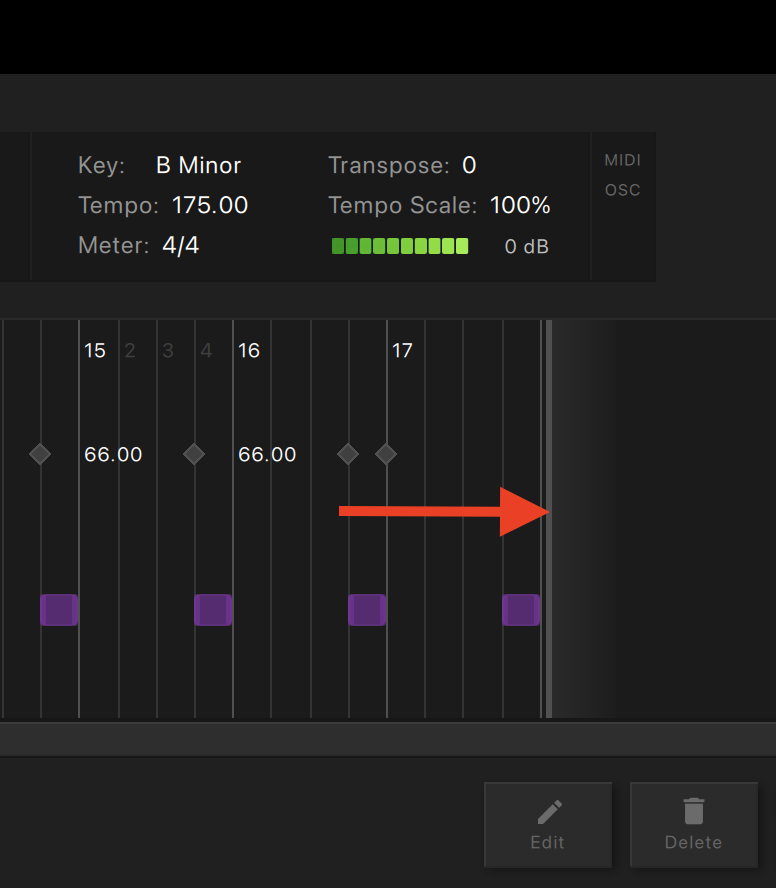
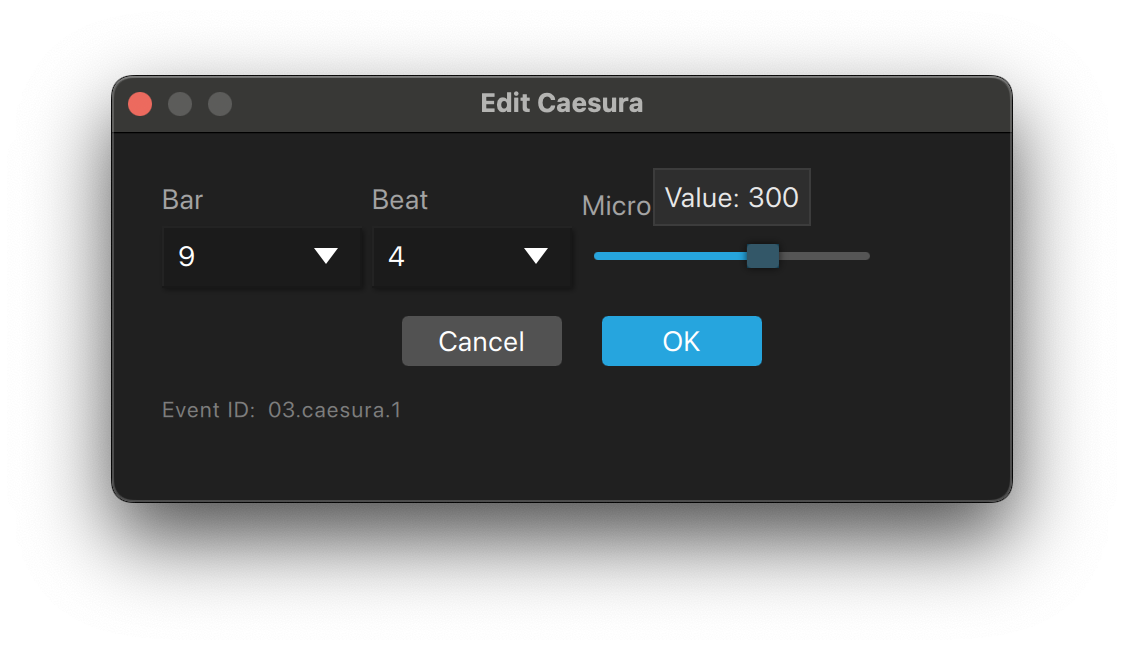
You can change the locations of caesuras using the Microshift function measured in MIDI ticks. There are 480 ticks in a quarter note, but the number of ticks per beat changes based on the meter, because a quarter note isn’t always one beat.
Caesura Microshift
| Meter | Ticks Per Beat |
|---|---|
| 2/4, 3/4, 4/4, etc. | 480 |
| 6/8, 9/8, 12/8, etc. | 720 (three 240 tick 1/8 notes per beat) |
| 2/2, 3/2, etc. | 960 |
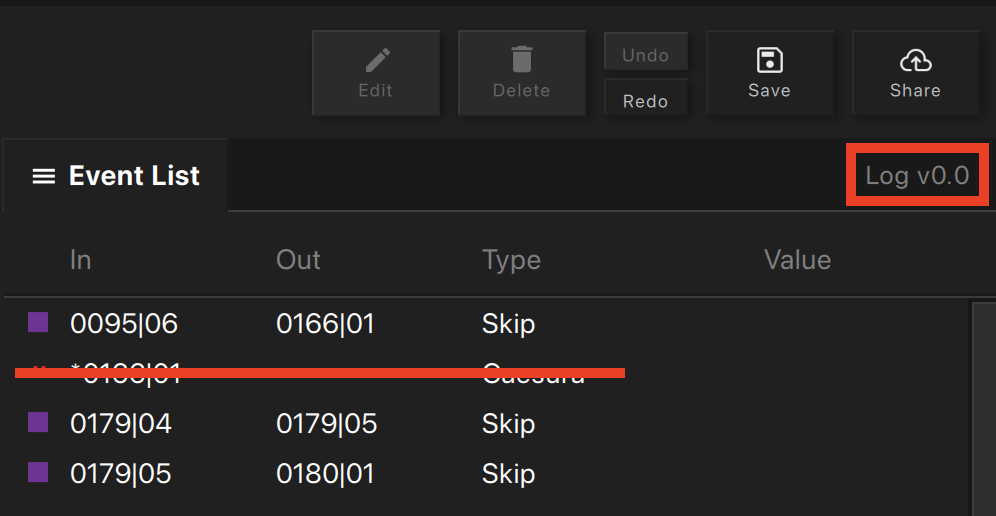
The actual caesuras are located exactly on the tick specified, but in the Event List they are rounded to the nearest beat.
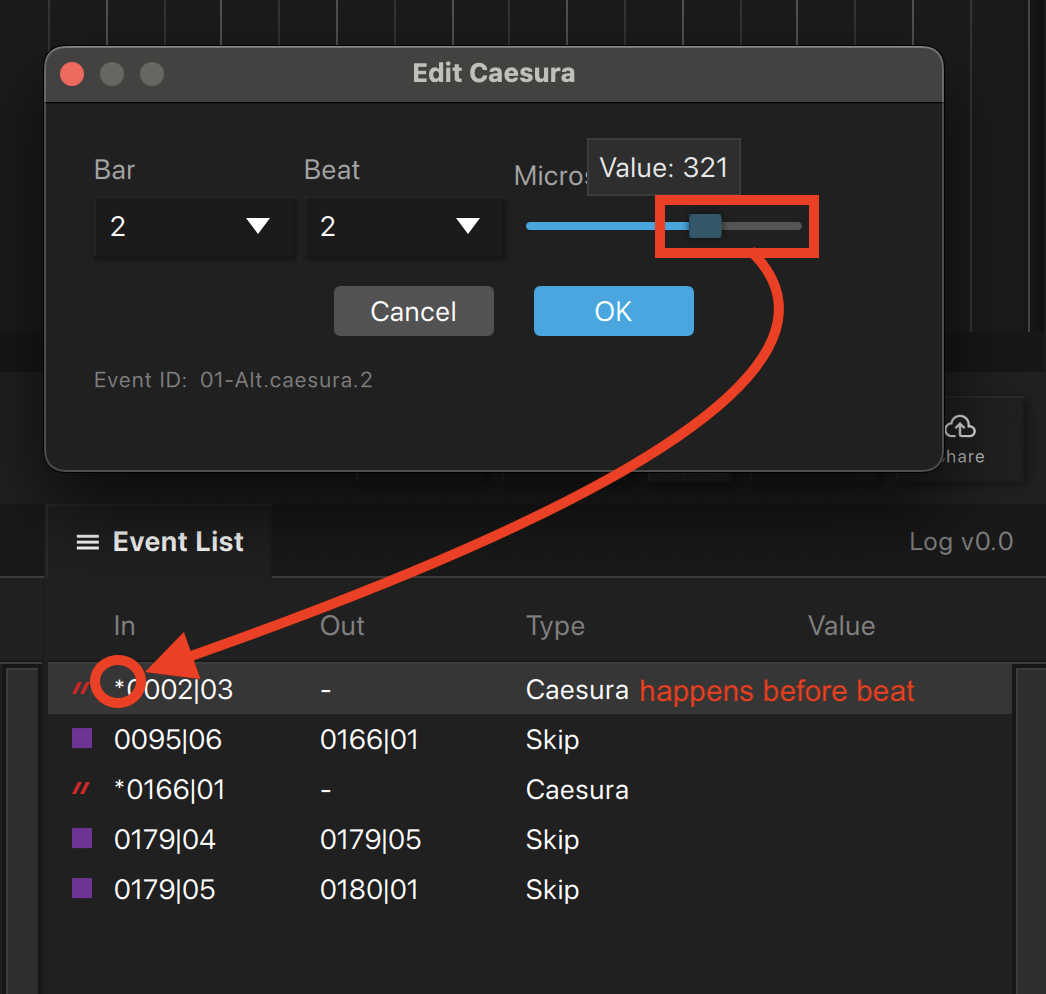
- If the asterisk is shown before the Bar | Beat value, the caesura is before that beat.
- If the asterisk is shown after the Bar | Beat value, the caesura is after that beat.
Microshifted Caesura Before Bar | Beat
Microshifted Caesura After Bar | Beat
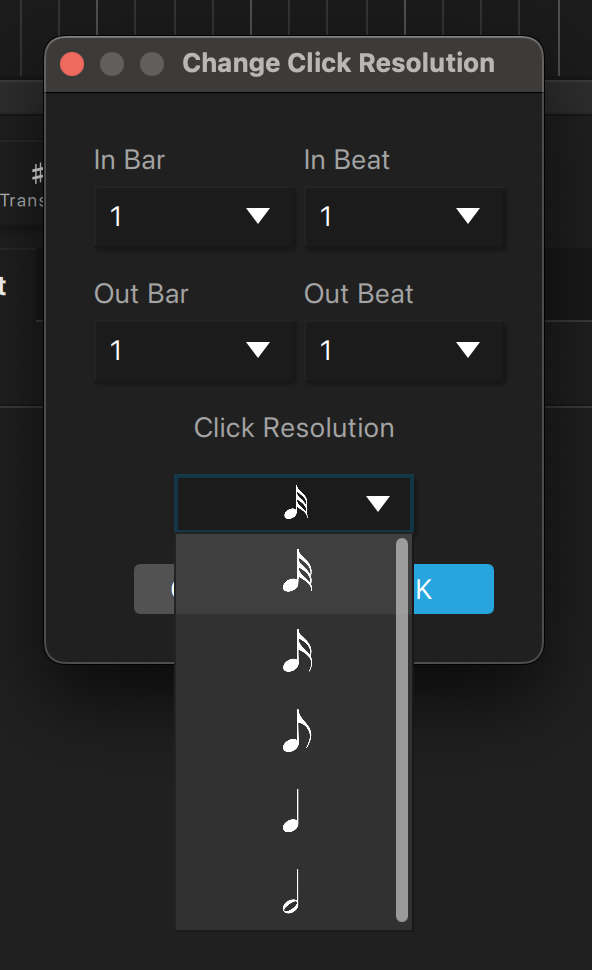
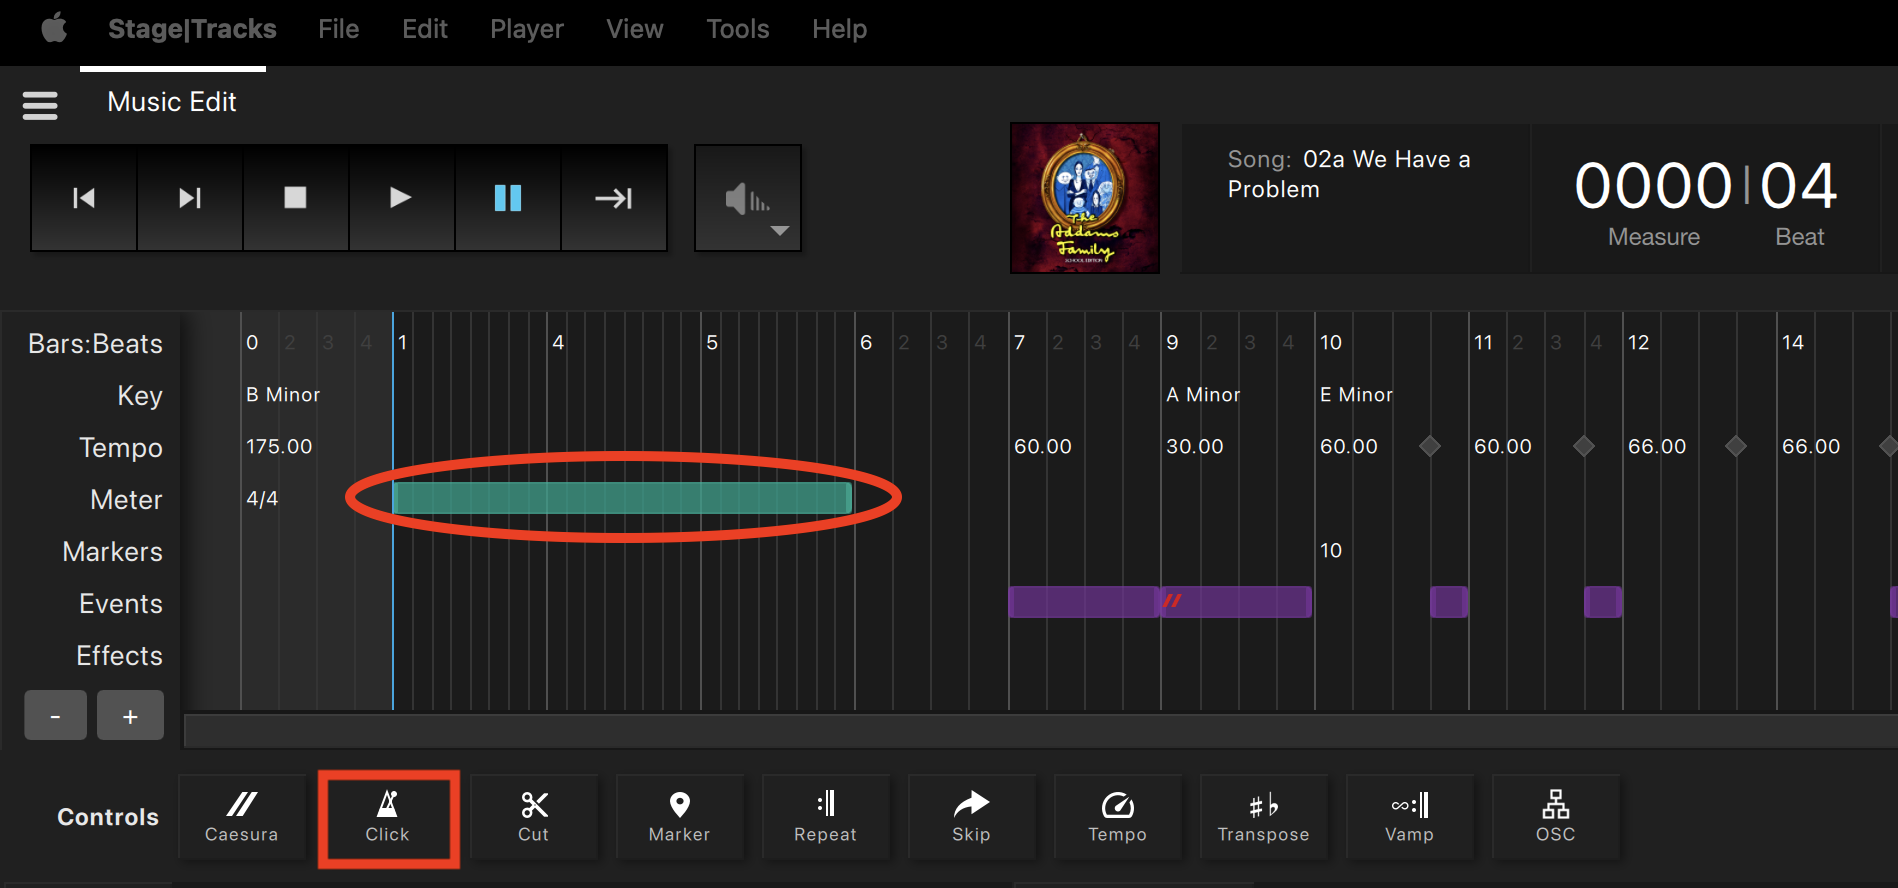
Click changes the resolution (subdivision) of the click track to aid in following the beat. There may be slower passages when you need eighth-note or even sixteenth-note clicks, but you won’t need those subdivisions at higher tempos. Click changes are reflected in the Timeline and Event List. Using the click button won’t change the volume of the click.
When you select the Click button, a pop-up notification will notify you that while there is no audible click track present in Stage|Tracks, this feature changes the resolution of where you can place events in the timeline to allow for more precise editing. Be aware that any edits made to the click in Stage|Tracks will affect the click track in Show|Ready. You can select Do not show again if you want to dismiss this pop-up window.

To change the click track resolution, you will do the following:
- Go to the Timeline and highlight the section where you want to change the click resolution.
- Click on the Click button in the Event Controls.
- Verify the In Bar, In Beat, Out Bar, Out Beat are correct OR type in the specific numbers.
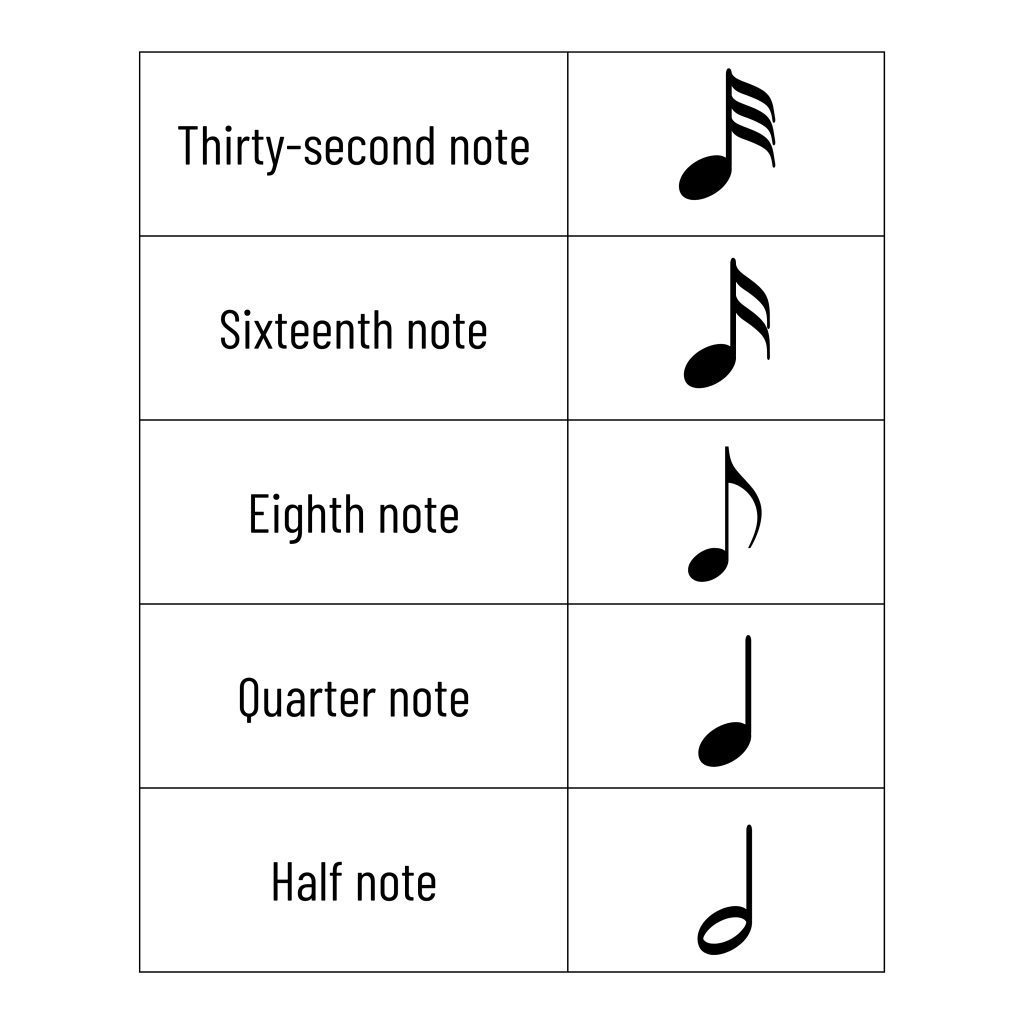
- Select one of the music note options from the drop-down menu.
- Click OK to save changes.
- The click resolution change is represented in the timeline as a dark green band.
Changing the click track in the Timeline will automatically update the resolution of the clicks on playback, which are audible in Show|Ready only. In Stage|Tracks, you will use it to be able to make more precise edits.
Changing Click
Music Note Key
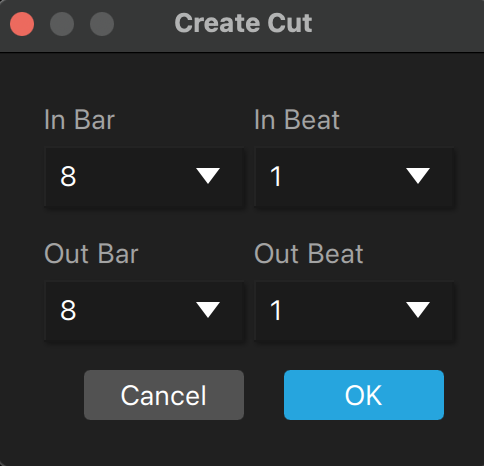
Cut removes a section of music from playback. Cuts are reflected in the Timeline and Event List. Use cuts only when necessary to remove specific sections. If you need to skip the song, change the playback state to a red X in the Playlist.
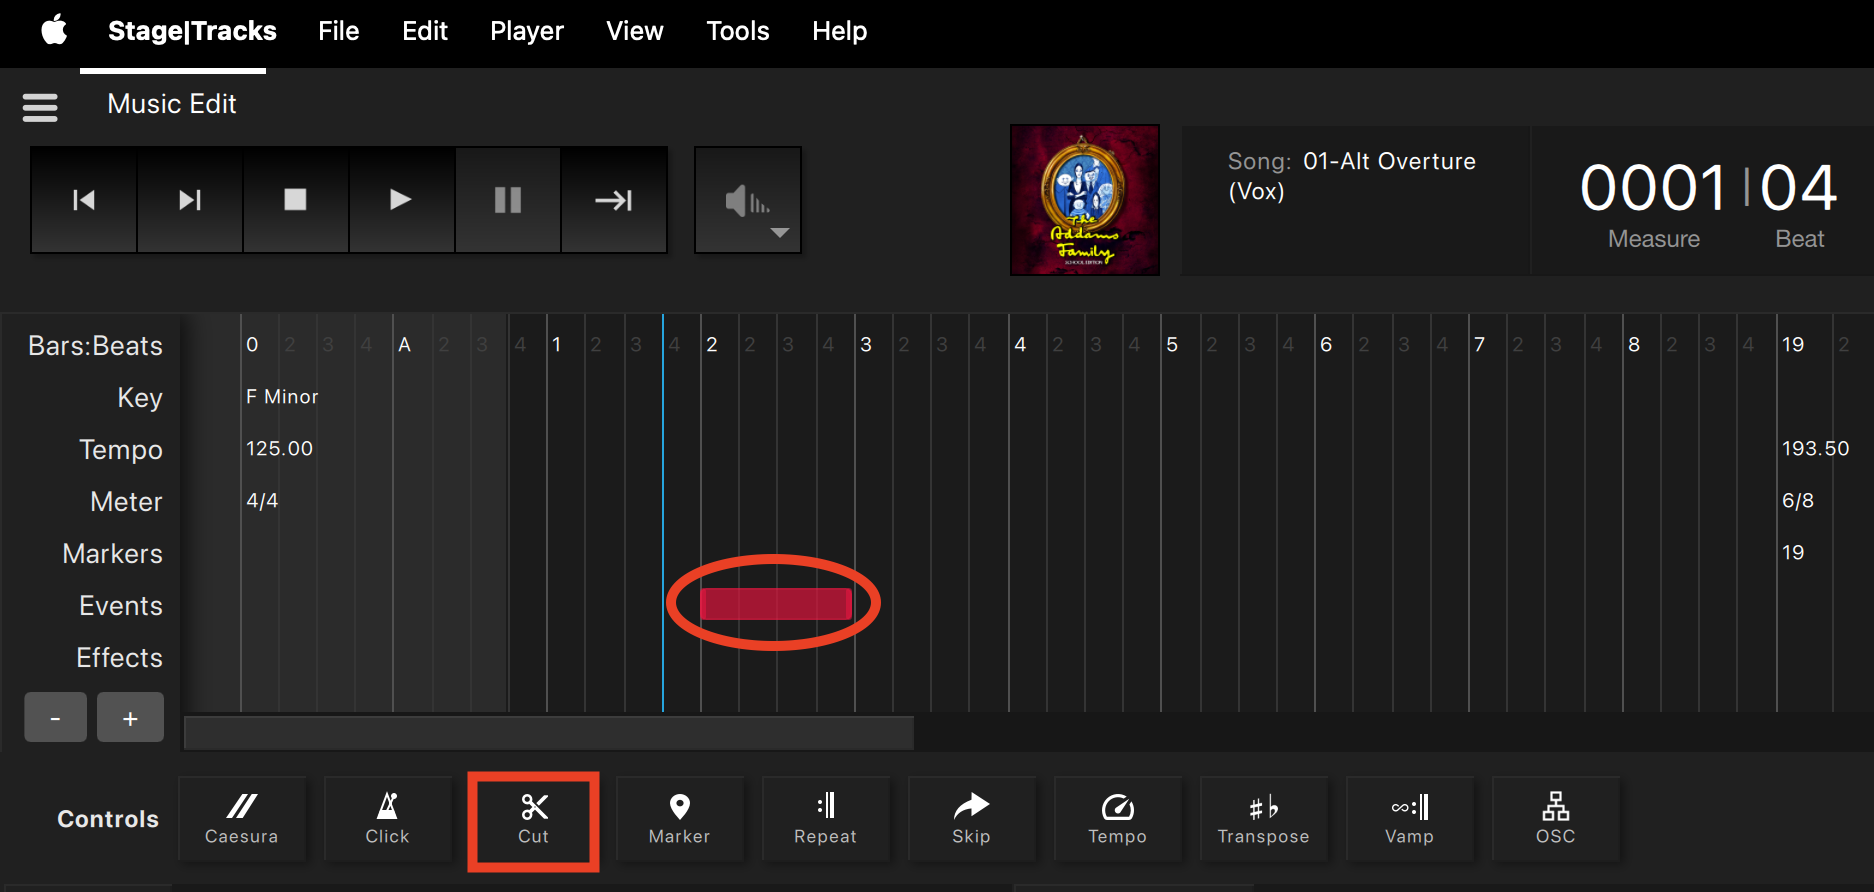
To add a cut, you will do the following:
- Go to the Timeline and highlight the section you want to cut.
- Click on the Cut button in the Event Controls.
- Verify the In Bar, In Beat, Out Bar, Out Beat are correct OR type in the specific numbers.
- Click OK to save changes.
- The cut will be represented in the timeline as a red band.
Creating a Cut
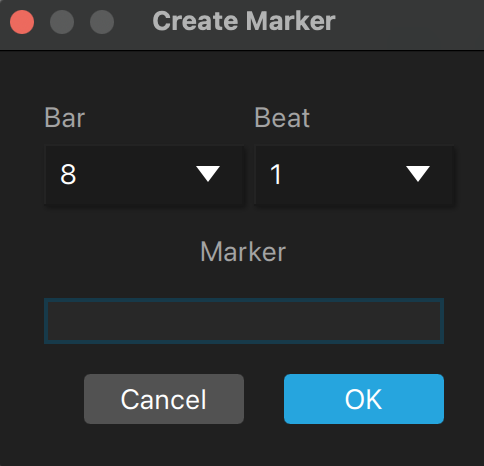
Markers show locations in the score or may include cue notes for the production staff or other comments. These markers can be changed or added at the editor’s discretion. Markers are reflected in the Timeline and Event List.
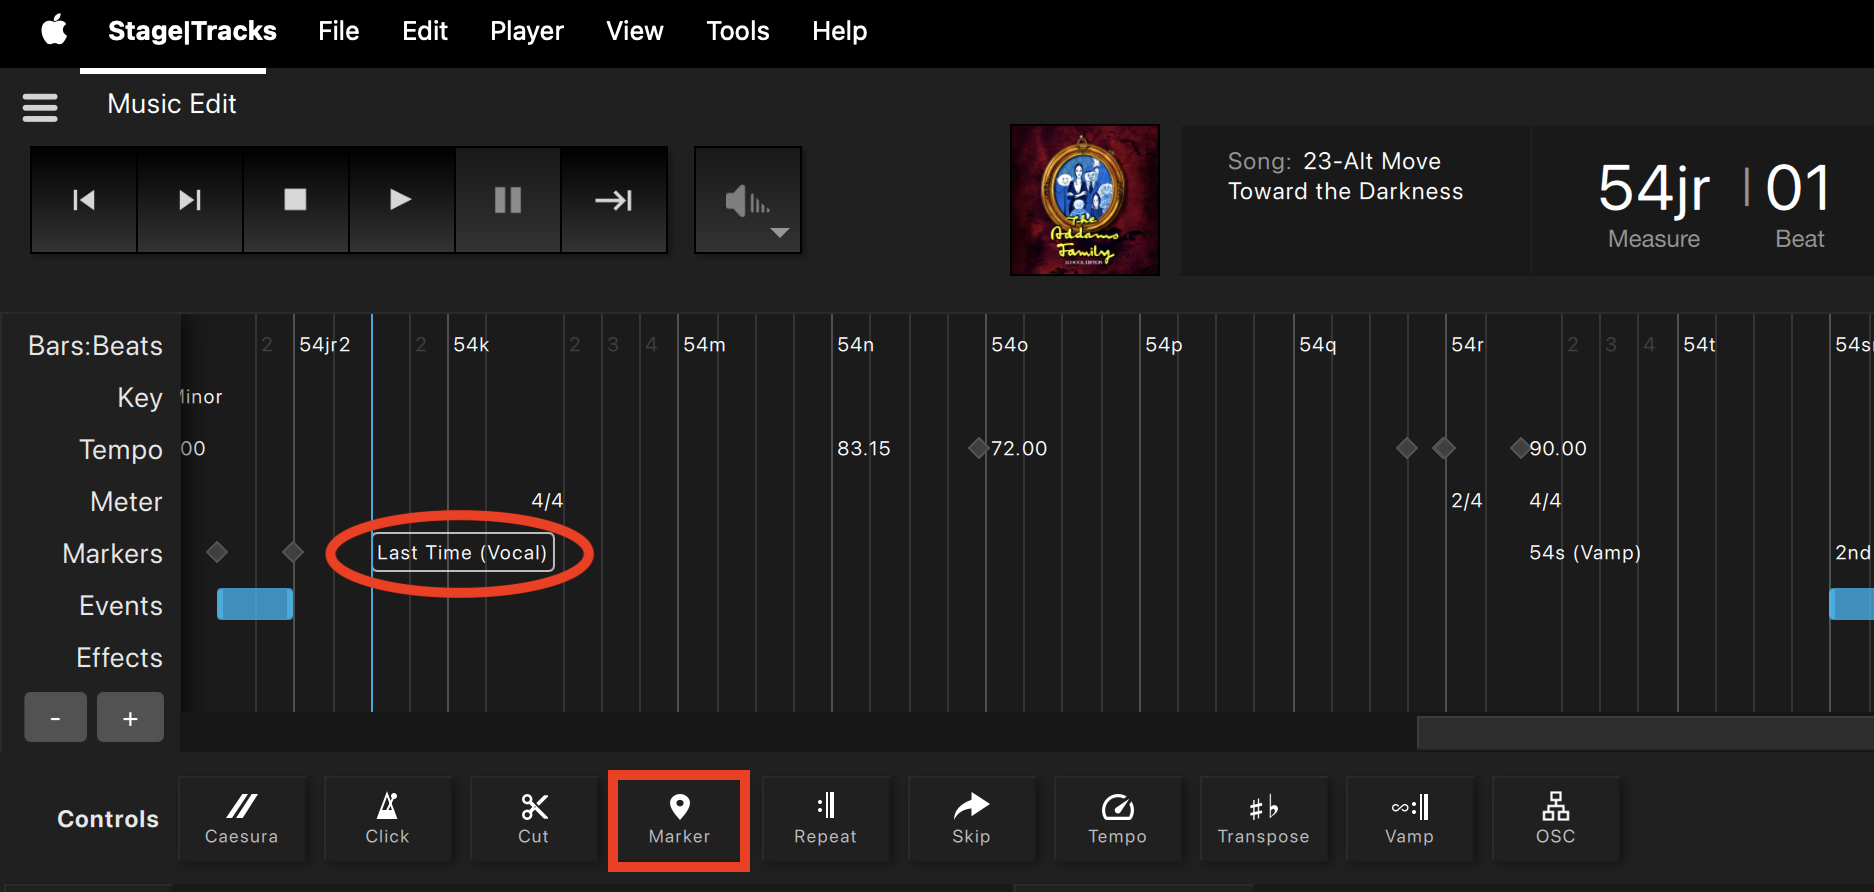
To add a marker, you will do the following:
- Go to the Timeline and select the bar where you want to add a marker.
- Click on the Marker button in the Event Controls.
- Verify the In Bar and In Beat are correct OR type in the specific numbers.
- In the Marker textbox, type the comment.
- Click OK to save changes.
- The marker will be represented in the timeline as text.
Adding a marker in the Timeline will not affect playback. However, you will see the comment in the Timeline.
Creating a Marker
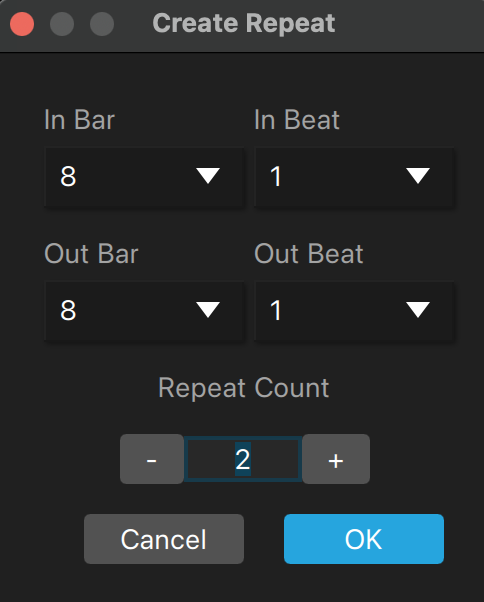
Repeats allow a section to be played a fixed number of times and then advance automatically. Repeats are different than Vamps, as Vamps loop an indefinite number of times and require user input to advance. Repeats are reflected in the Timeline and Event List. You will also see a Repeat label in the Song Info.
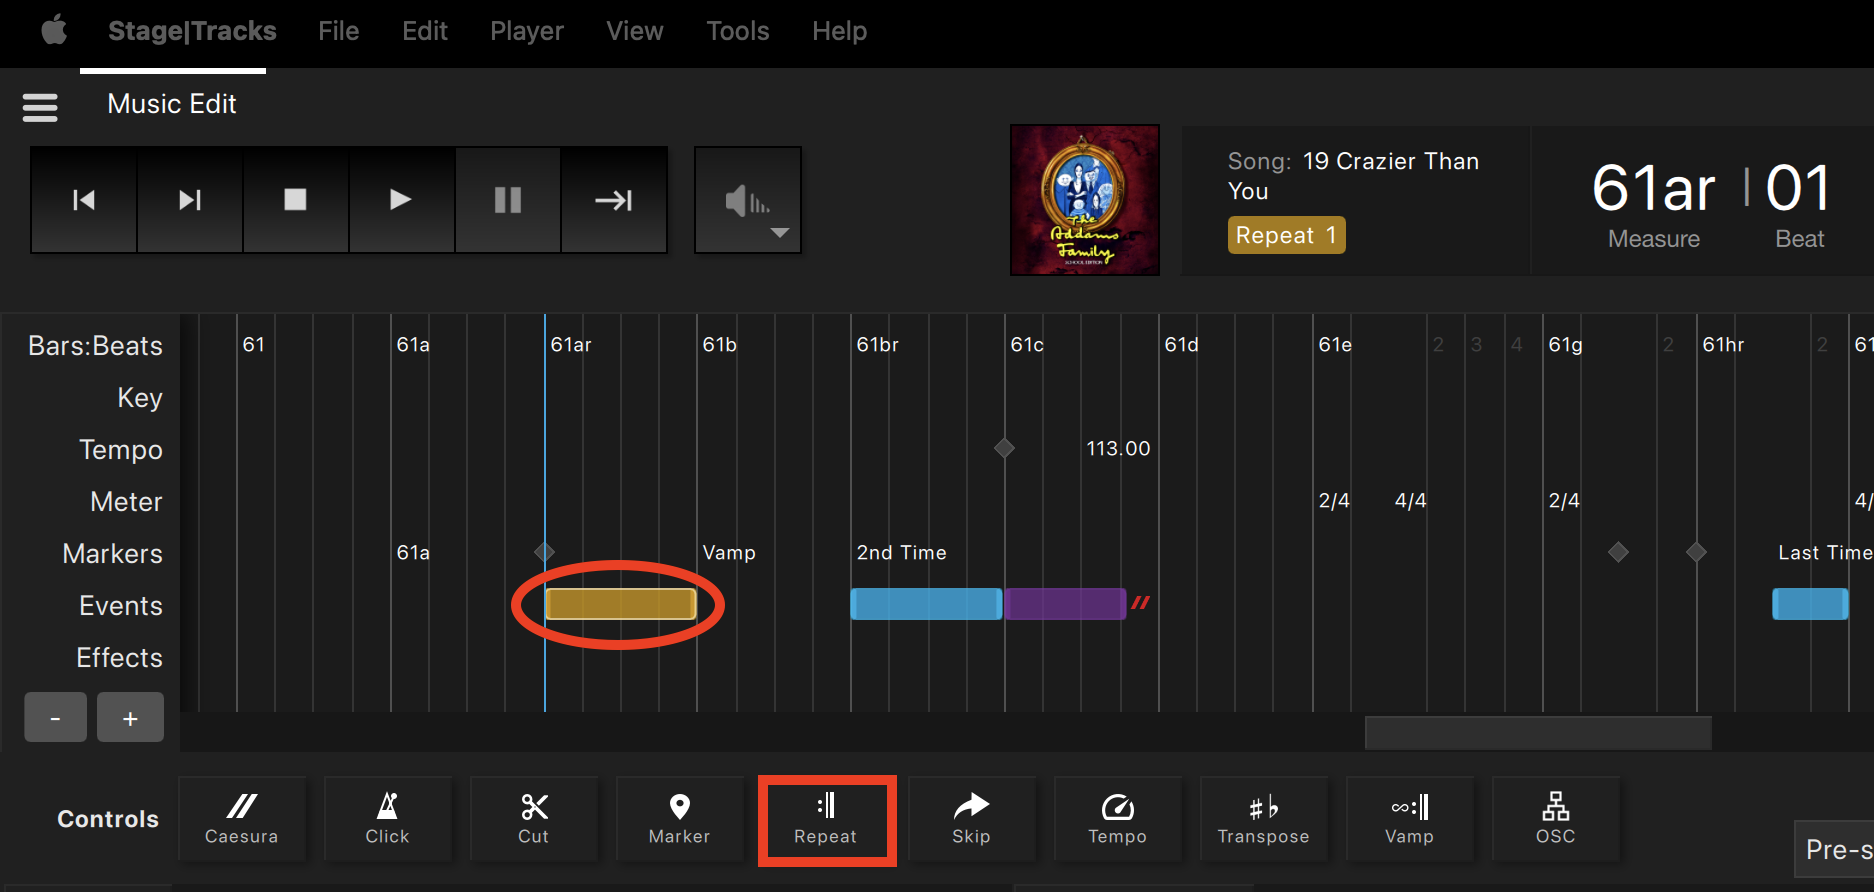
To add a repeat, you will do the following:
- Go to the Timeline and highlight the section where you want to add a repeat.
- Click on the Repeat button in the Event Controls.
- Verify the In Bar, In Beat, Out Bar, Out Beat are correct OR type in the specific numbers.
- Type a number in the Repeat Count field. The Repeat Count indicates the total number of times the section plays.
- Click OK to save changes.
- The repeat will be represented in the timeline as an orange band.
Creating a Repeat
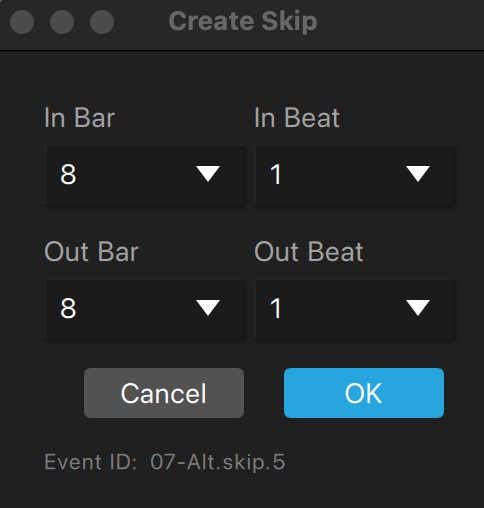
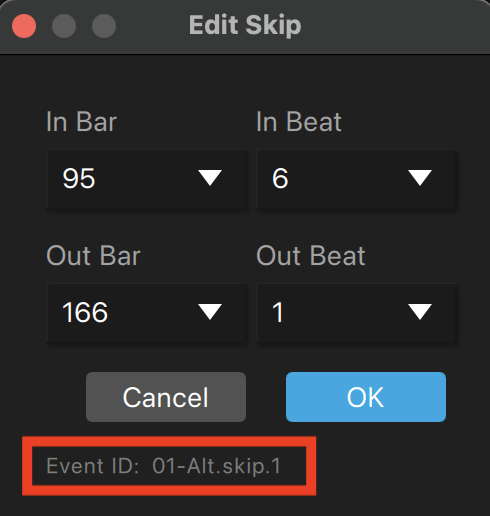
Skip allows you to execute an instant skip to the end of a section in a song when desired. For example, when fermatas are written in the score, we have recorded more time than might be needed. Since stretching audio too far yields undesirable results, extra time is added, and you can jump out of a section to move on. Skips are reflected in the Timeline and Event List. You will also see a Skip label in the Song Info.
To add a skip, you will do the following:
- Go to the Timeline and highlight the section where you want to add a skip.
- Click on the Skip button in the Event Controls.
- Verify the In Bar, In Beat, Out Bar, Out Beat are correct OR type in the specific numbers.
- Click OK to save changes.
- The skip will be represented in the timeline as a purple band.
Adding a skip in the Timeline will not affect playback unless you trigger it to skip using Advance. If you do nothing, a standalone skip (without a related caesura) will continue to play at the end of the purple bar region in the Timeline.
Skip without Caesura
Skip with Caesura
However, if you desire to skip out of this region early, you can do so in the following ways:
Once the Timeline Playhead is within a skip:
- Click the Advance button (|).
- Press the Right Arrow () on your keyboard.
Creating a Skip
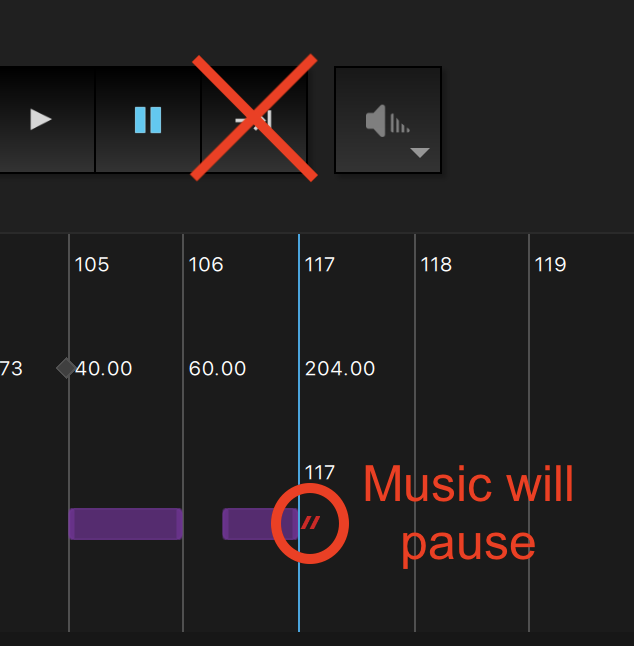
NOTE: Depending on score requirements, preset skips are often paired with preset caesuras (as seen in the example above). Usually, the caesura is placed inside the skip, so if additional time is needed beyond the preset skip, the playback will pause and wait until you trigger using the Advance button. In other cases, the caesura is placed after the skip, so that playback skips to the caesura and waits until you trigger the caesura independently.
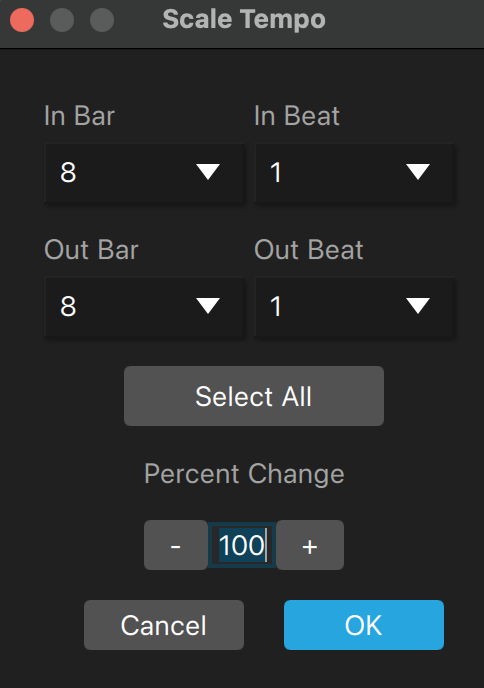
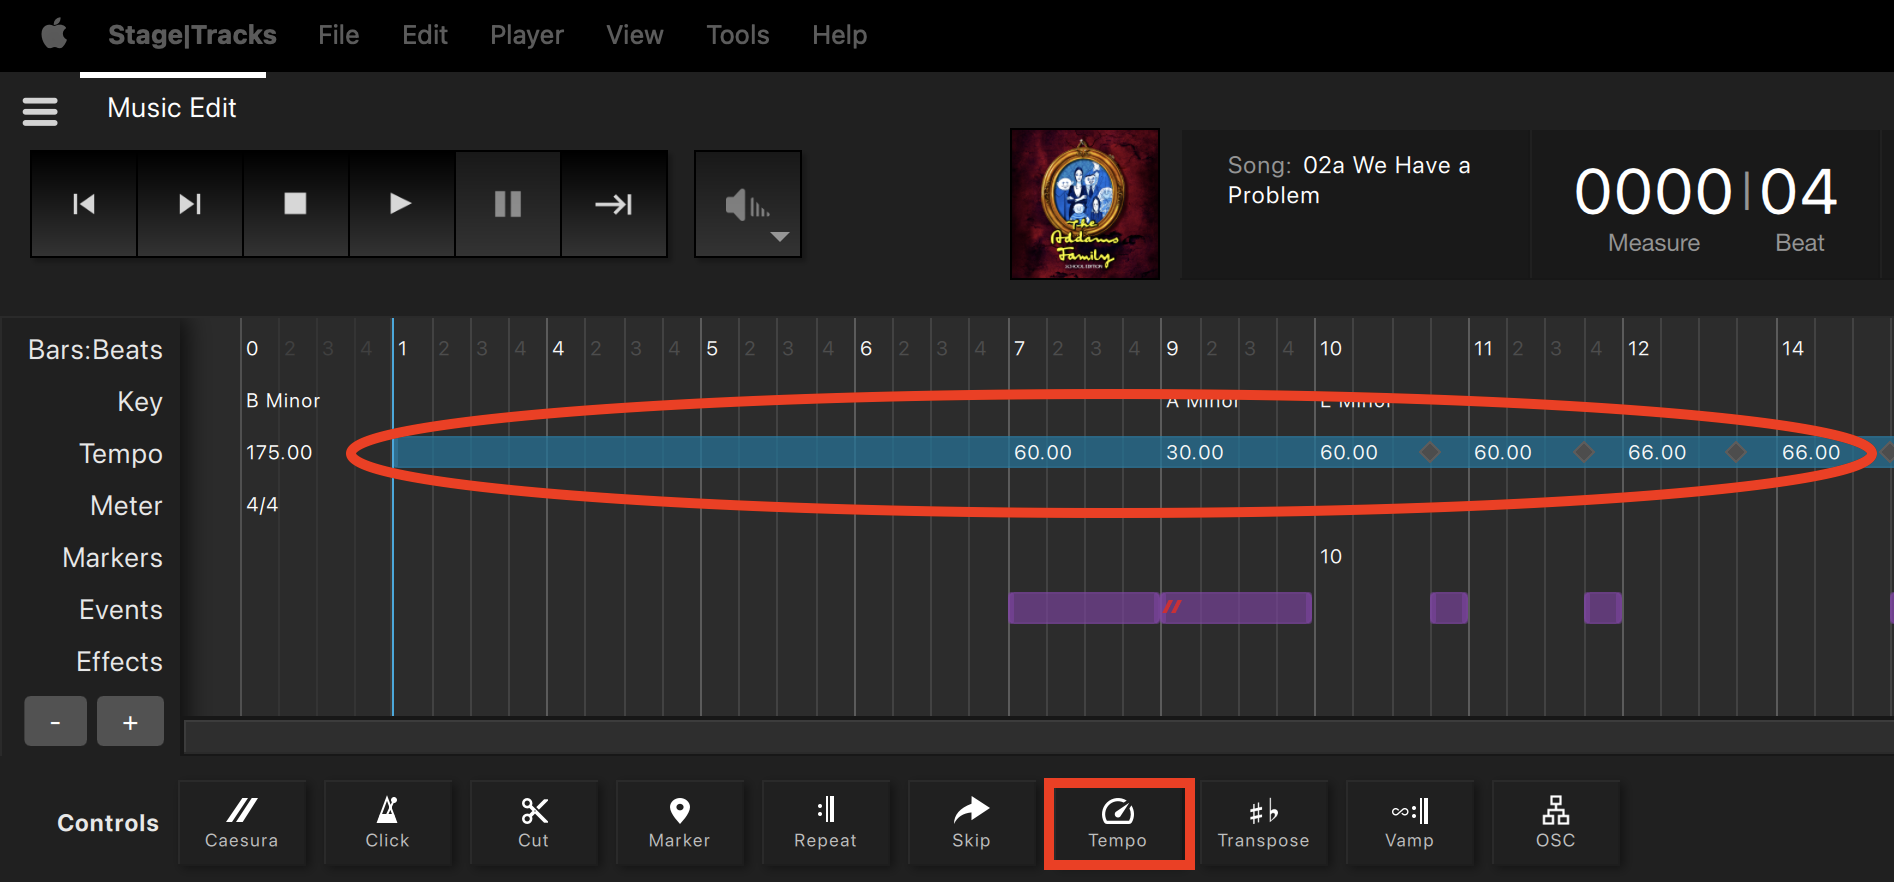
Tempo allows you to scale the speed of a section of a song. For example, if your cast members need more time to complete choreography, you can slow down the tempo to give them more time. Changes to the tempo are reflected in the Song Info, Timeline, and Event List.
To change the tempo, you will do the following:
- Go to the Timeline and highlight the section where you want to scale the tempo.
- Click on the Tempo Scale button in the Event Controls.
- Verify the In Bar, In Beat, Out Bar, Out Beat are correct OR type in the specific numbers.
- Select a number in the Tempo Scale field. We recommend scaling the tempo by +/- of 30% or less.
- Click OK to save changes.
- The tempo change will be represented in the timeline as a dark blue band.
Adjusting the tempo in the Timeline will automatically scale the speed in that section in playback.
Changing Tempo
NOTE: While it is possible to change the tempo significantly, it is recommended not to go beyond a 30% increase or decrease. Going beyond 30% reduces the sound quality.
Transpositions change the key in which the song plays. This allows you to adjust the song to accommodate specific vocal ranges. Changes to the transposition are reflected in the Song Info, Timeline, and Event List.
To change the transposition, you will do the following:
- Go to the Timeline and highlight the section where you want to change the key.
- Click on the Transpose button in the Event Controls.
- Verify the In Bar, In Beat, Out Bar, Out Beat are correct OR type in the specific numbers.
- Select a number in the Half Steps drop-down box. We recommend changing the key by +/- of four half-steps or less.
- Click OK to save changes.
- The transposition change will be represented in the timeline as a purple band.
Adjusting the key in the Timeline automatically changes the key in that section in playback.
Changing Transposition
NOTE: While it is possible to transpose an octave in either direction, we recommend going no more than four half-steps in either direction. Transposing beyond four half-steps reduces the quality of the sound recording.
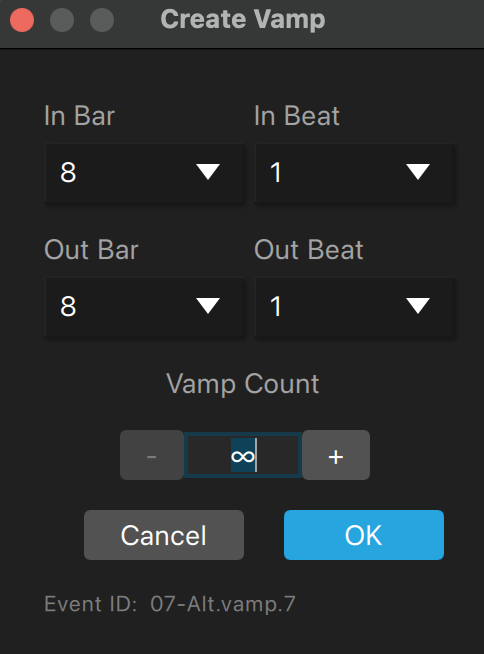
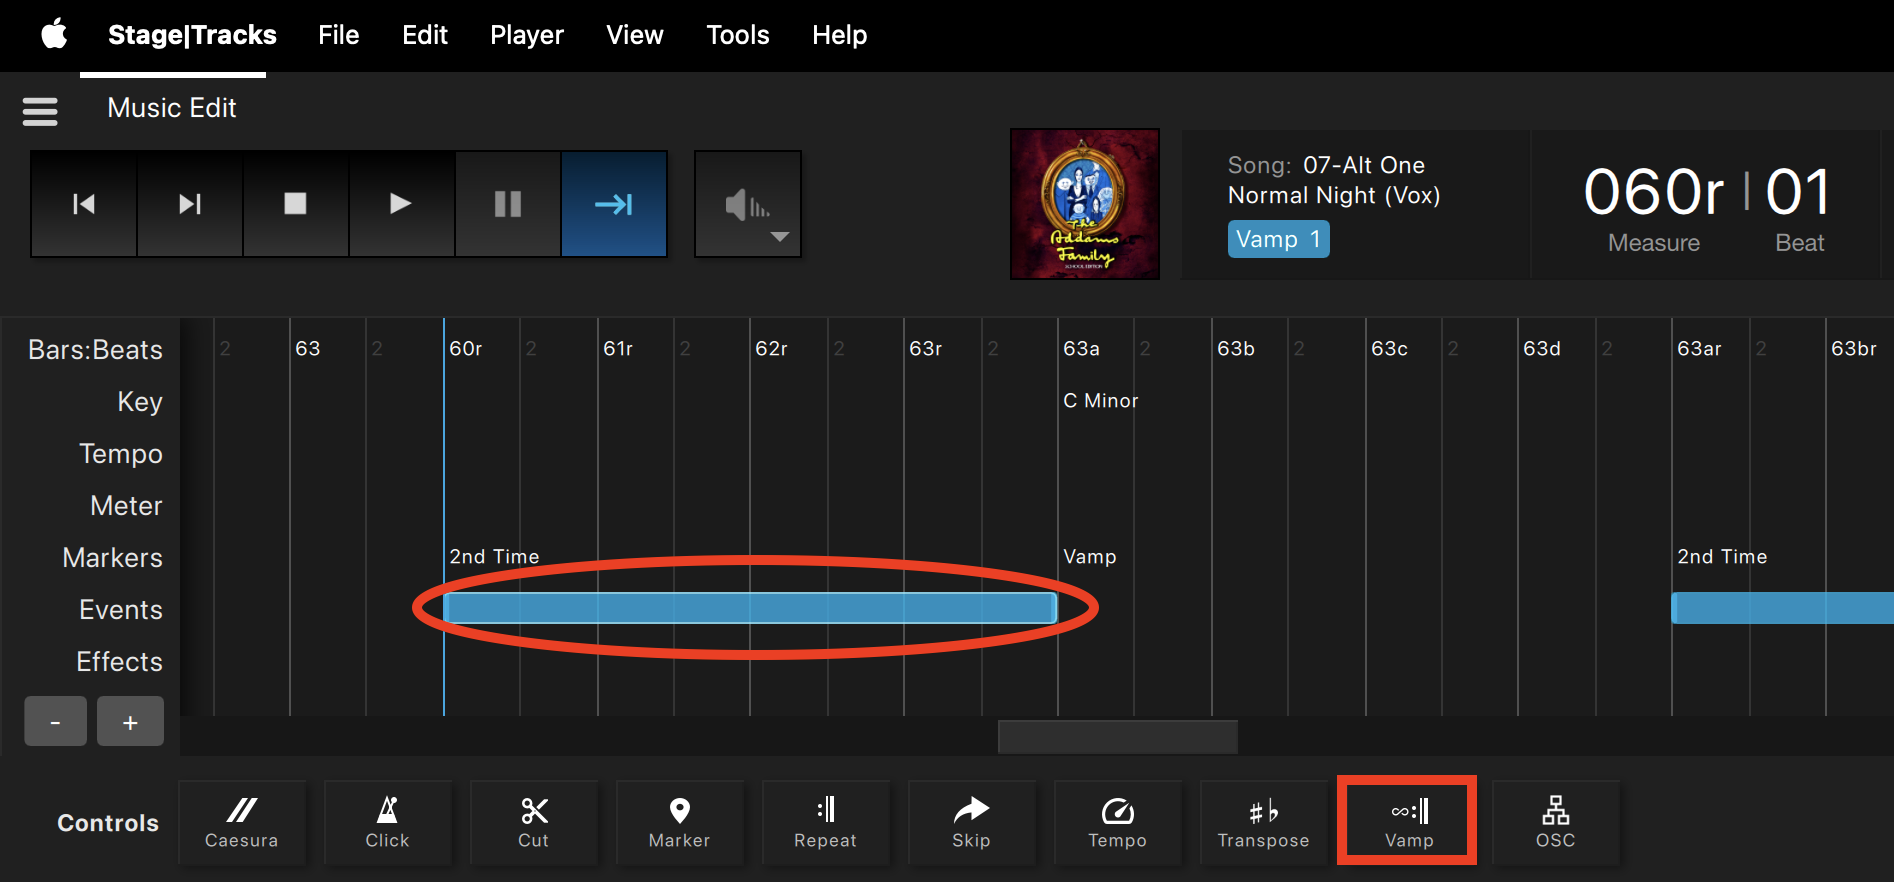
Vamp allows a section to be played an indefinite number of times according to the score, to accommodate any extra time needed for stage business. Vamps require you to trigger an “advance” to continue playback. Vamps are different than Repeats, in that Repeats will play a fixed number of times and don’t require you to advance the event. Vamps are reflected in the Timeline and Event List. You will also see a Vamp label in the Song Info.
To add a vamp, you will do the following:
- Go to the Timeline and highlight the section where you want to add a vamp.
- Click on the Vamp button in the Event Controls.
- Verify the In Bar, In Beat, Out Bar, Out Beat are correct OR type in the specific numbers.
- For an indefinite vamp, keep the Vamp Count at zero.
- If you want to change a vamp to a fixed number of repeats, you can enter that number in the vamp count field. The vamp count indicates the total number of times the section will be played.
- Click OK to save changes.
- The vamp will be represented in the timeline as a light blue band.
Adding an indefinite vamp in the Timeline will automatically make that section loop indefinitely until you trigger it to continue playback. To exit a vamp, you can do so in the following ways:
Once the Timeline Playhead is inside a vamp:
- Click the Advance button (|).
- Press the Right Arrow () on your keyboard.
Creating a Vamp
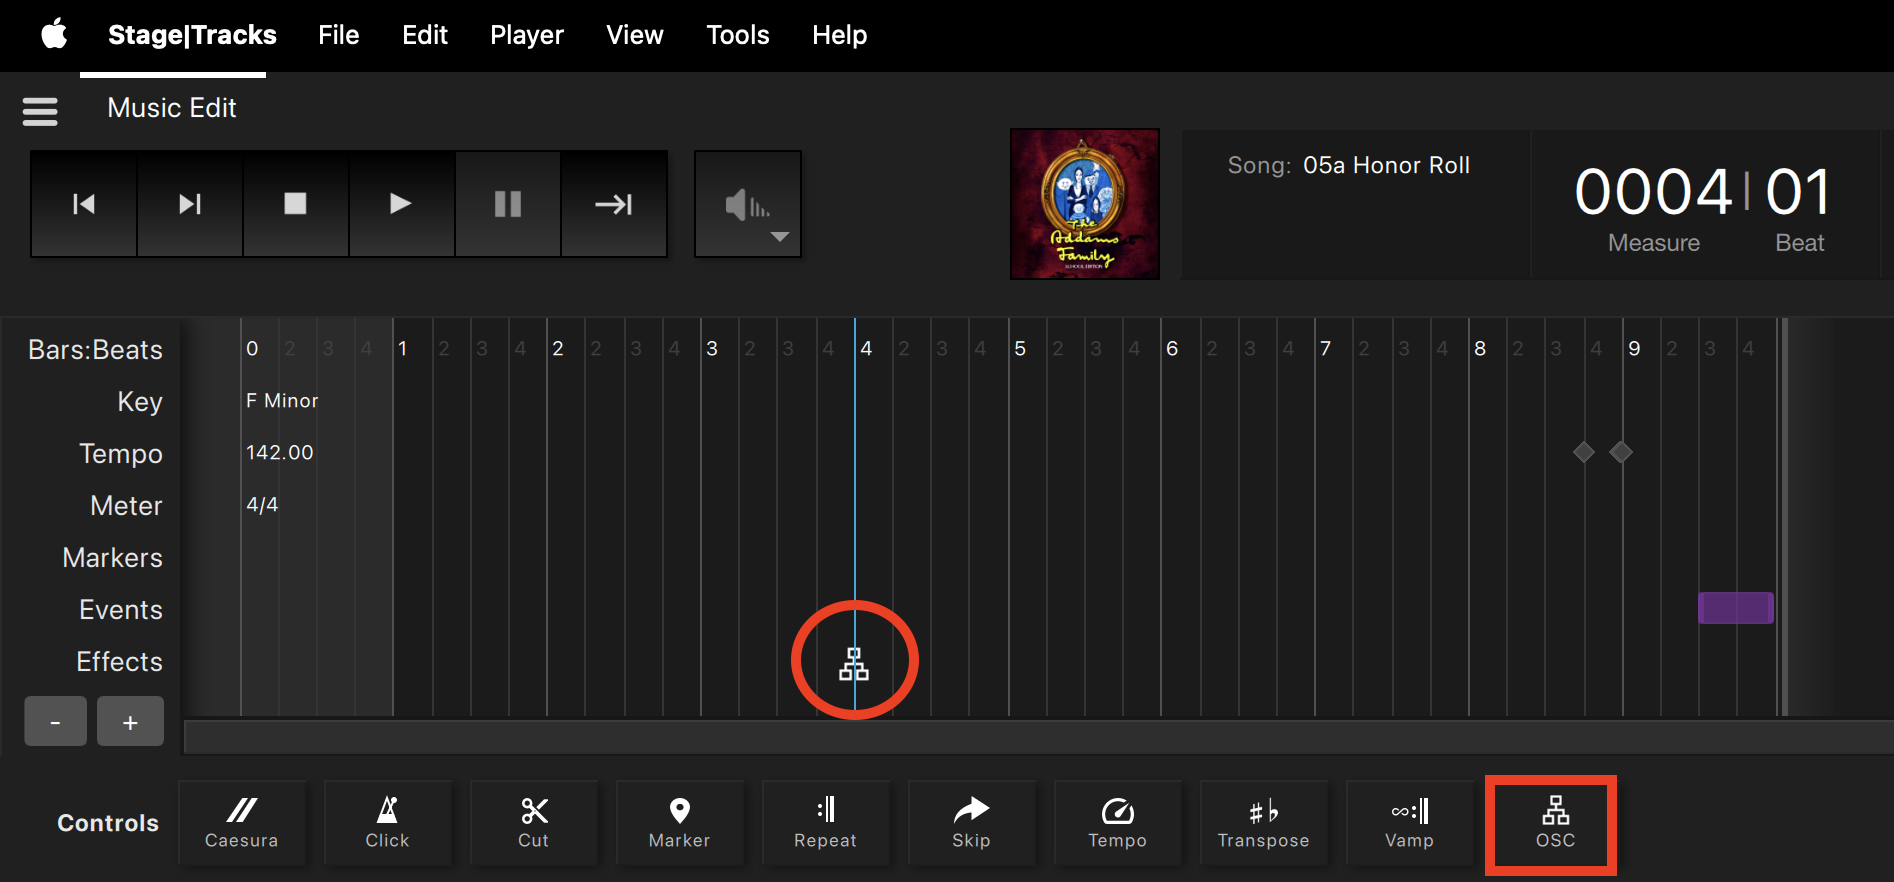
OSC stands for open sound control. It is a simple yet powerful network protocol that enables software, computers, and devices to communicate with each other, particularly when controlling audio, lights, and other show devices. We use OSC commands to integrate Stage|Tracks with QLab. OSC commands will be represented in the timeline as a network icon.
The OSC command pop-up window includes the following info:
- Bar / Beat– the location in the Timeline where you want to add the OSC command.
- Microshift– a shifter that allows you to add an OSC command at a precise location (480 ticks in a 4/4 meter).
- Network– a drop-down menu to select the network patch where you want to send the OSC command.
- OSC Command– this is the field where you will type the OSC command.
- Example Commands– included are the volume automation OSC commands for easy reference.
OSC Commands are case-sensitive and must be written exactly as specified for the command to function.

For more information on how to use OSC, please check out the following sections:
5. Volume Automation Within Stage|Tracks
Open sound control (OSC) is a protocol used to send messages between various software and hardware applications, often for music, theater, and multimedia usage. It works by sending simple messages, like commands to start a sound or control a light. We use this messaging system to send commands from QLab to Stage|Tracks or other OSC-enabled devices, allowing you to control your show production.
If you want more information about how OSC works, check out these two amazing articles from ETC by Sam Smallman:
Before we use OSC commands for volume automation in Stage|Tracks, we need to check the network settings. All network connections are to be configured using the OSC manager in Stage|Tracks.
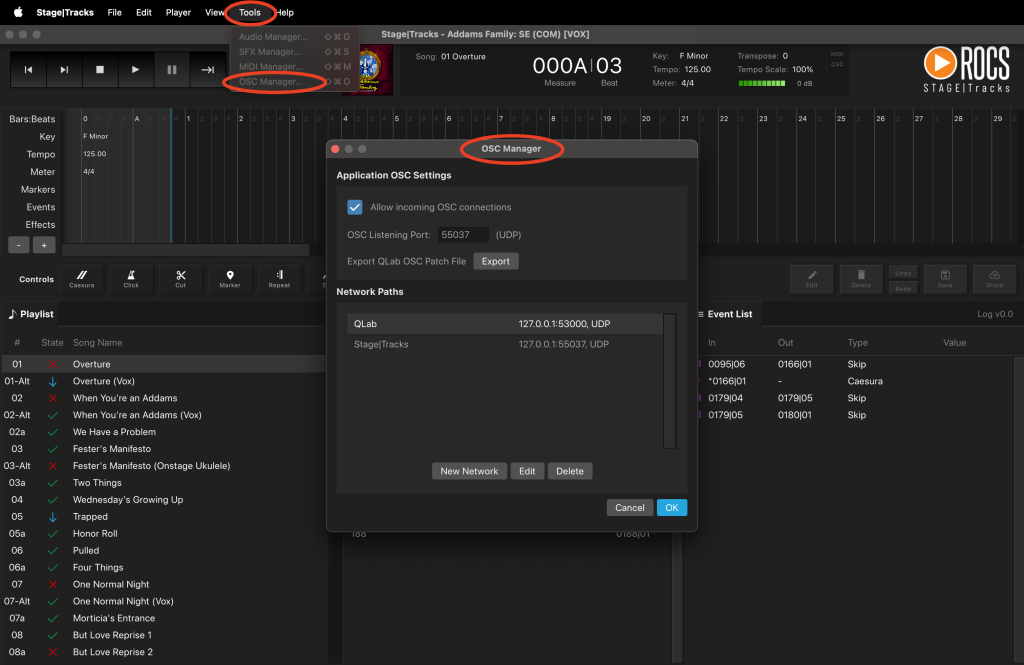
To find the OSC manager, do the following:
- Open Stage|Tracks.
- Go to Tools in the top menu.
- Click on OSC Manager in the drop-down menu.
- The OSC Manager will appear in a pop-up window.
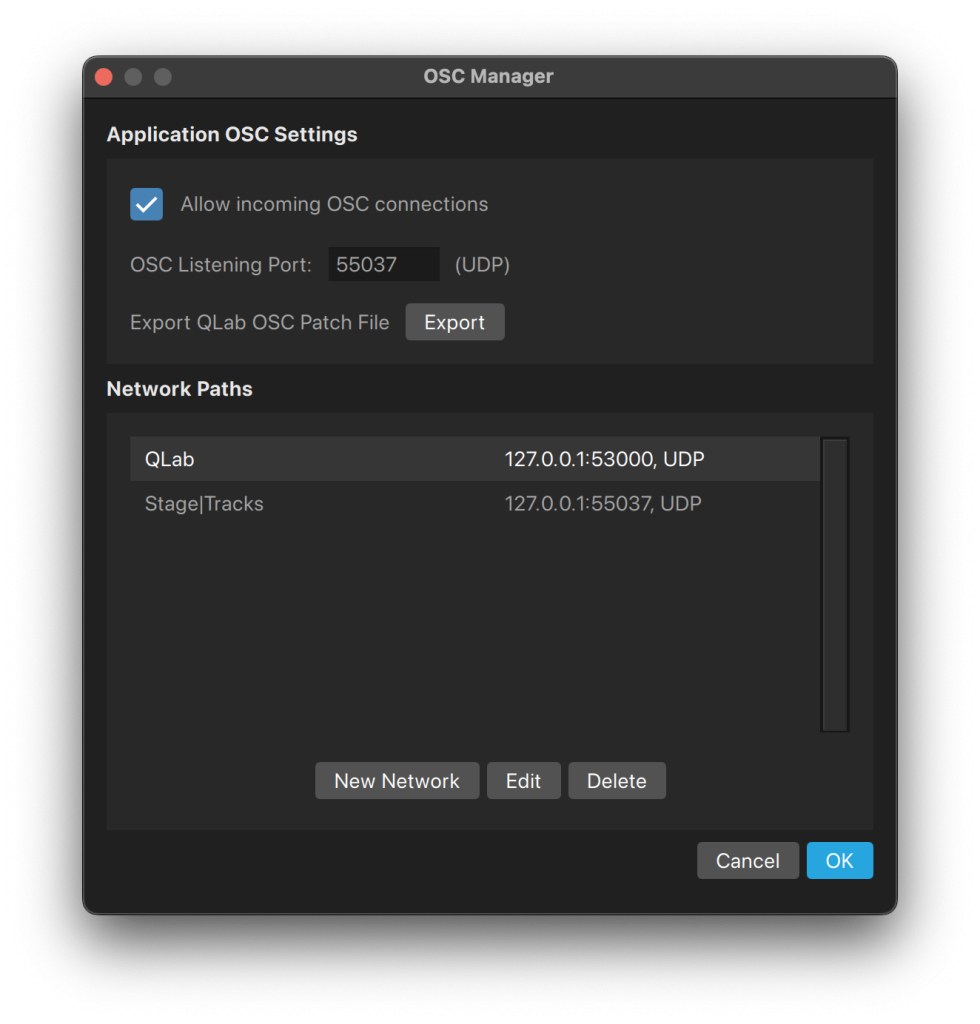
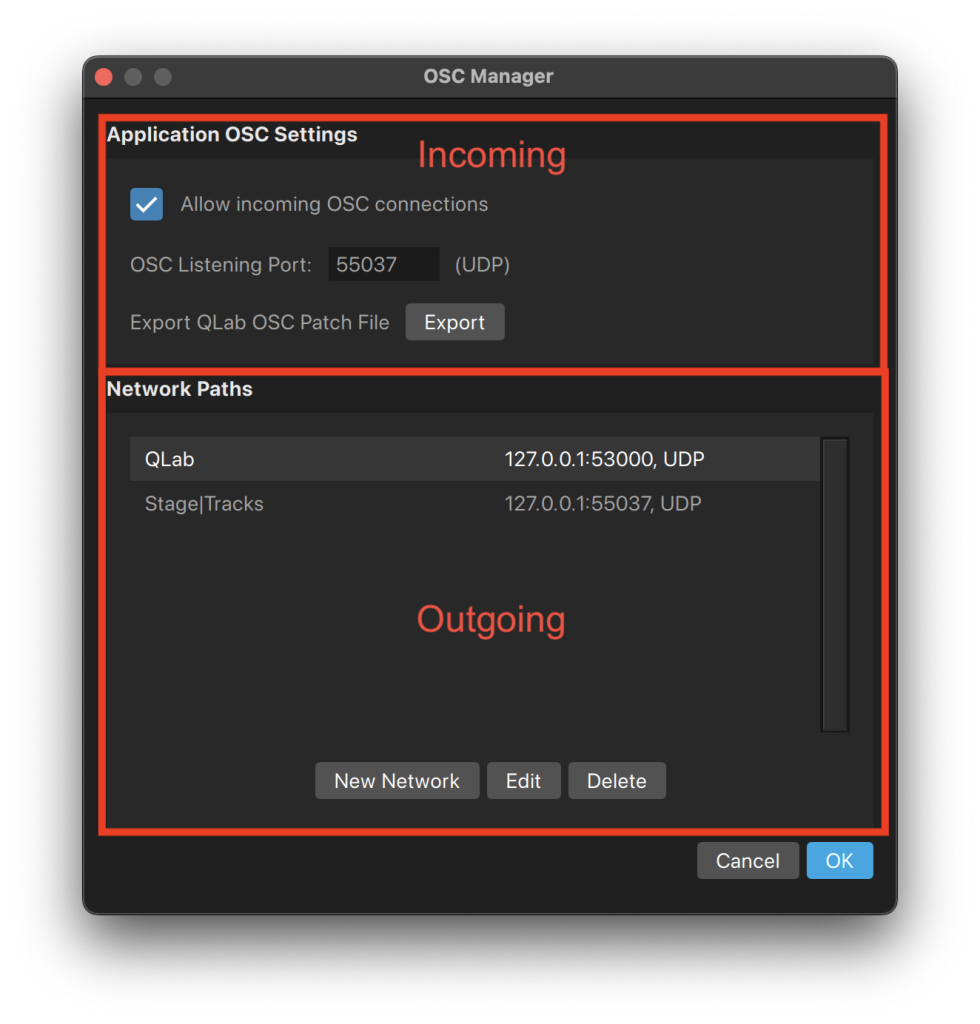
The OSC manager window for Stage|Tracks is separated into two sections:
- Application OSC Settings– refers to where the OSC commands from external devices are received by Stage|Tracks.
- Allow incoming OSC connections – allows other devices (such as QLab) to send OSC commands to Stage|Tracks.
- OSC Listening Port– determines which port Stage|Tracks will listen on to receive incoming commands.
- Network Paths– refers to where the OSC commands from the Stage|Tracks Timeline are sent.
- QLab– routes OSC commands to QLab.
- Stage|Tracks– routes OSC commands back into Stage|Tracks.
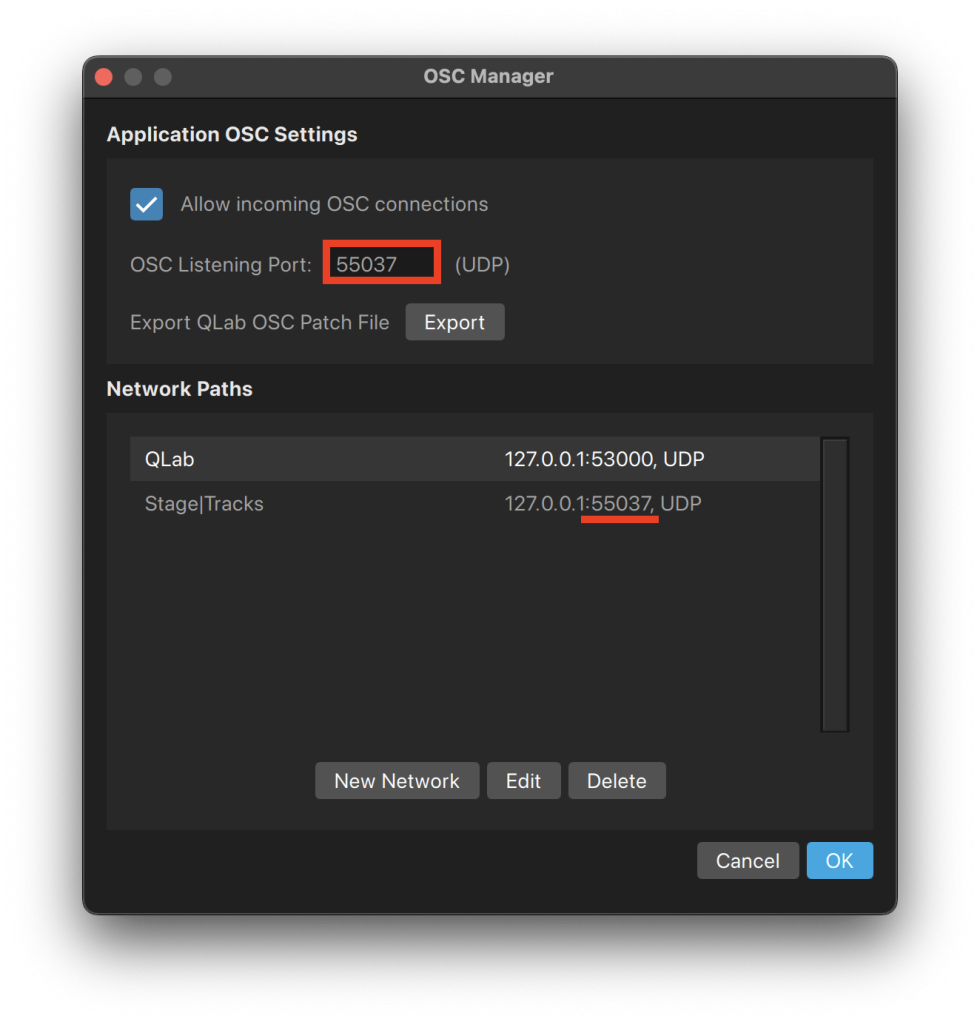
If you want to use volume automation within Stage|Tracks, first verify that your network settings are configured correctly in the OSC Manager.
To verify your network is configured correctly, do the following:
- Go to Tools in the menu bar.
- Click on OSC Manager in the drop-down menu.
- Verify Allow incoming OSC connections is checked.
- Verify that the OSC Listening Port matches Stage|Tracks (55037 by default) under Network Paths.
- If they don’t match, you will match the two numbers by doing one of the following options:
- 1. Type to change the OSC Listening Port to match the Stage|Tracks network path.
- 2. Select the Stage|Tracks network path and click Edit. Update the network path to match the OSC Listening Port.
- Click OK to close the pop-up window.
- Click the Share button in the Event Controls to save your changes.

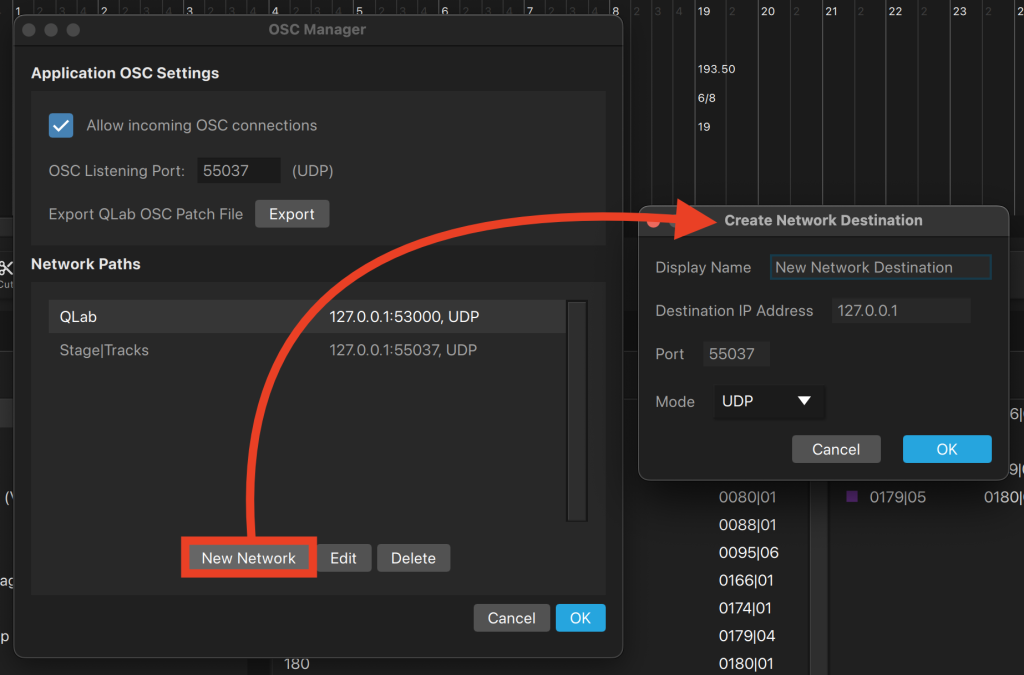
If you want Stage|Tracks to send OSC commands to QLab or another OSC-enabled device, you will need to add a new network path.
To add a new network path, do the following:
- Go to Tools in the menu bar.
- Click on OSC Manager in the drop-down menu.
- Click the New Network button and enter the following details:
- Display – name of the new network path
- Destination IP Address
- If QLab is on the same computer as Stage|Tracks, you can use the IP address: localhost OR 127.0.0.1.
- If QLab or any other OSC-enabled device is not on the same computer, enter that device’s IP Address.
- Port
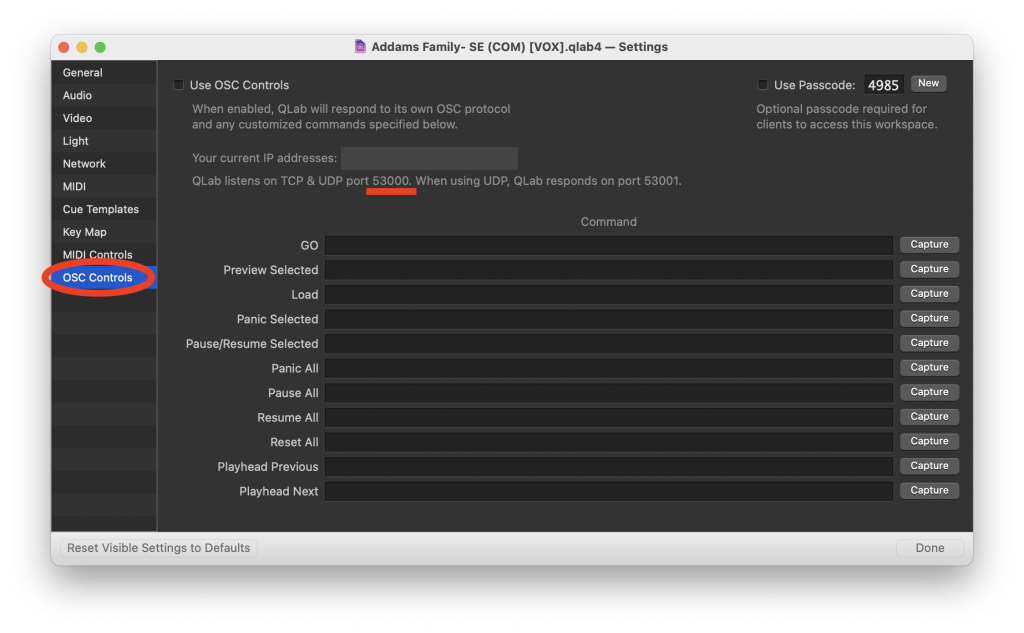
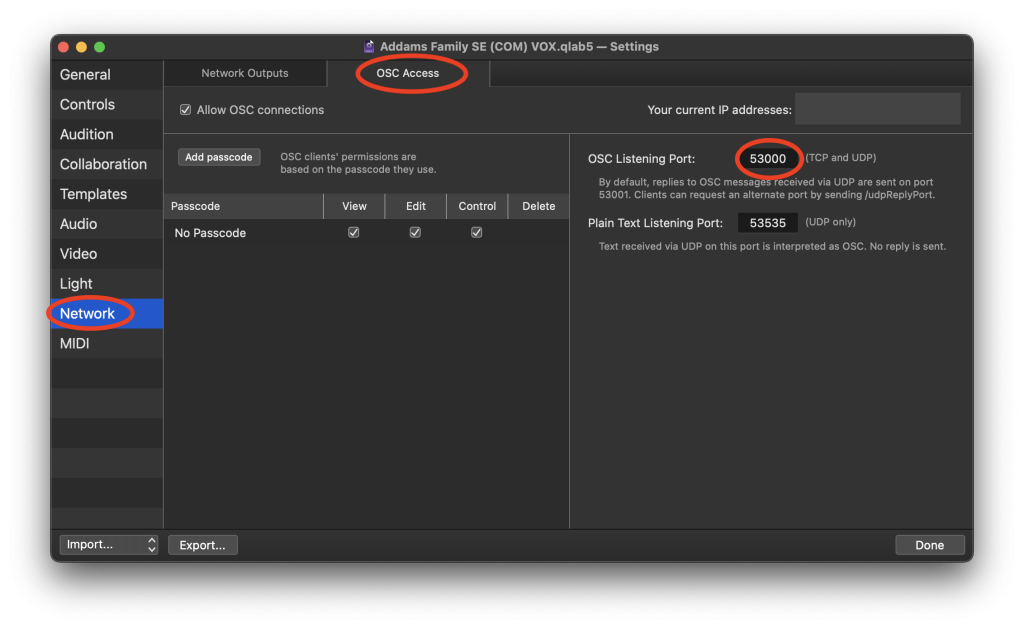
- QLab’s default OSC Listening Port is 53000
- To find in QLab 5: File > Workspace Settings > Network > OSC Access tab (53000 is the default but it can be manually changed)
- To find in QLab 4: File > Window > Workspace Settings > OSC Controls (cannot be changed)
- For any other OSC-enabled device, enter the port number of the destination device.
- QLab’s default OSC Listening Port is 53000
- Mode – UDP (only option)
- Click OK to close the pop-up window.
- Click the Share button in the Event Controls to save your changes.
QLab 4 Default Listening Ports
QLab 5 Default Listening Ports
Adding a New Network Path
Within Stage|Tracks, we use OSC commands to adjust the volume of the music. Below is a list of OSC commands you can use in Stage|Tracks. However, you will need to verify that your OSC Manager is correctly configured first.
| Action | OSC Command | Example |
|---|---|---|
| Set Volume | /rocs/volume (-#dB) | /rocs/volume -15 |
| Fade Out Cue & Move to Next Song | /rocs/fadeout (#time) | /rocs/fadeout 5.5 |
| Fade To (a different audio level)* | /rocs/fadeto (-#dB) (#time) | /rocs/fadeto -12 3 |
| -#dB Values | #time Values |
|---|---|
| 0 = full volume (default) -60 = minimum volume before mute | Seconds |
When using an OSC command, you will replace the (-#dB) and (#time) with only the specific numbers you want. The OSC commands are case-sensitive and must be lowercase to work.
Time is represented by time and is measured in seconds. You can do whole or decimel numbers.
Volume is represented by dB which stands for decibles. The dB value is the target volume level relative to the maximum level (0). In other words, playback will sound -#dB below the maximum level. It is an absolute volume level, not relative to the other volume levels. The playback volume is displayed by green gradient segments in the Song Info display.
Full Volume = 0dB

Adjusted Volume = -1 dB to -60 dB

For example, if you want to immediately change the volume from full volume (0 dB) to -15 dB, the OSC command would look like this:
- /rocs/volume -15
For example, if you want to fade out to the current song in 5.5 seconds and move to the next song, the OSC command would look like this:
- Example: /rocs/fadeout 5.5
If you want to gradually fade the volume level within a song, such as change the volume from the current volume level to -10 dB over 3 seconds, the OSC command would look like this:
- Example: /rocs/fadeto -10 3
NOTE: It is an absolute volume level, not relative to the other volume levels.
If you want to change the volume, you will use the OSC command: Volume. This means that up until that specific point, the volume will be the default of 0 dB (full volume). With the OSC command, you have the ability to turn down the volume in Stage|Tracks. Once the OSC command is sent, the volume will change immediately to the new volume level at that point on the timeline. This will immediately set the volume to an absolute value below 0 dB.
If you want the entire song volume adjusted, you will place the Volume OSC command at the beginning of the song. Be aware that the volume resets to full volume (0 dB) for each song. If you don’t want the volume to change suddenly, use the OSC Command for Fade To instead for a more gradual transition.
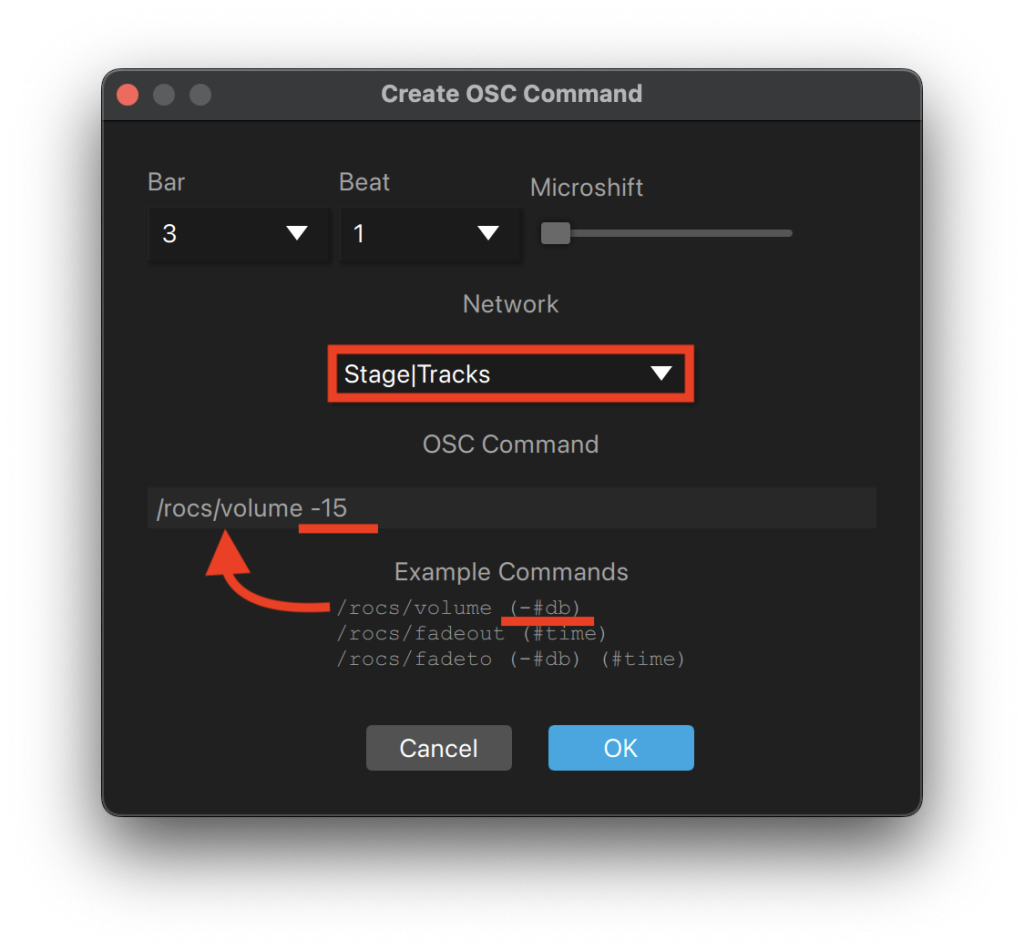
To adjust the volume using an OSC command, you will do the following:
- Set up your network using the OSC Manager.
- Go to the Timeline and select the bar and beat where you want the adjustment to happen.
- Click on the OSC button in the Event Controls.
- Verify the In Bar and In Beat are correct.
- (Optional) Move the Microshift to the exact place desired.
- For Network you will select Stage|Tracks.
- Copy and paste this OSC command:
- /rocs/volume (-#dB)
- Replace the -#dB with the correct dB volume level you want between full volume 0 dB to -60 db.
- Example: /rocs/volume -15
- Click OK to save changes.
- The OSC event will be represented in the timeline as a network icon.
- You will see the volume adjustment (green gradient) in the Song Info display when you play the music.
Using OSC to Set Volume
NOTE: At this time, you can’t turn the volume louder than full volume (0 dB). You can only turn the volume down in Stage|Tracks.
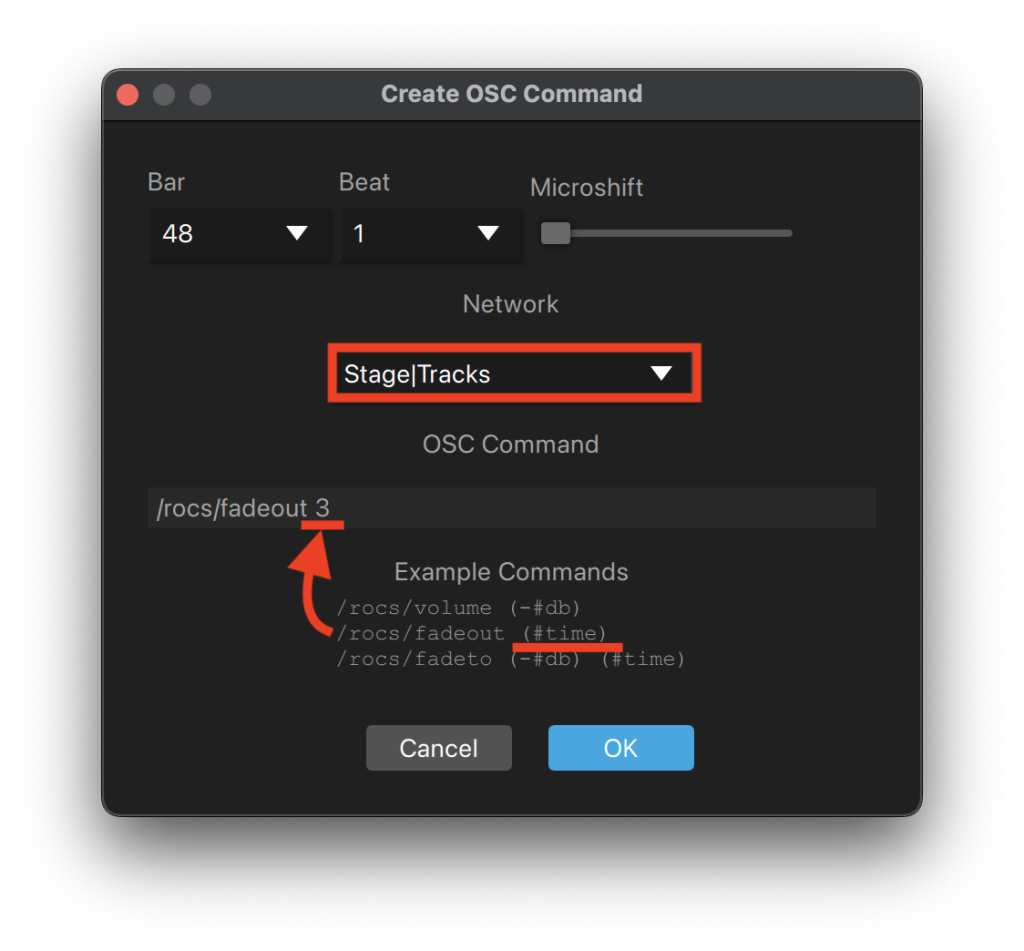
To fade out the volume using an OSC command, you will do the following:
If you want to predetermine the fade-out location of a song and move to the next song, you will use the OSC command: FadeOut. Once the OSC command is sent, the volume will gradually fade out until it is muted (- dB), and playback will stop and load the next song. This is most often used to end scene change music. Alternatively, a spontaneous fade-out can be triggered using the Fade Out Button in the Transport.
- Set up your network using the OSC Manager.
- Go to the Timeline and select the bar and beat where you want the fade to begin.
- Click on the OSC button in the Event Controls.
- Verify the In Bar and In Beat are correct.
- (Optional) Move the Microshift to the exact place you desire.
- For Network you will select Stage|Tracks.
- Copy and paste this OSC command:
- /rocs/fadeout (#time)
- Replace the (#time) with the duration of your desired fade (seconds).
- Example: /rocs/fadeout 3
- Click OK to save changes.
- The OSC event will be represented in the timeline as a network icon.
- You will see the volume adjustment (green gradient) in the Song Info display when you play the music.
Using OSC to Fade Out
If you want to gradually change from one volume level to another in a song, you will use the OSC command: FadeTo. This means that up until that specific point, the volume will be the default of 0 dB (unless you have previously adjusted it using the OSC Command: Set Volume). Once the FadeTo OSC command is sent, the volume will change gradually to the new volume level over the specified time. If you want the volume to change immediately, use the OSC Command: Set Volume instead for an immediate change.
Here is an example of how the OSC command: fadeto works:
- Default volume level: 0 dB (full volume)
- You send an OSC command to set the volume to -6 dB:
- /rocs/volume -6
- You want to fade up from -6 to -4 dB over 3 seconds so you send another OSC command:
- /rocs/fadeto -4 3
- This will cause the volume to fade up from -6 dB to -4 dB over 3 seconds, NOT down to -10 dB.
- New volume level: –4 dB
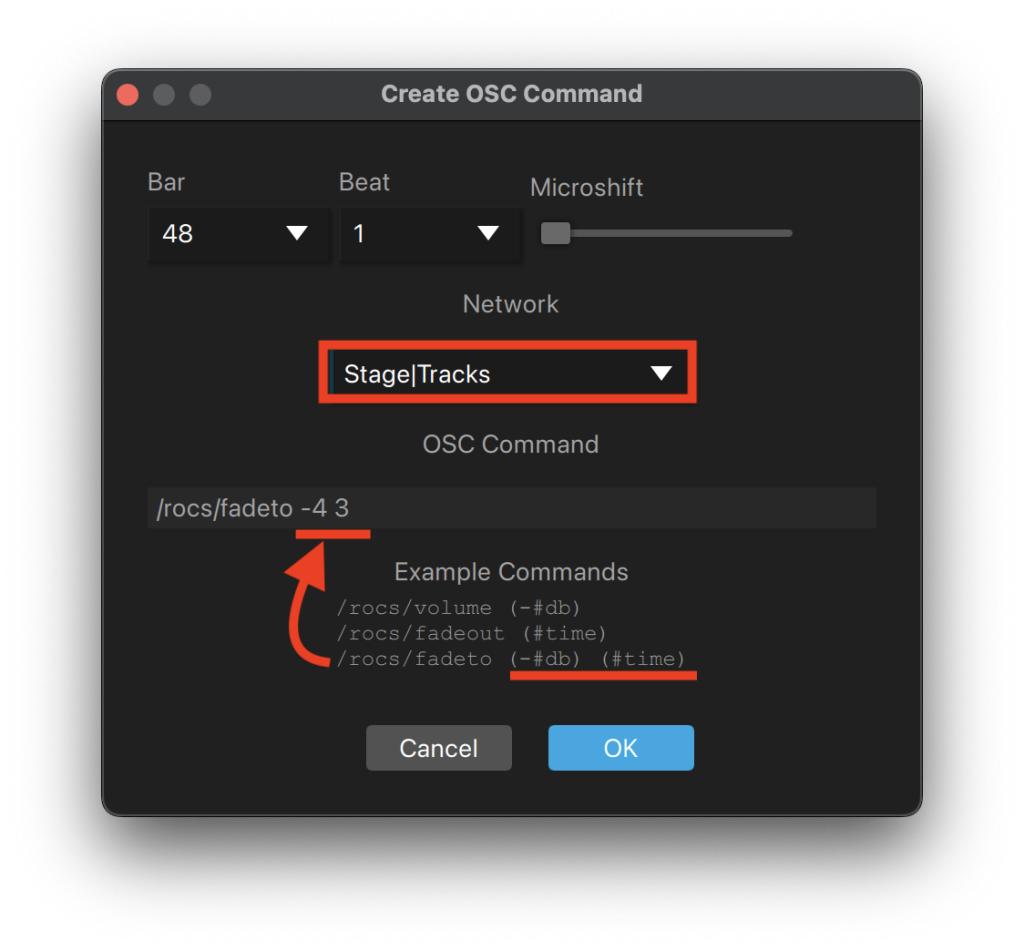
To fade to a specific volume using an OSC command, you will do the following:
- Set up your network using the OSC Manager.
- Go to the Timeline and select the bar where you want the adjustment to happen.
- Click on the OSC button in the Event Controls.
- Verify the In Bar and In Beat are correct.
- (Optional) Move the Microshift to the exact place you desire.
- For Network you will select Stage|Tracks.
- Copy and paste this OSC command:
- /rocs/fadeto (-#dB) (#time)
- Replace the (-#dB) with the correct dB volume level you want between 0 dB (full volume) to -60 db. Replace the (#time) with a number representing seconds.
- Example: /rocs/fadeto -4 3
- Click OK to save changes.
- The OSC will be represented in the timeline as a network icon.
- You will see the volume adjustment (green gradient) in the Song Info display when you play the music.
Using OSC to Fade To
NOTE: At this time, you can’t turn the volume louder than 0 dB (full volume). You can only turn down the volume in Stage|Tracks.
Using OSC to Connect to Other OSC-Enabled Devices
We want to briefly touch on how Stage|Tracks can use OSC to control QLab and other OSC-enabled devices. Cues can be automatically fired in QLab using real-time minutes and seconds (wait commands). However, if you want to fire cues synchronized to bars and beats in Stage|Tracks, you can use OSC commands placed in the Stage|Tracks timeline. This will cause any cues programmed to bars and beats to fire accurately even after tempo changes, cuts, vamps, skips, repeats, or any other edits! That cue will always fire at that moment in the music, without recalculating any wait times.
Common use cases for this OSC feature would include, but are not limited to, the following:
- Adding sound effects
- Sweetener vocals
- Lighting cues
- Muting and unmuting mic groups or other sound console cues
- Adding pre-recorded offstage lines/dialogue
If you have other OSC-enabled devices (sound board, light console, etc.) you can send OSC commands over your network to control these devices. To set up your network path, do the following:
- Open the OSC Manager.
- Set up a network path containing that device’s IP address and port number.
- Refer to the device’s documentation for its OSC library for commands.
- For example: QLab OSC Dictionary
Once your network path is set up, you can send an OSC command from Stage|Tracks to the OSC-enabled device. To send an OSC command, do the following:
- Select a location on the Timeline in Stage|Tracks when you want an OSC command to fire.
- Click on the OSC button in the event controls.
- Select the network dropdown for the correct OSC-enabled device.
- Type in your OSC command based on the device’s documentation.
- QLab example: /cue/sfx02/go
OSC from Stage|Tracks to QLab
Frequently Asked Questions (FAQ)
Why did my Stage|Tracks crash when I plugged in a new audio output?
Stage|Tracks doesn’t support Bluetooth speakers because Bluetooth introduces significant latency, making audio playback unreliable and out of sync. This is especially problematic in professional theatre settings. Additionally, Bluetooth connections can be unstable, risking dropouts or connection loss during cues. For more information on changing the audio output without crashing Stage|Tracks, check out this section: Selecting Audio Output.
Does Stage|Tracks work with MIDI?
ROCS Applications include a MIDI Manager that allows you to configure control signals from a MIDI source—such as QLab or a connected MIDI keyboard—to operate the application. MIDI commands can trigger various actions, including play, stop, and pause. To get started, you’ll need to set up a virtual MIDI port that QLab uses to send messages to Stage|Tracks.
To get started on a Mac, do the following:
1. Configure a Virtual MIDI Port.
- Close Stage|Tracks before setting up the virtual port.
- Open the Audio MIDI Setup application.
- From the top menu, click “Window” and select “Show MIDI Studio.”
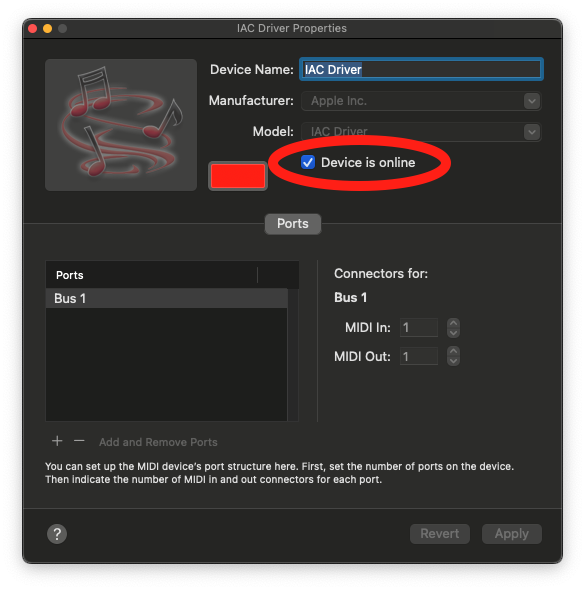
- In the pop-up window, double-click the red IAC Driver to open.
- In the pop-up window, make sure the checkbox for “Device is online” is checked.
2. Send QLab MIDI Commands to the Virtual MIDI port.
- Open QLab (must be a paid license).
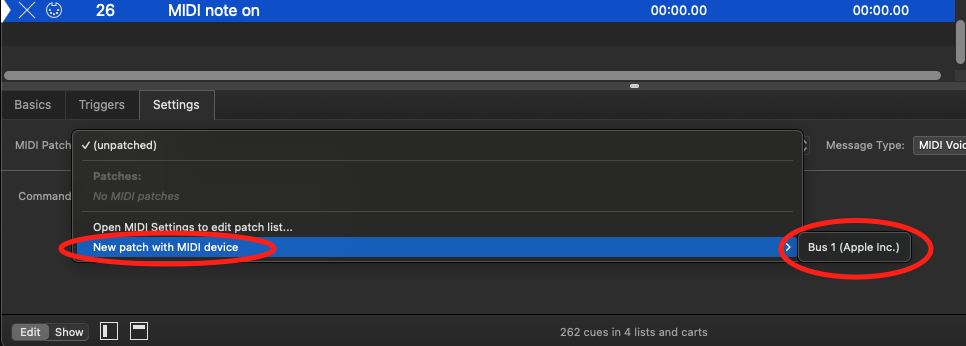
- Add a MIDI cue in the cue list.
- In the Settings tab, next to MIDI Patch, click the drop-down menu and select “New patch with MIDI device” > “Bus 1 (Apple Inc).”
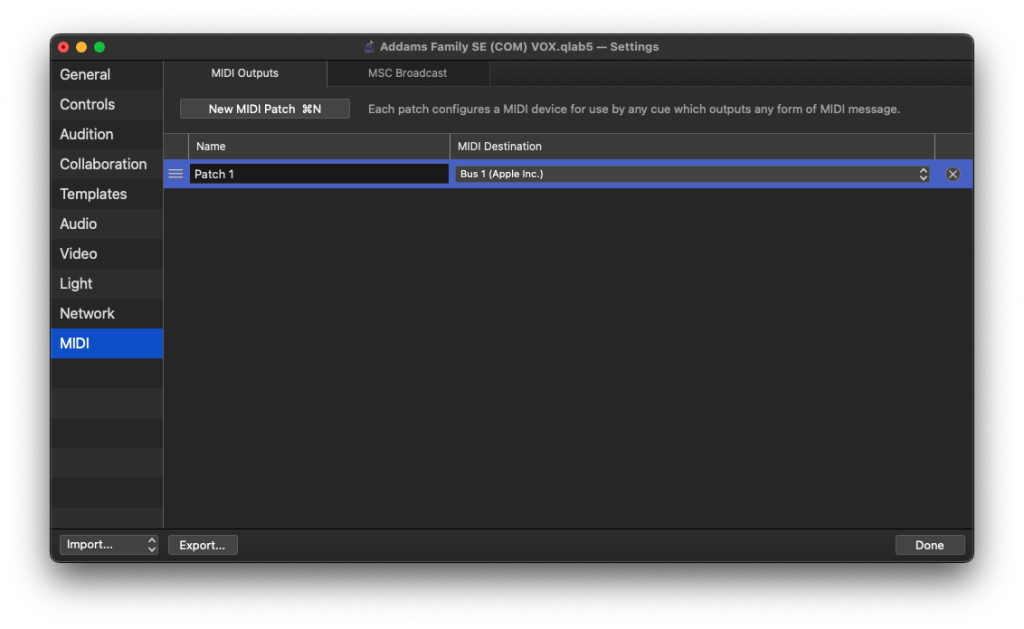
- In the pop-up window, click “Done” to save the patch.
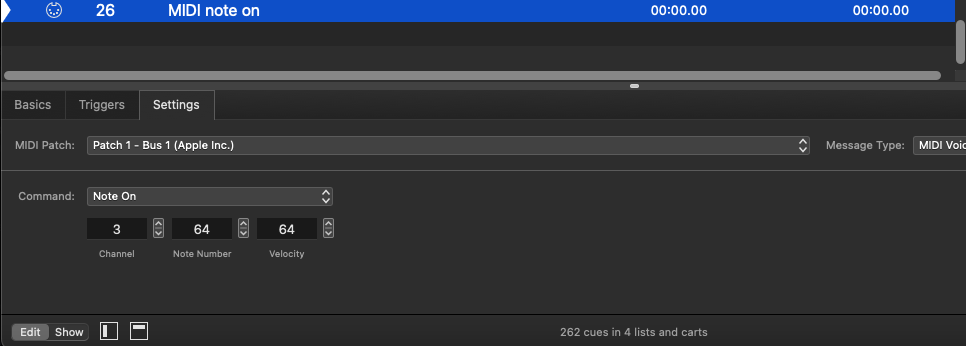
- Change the commands to the following:
- Channel: 3
- Note Number: 64
- Velocity: 64
- Save your QLab workspace.
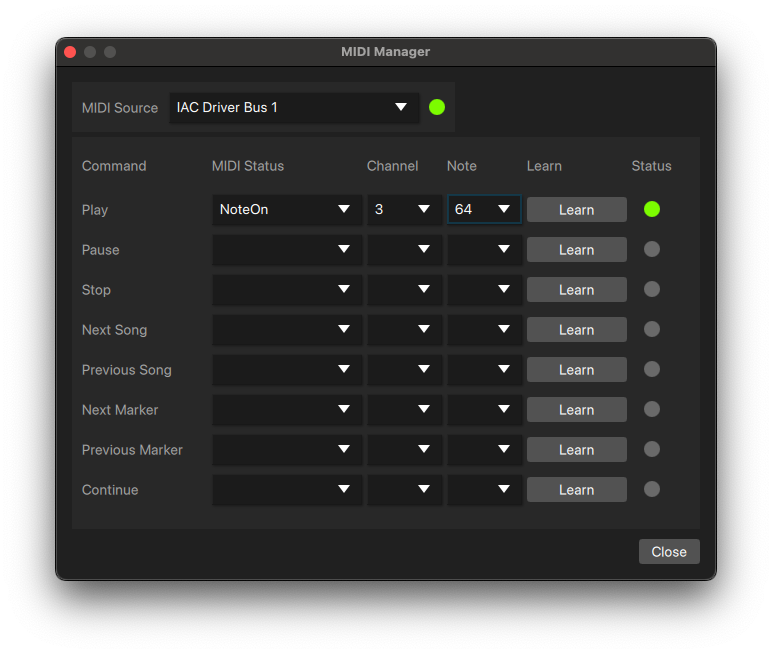
3. Configure Stage|Tracks to listen to the Virtual MIDI port.
- Open Stage|Tracks.
- From the top menu, click “Tools” and select “MIDI Manager.”
- If it is not already selected, in the drop-down menu, select “MIDI Source “IAC Driver Bus 1” from the drop down menu “IAC Driver Bus 1.”
- Next to Play, update the following:
- MIDI Status: NoteOn
- Channel: 3
- Note: 64
- Open QLab and press “GO” to test that it worked.
- Rinse and repeat for all other MIDI cues in QLab. Be sure to never use the same channel and port number for the same command.
How do you manage double casts?
If you have two different casts, you can manage it by doing the following:
- Make all general edits cast A (vamps, cuts, tempo, transposition, etc.) and note the event log number.
- Make all general edits cast B (vamps, cuts, tempo, transposition, etc.) and note the event log number.
- Load the corresponding event log for cast A or B when necessary.
The key is to remember that whenever you make cast-specific edits, you need to track the log for that cast. It’s best to make all cast-specific edits at once to avoid complications when switching between casts.
To switch between logs, check out this section: Reverting to Previous Event Log.