Currently only available for Harry Potter and the Cursed Child: High School Edition.
Introducing ROCS|Cue
ROCS|Cue is a simple and free tool that allows you to cue music, SFX, and OSC commands for your show production. It doesn’t have all of the functionality of QLab, but it’s a good choice if your options are limited. It is available for Mac & PC.
Before diving into this user manual, we recommend that you read this page first:
Menu
ROCS|Cue Setup
ROCS|Cue Implementation Checklist
You have selected Option 2 for Harry Potter and the Cursed Child: High School Edition. This meant that you would be using ROCS|Cue without QLab integration.
To access your corresponding Implementation Checklist and downloads, check your licensing email to get the link.
ROCS|Cue is a simple tool created to play your show for rehearsals and performances. As we continue to develop and enhance its features, you may encounter some limitations or bugs. We highly value your feedback and encourage you to submit any feature requests or report any issues. You can submit your requests here:
Regular updates with new features and bug fixes will be rolled out in the future. For more info, visit our support page:
Also, whenever a newer version of the ROCS|Cue software is available, we will email you so you can get all the latest features!
1. Managing Your ROCS|Cue License
Getting Your Authorization Code
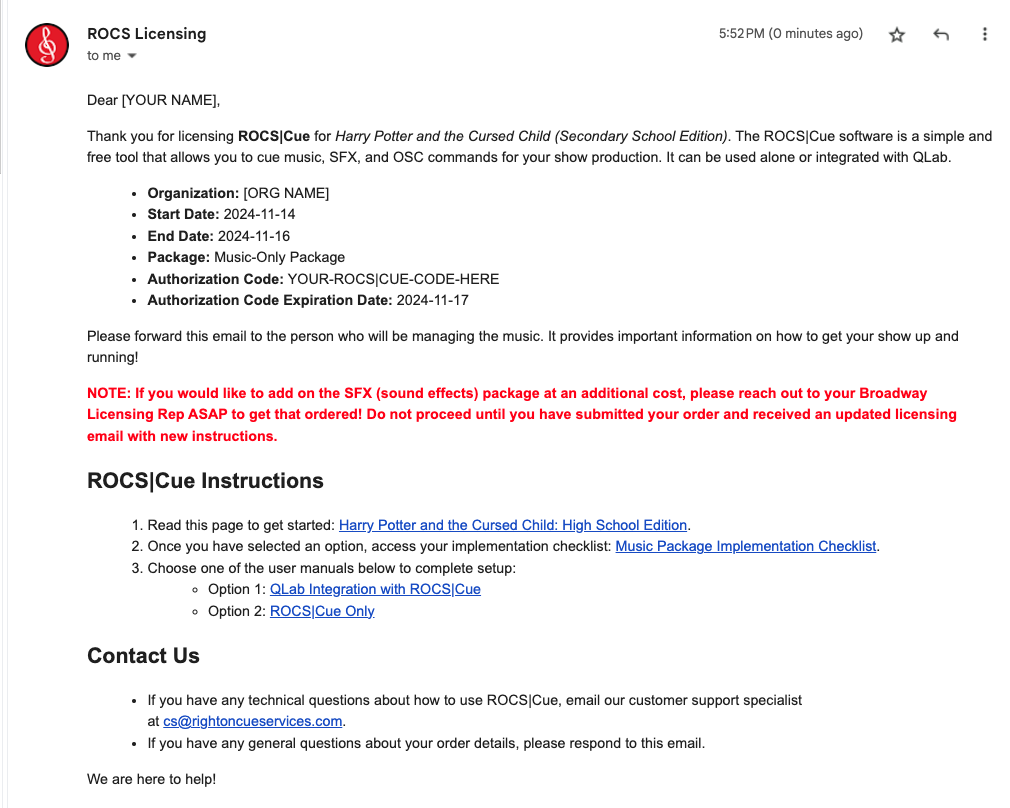
After licensing the show, Right on Cue Services (ROCS) will process your order, and you will receive the following email from licensing@rightoncueservices.com with your authorization codes.
Licensing Email
Once you have the codes, we recommend that you send your code to your ROCS|Cue operator. They will input this code into the ROCS|Cue software to gain access to the software. They need to make sure to download and install the music-only package or SFX & music package first, before launching the software!
To get your authorization code, check your licensing email.
An authorization code might be confusing, so let’s explain how it works:
- License
- Your organization is granted one license per show. You obtain this license through the licensing company that represents the rights to the show you want to perform.
- This license grants your organization permission to perform a live production of the show.
- Authorization Code
- This code grants access to ROCS|Cue.
- Directors should share this code with their ROCS|Cue operator.
- Anyone with this code can play the audio unlimited times during your contract period (see the start and end date on your licensing email).
Before you open ROCS|Cue, you need to download and install the audio package first. Your access depends on which package you licensed from the licensing company. Your director would have selected one of the following options:
- Music-only package
- Music & SFX package*
To download your audio package, check your licensing email to get the link.
NOTE: If you would like to add on the SFX package at additional cost, please reach out to your licensing rep ASAP and get that ordered! Do not proceed until you have submitted your order and received an updated licensing email. Once you have access, you will need to repeat most of the steps in your implementation checklist to get started.
We always recommend downloading the most recent version of ROCS|Cue. To download the software for MacOS or Windows (desktop or laptop):
- Go to our Downloads page for the most up-to-date software.

After you download the ROCS|Cue file, do the following:
- Drag and drop the application from the left-hand side into the Applications folder.
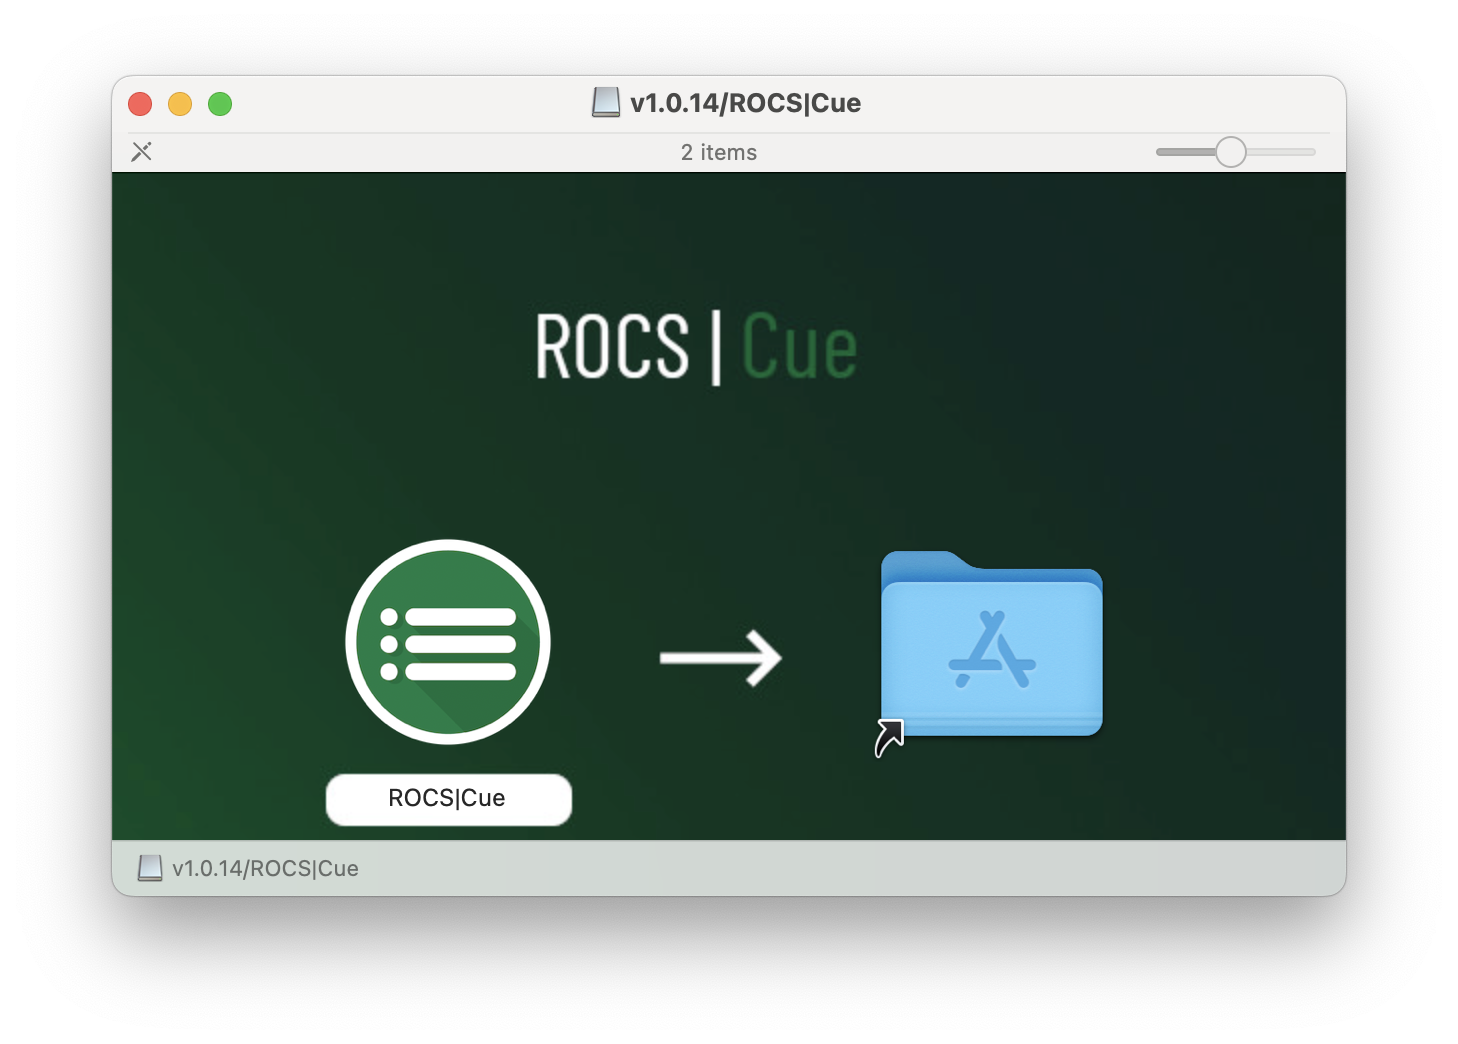
- Double-click it to install.
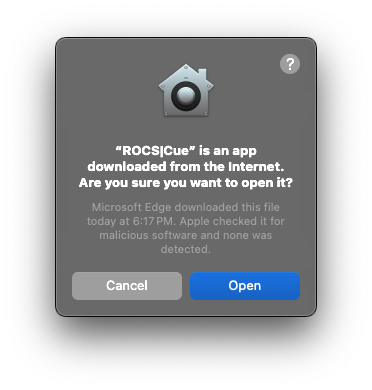
- A pop-up window will ask if you want to open this application.
- Click Open to proceed.
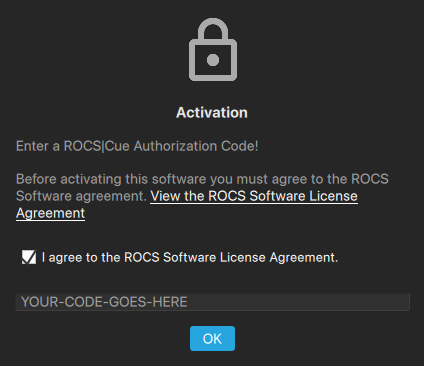
The first time you launch ROCS|Cue on Mac or Windows, an activation pop-up window will appear asking you to agree to the Right on Cue Services (ROCS) software license agreement and input your authorization code.
- Click View the ROCS Software License Agreement to review it.
- Select the checkbox next to I agree to accept the terms and conditions.
- Paste your authorization codes.
- Click OK to activate your show.
Using Your Authorization Codes
Your show will be immediately active and available. Access to your show will expire on the End Date listed in your Licensing Email.
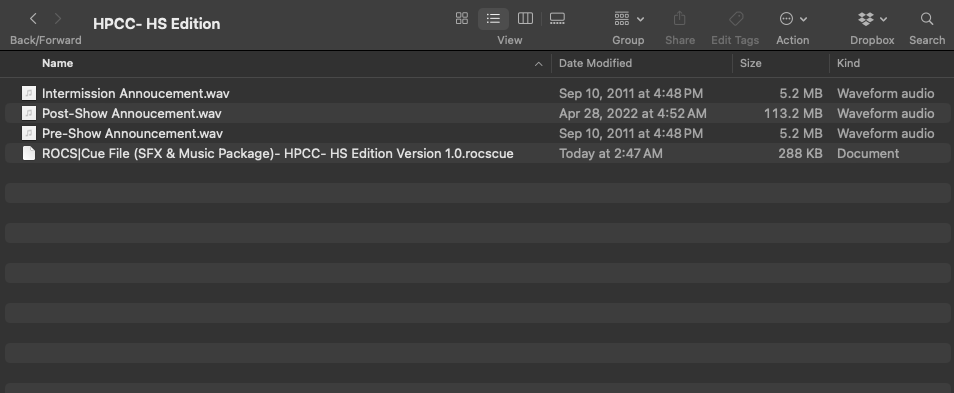
Now that you have downloaded your audio package and the ROCS|Cue software, you will also need to download your ROCS|Cue show file (.rocscue). This file provides all the necessary show programming for ROCS|Cue to work.
It is recommended that you create a folder on your desktop, or document folder, and place the .rocscue file in it, so you have a place to hold any of your custom audio files later.
To download your ROCS|Cue file, check your licensing email to get the link.
Once you have downloaded your ROCS|Cue file, you will need to open the software to load your show.
To load your file, you will do the following:
- Go to File.
- Click on Open in the drop-down menu.
- In the pop-up window, navigate to where the ROCS|Cue file is located.
- Click on the ROCS|Cue file name.
- Click Open.
If you launched ROCS|Cue and received any of the following error codes, here is what they mean:
- Authorization Update Failed- Invalid encoded string format
- Your code is incorrect. If you copied and pasted in, it might have added an extra space at the end. Make sure to remove the space at the end and try again.
- Authorization Update Failed- Invalid Code. Error 01.
- You are missing your code. Make sure to agree to the ROCS Software License Agreement and paste in your authorization code before proceeding.
- Failed Activation- SFX Read error MNFST.01. Are you sure you installed an SFX Package for your show?
- Your audio package may be incorrect. Make sure to download the audio correct package for your desktop (Mac = pkg, Windows = exe).
- If you verified that you have the correct audio package, make sure that you are logged in as an admin.
- An error occurred opening the file: The file has a parse error: 3 invalid value.
- You haven’t opened the correct file. Instead, open the ROCS file (.rocscue) to load it into the software.
2. Navigating ROCS|Cue
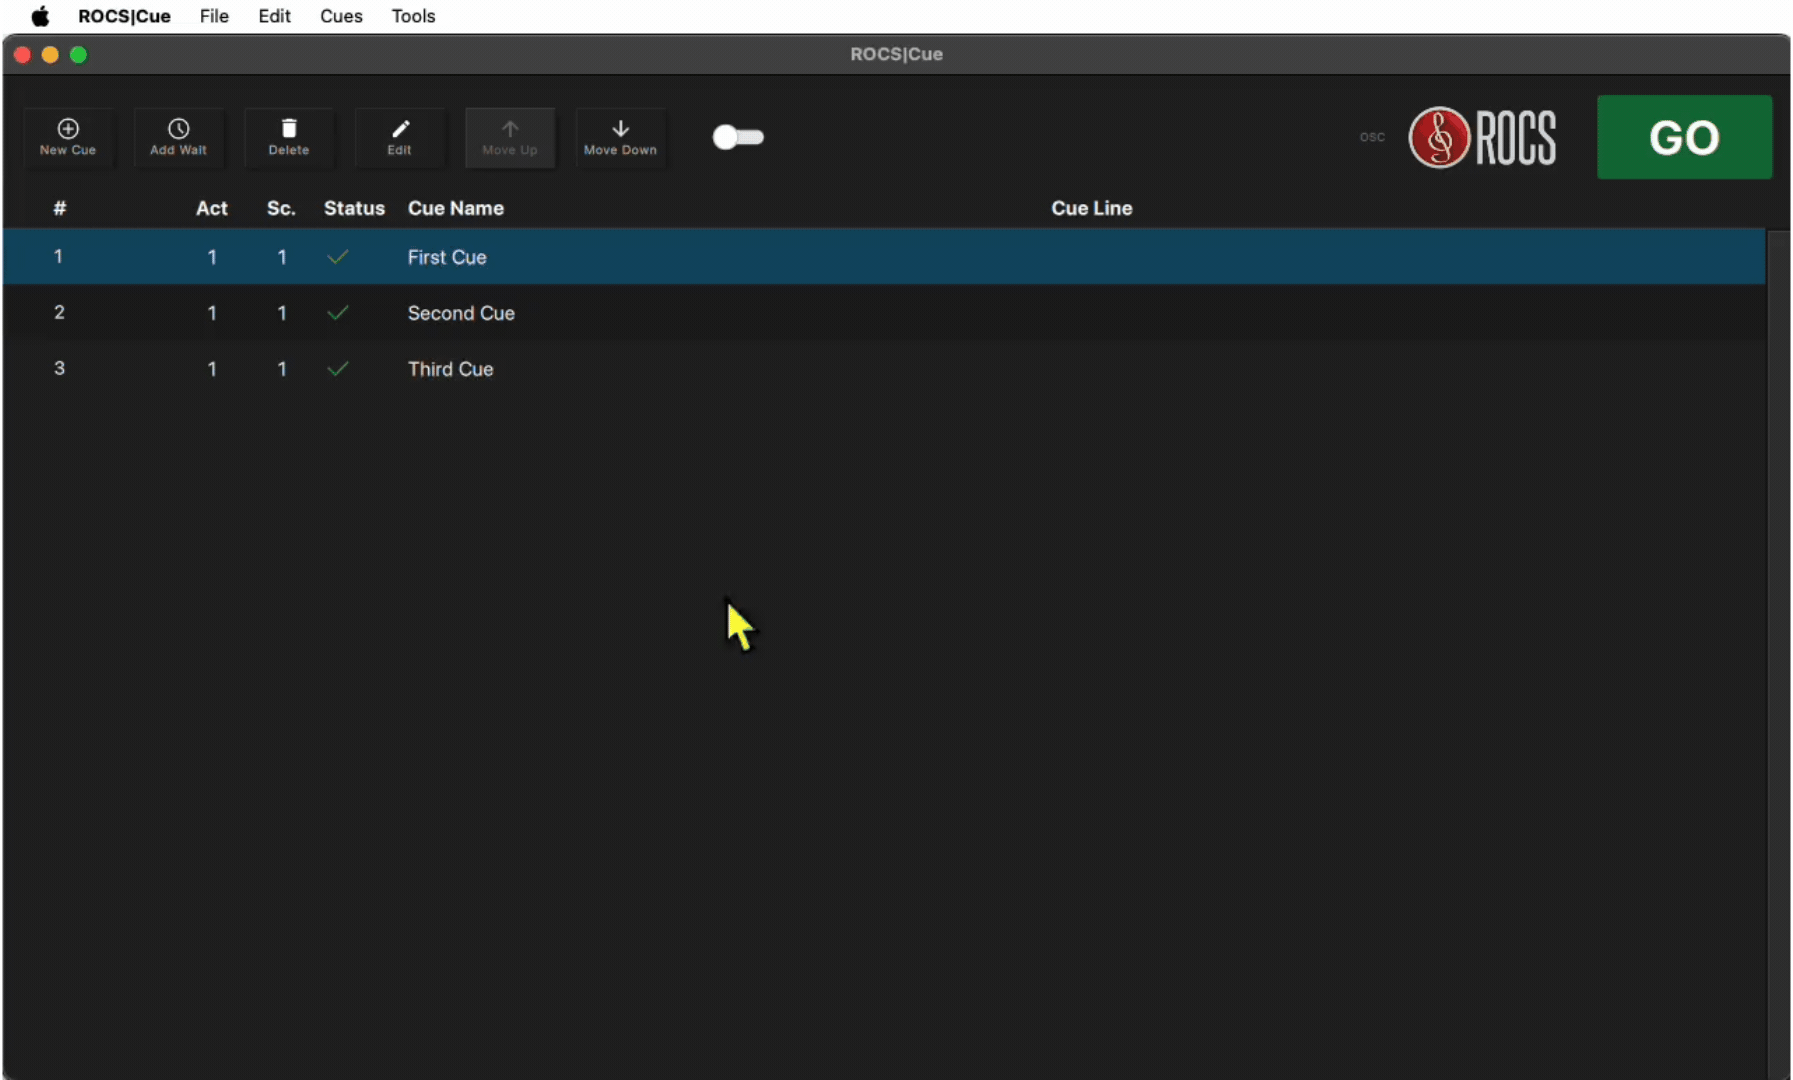
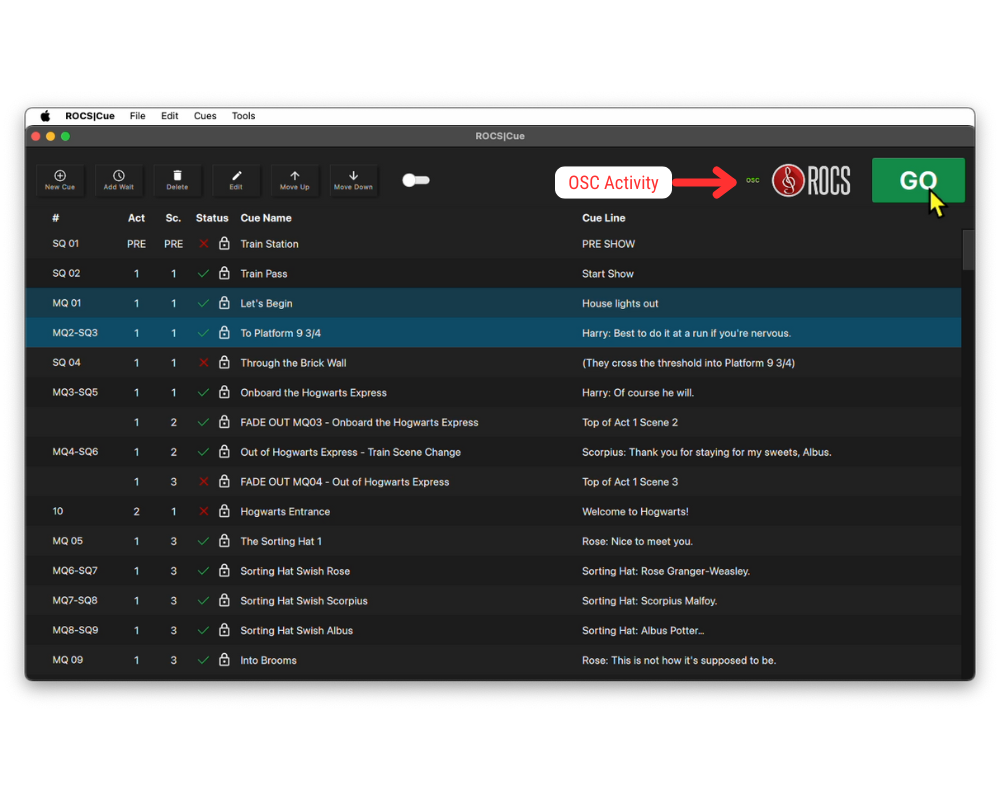
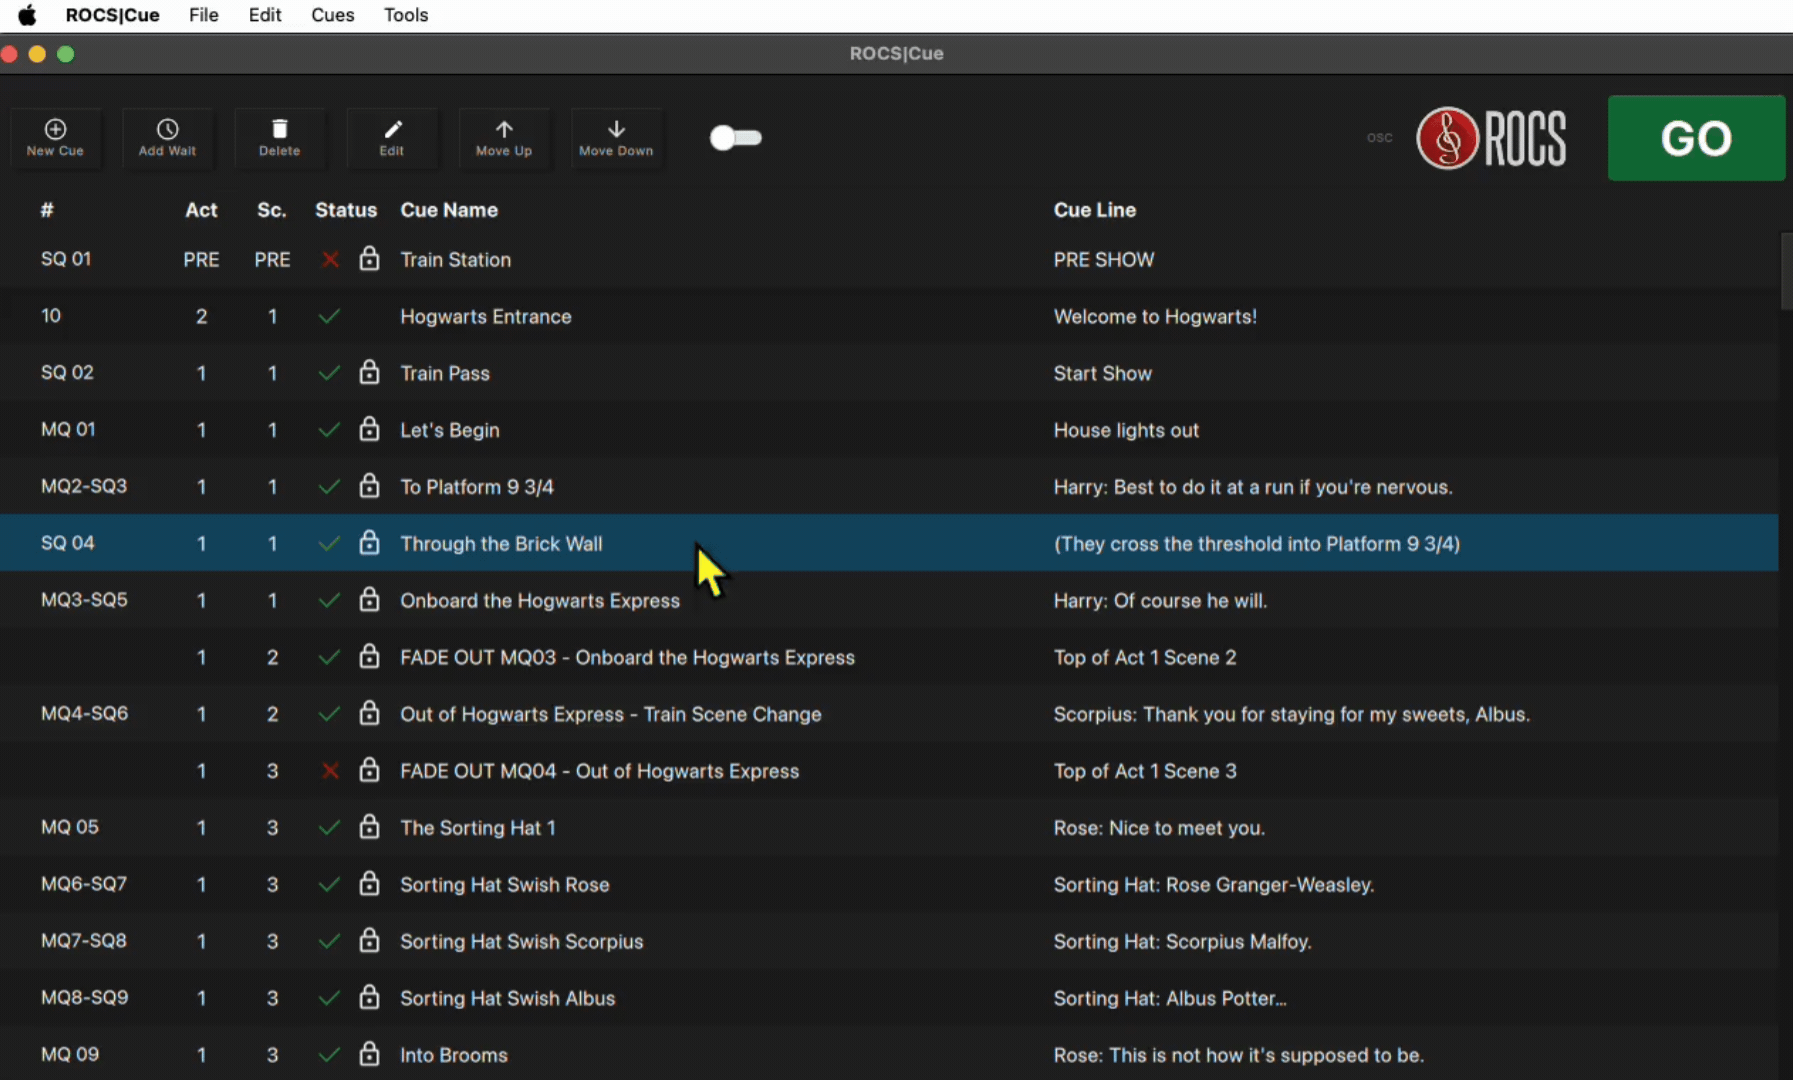
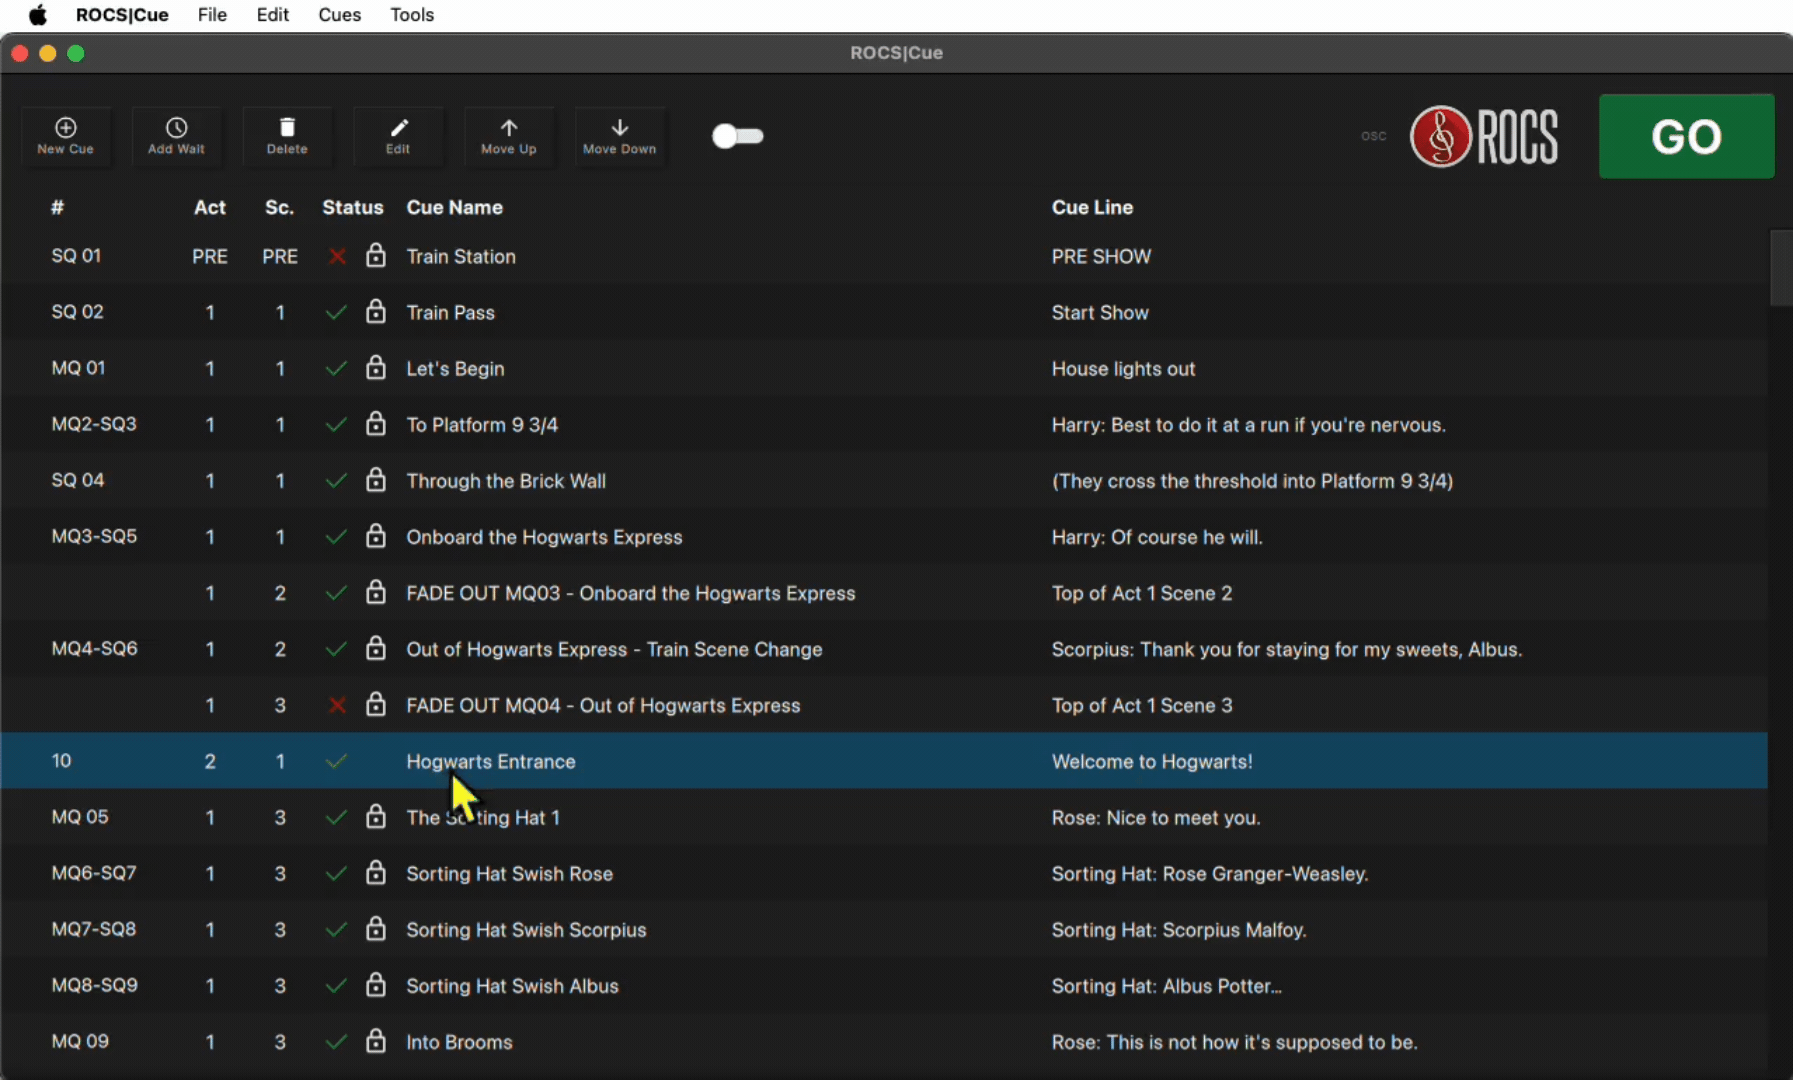
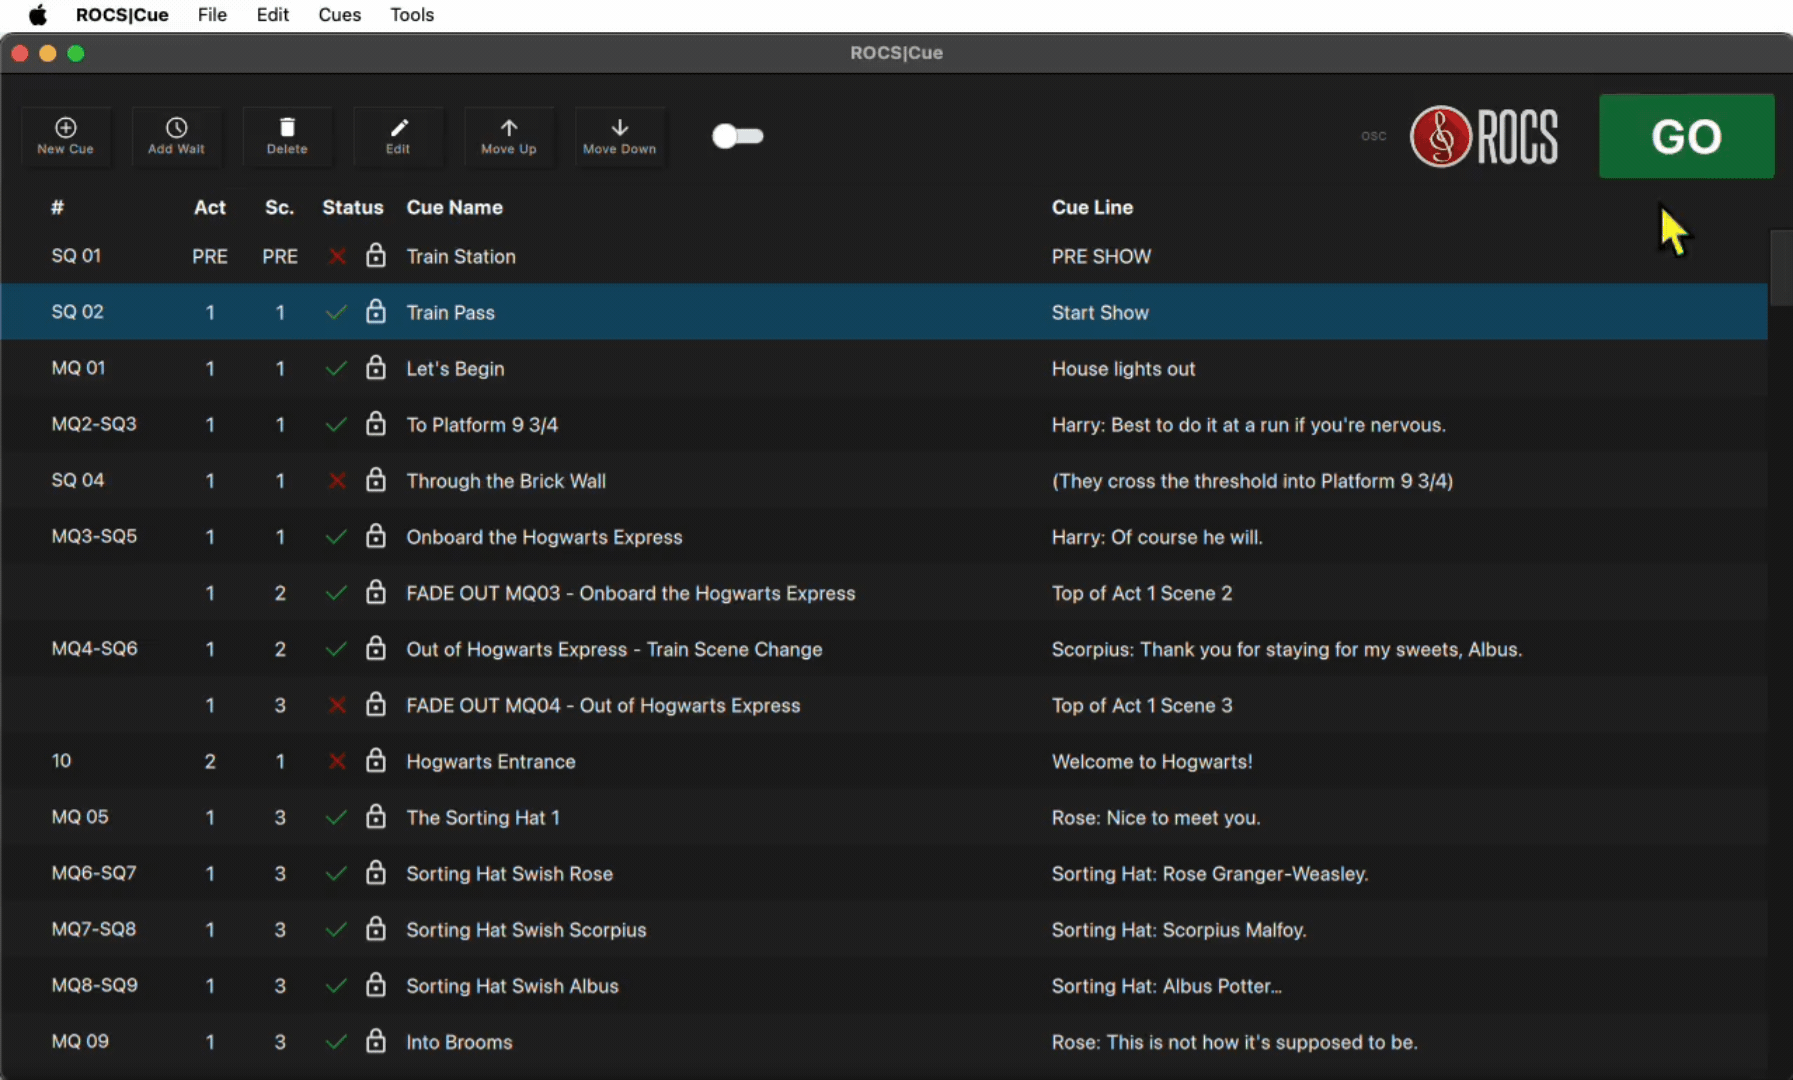
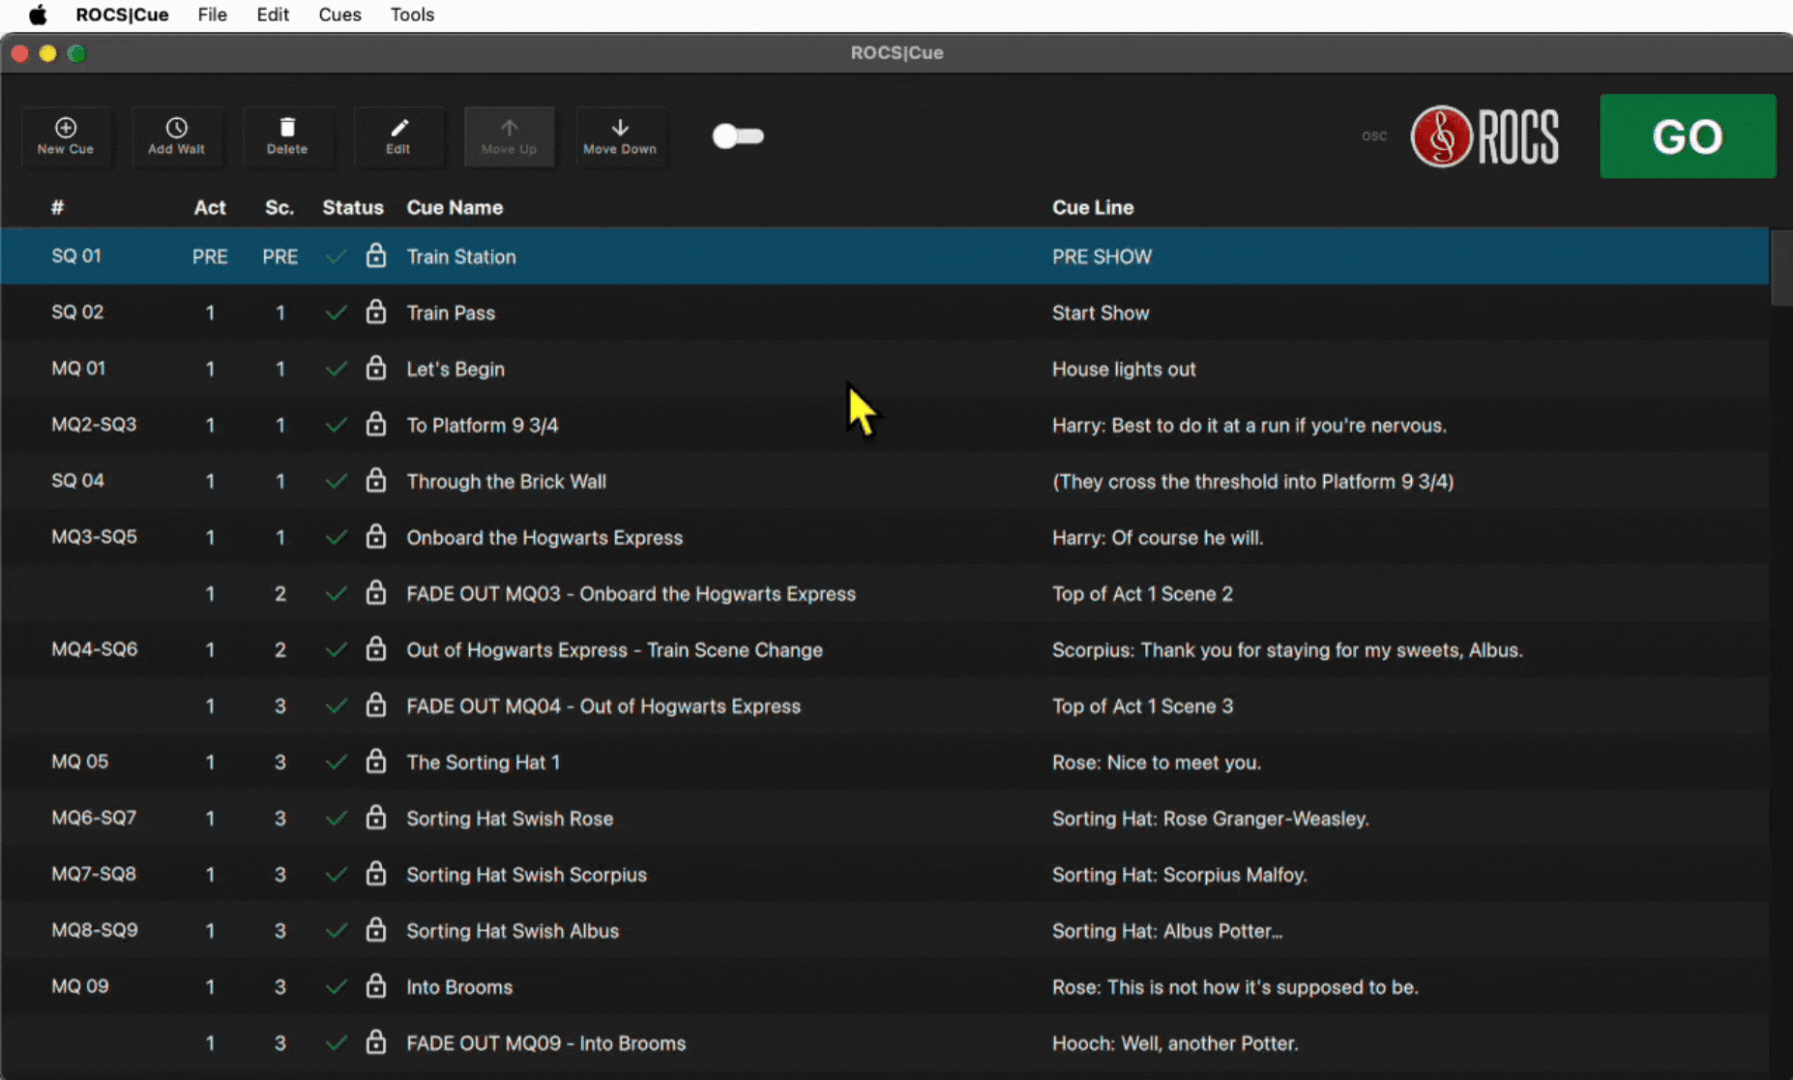
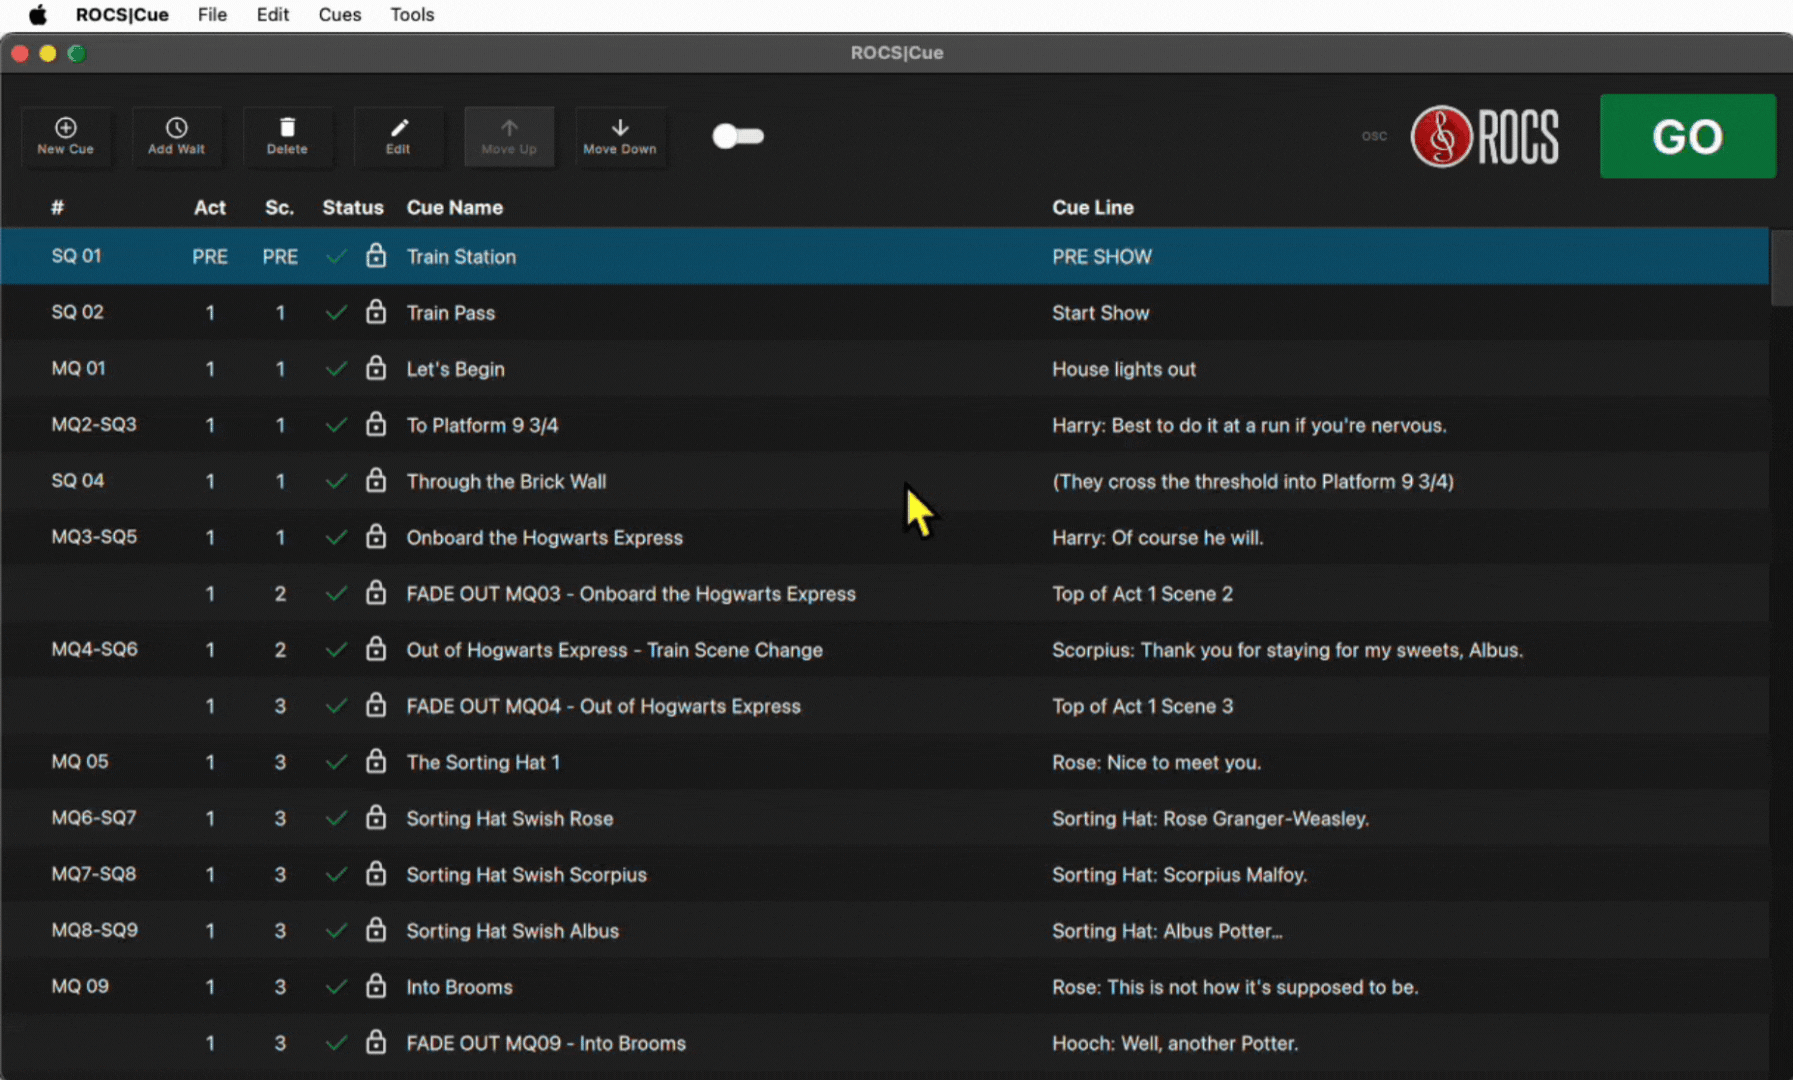
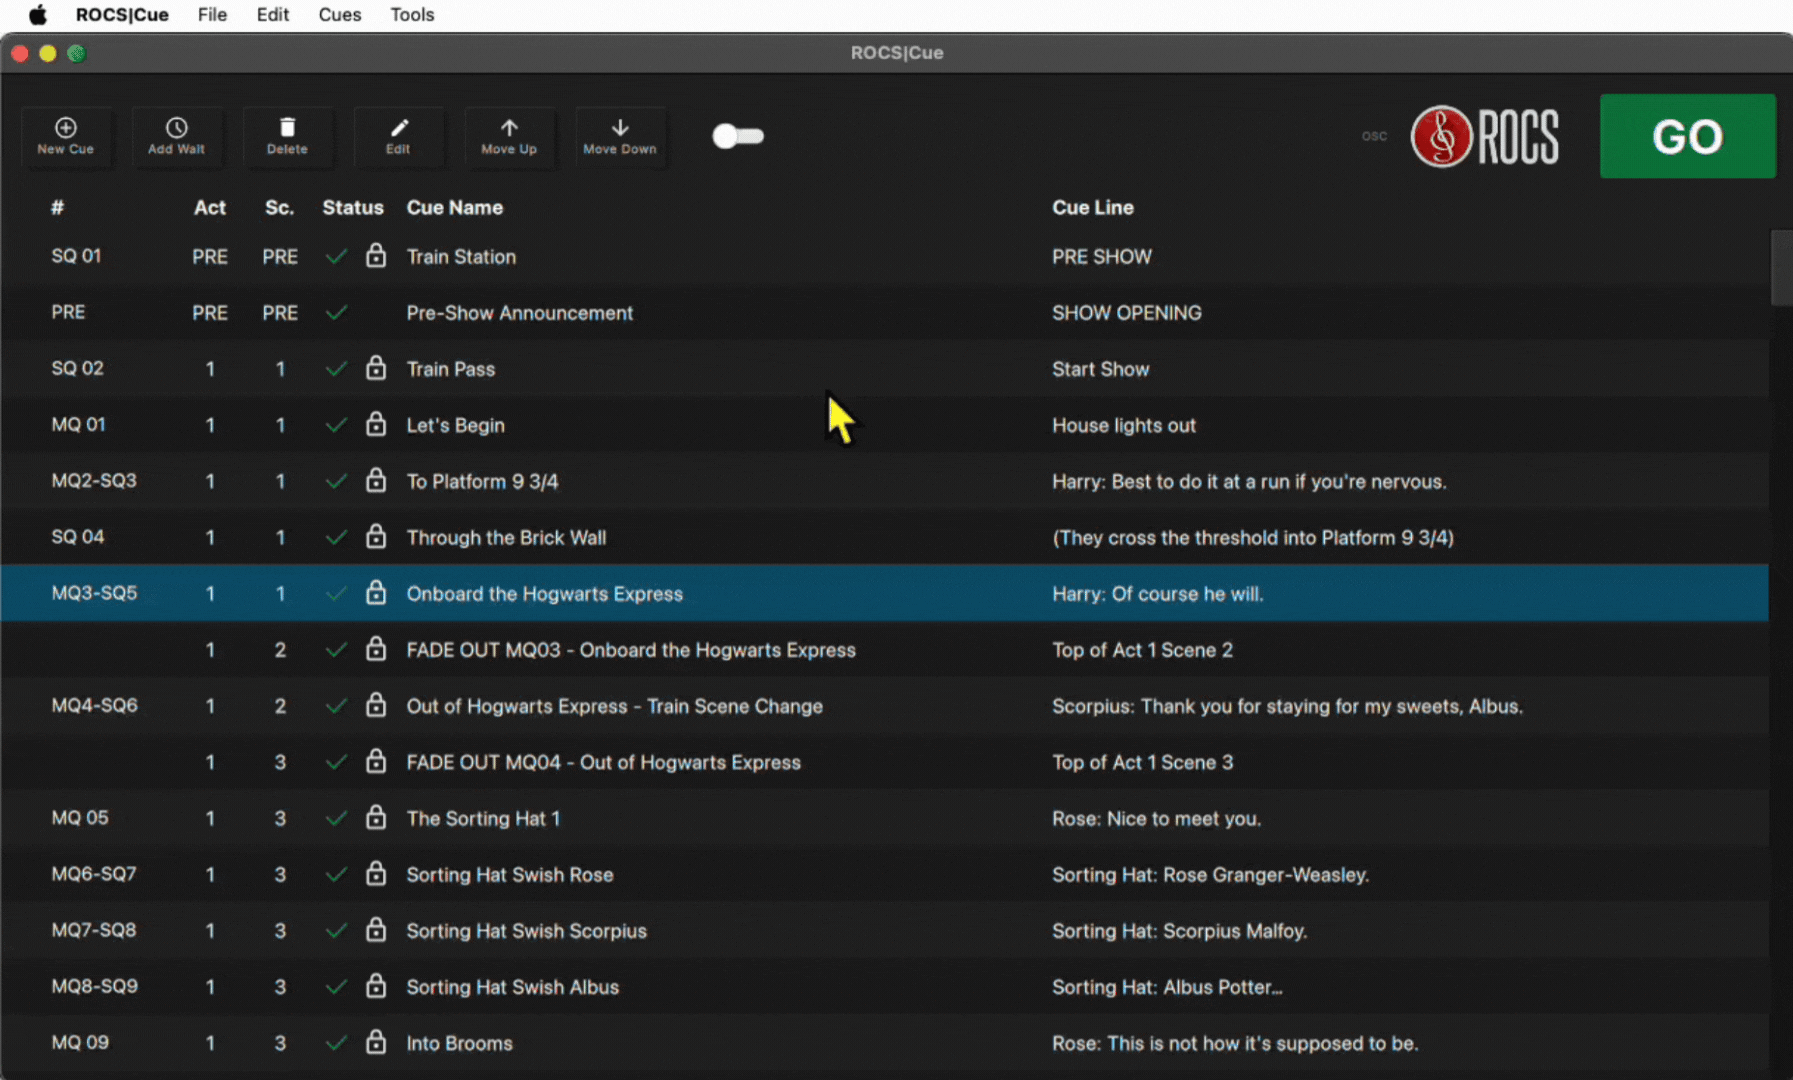
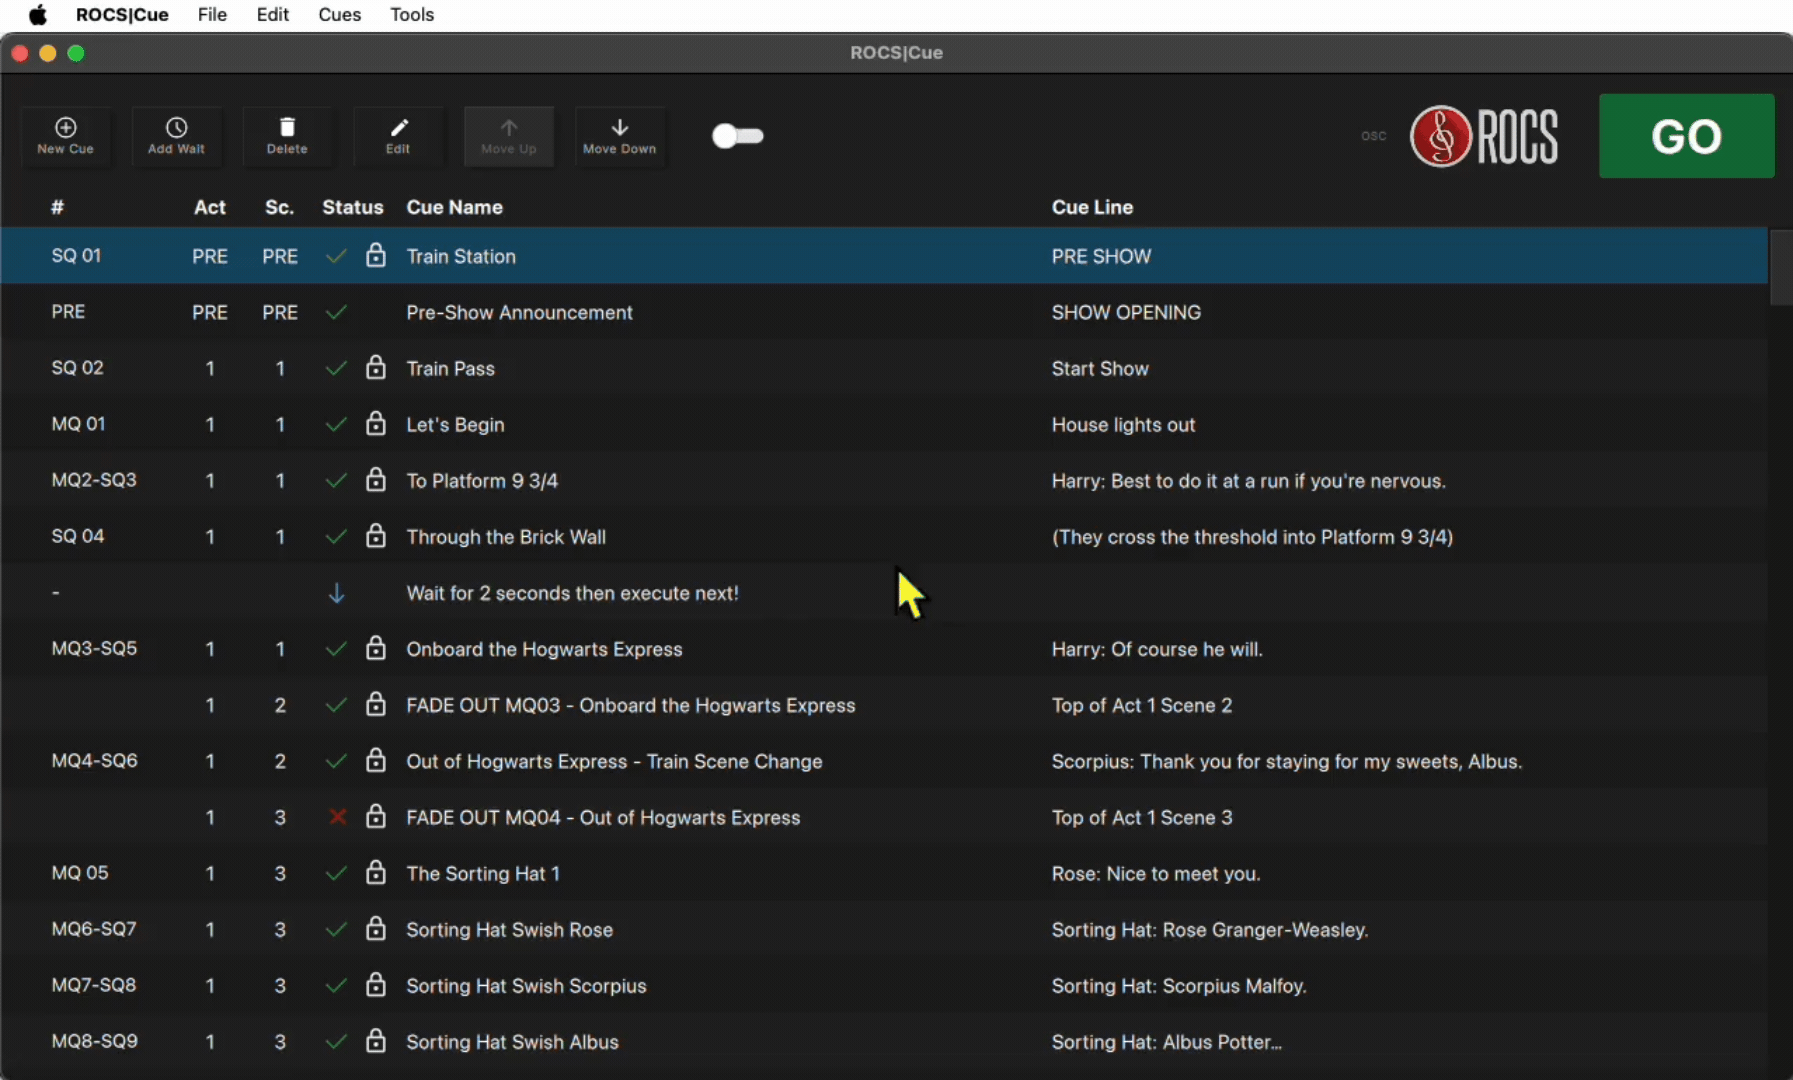
Below is the main window for ROCS|Cue. It houses the Cue List, which includes all of the pre-built cues you need to be able to rehearse and perform the default version of your show. From there, you can edit, customize, and add cues to this list as you see fit.
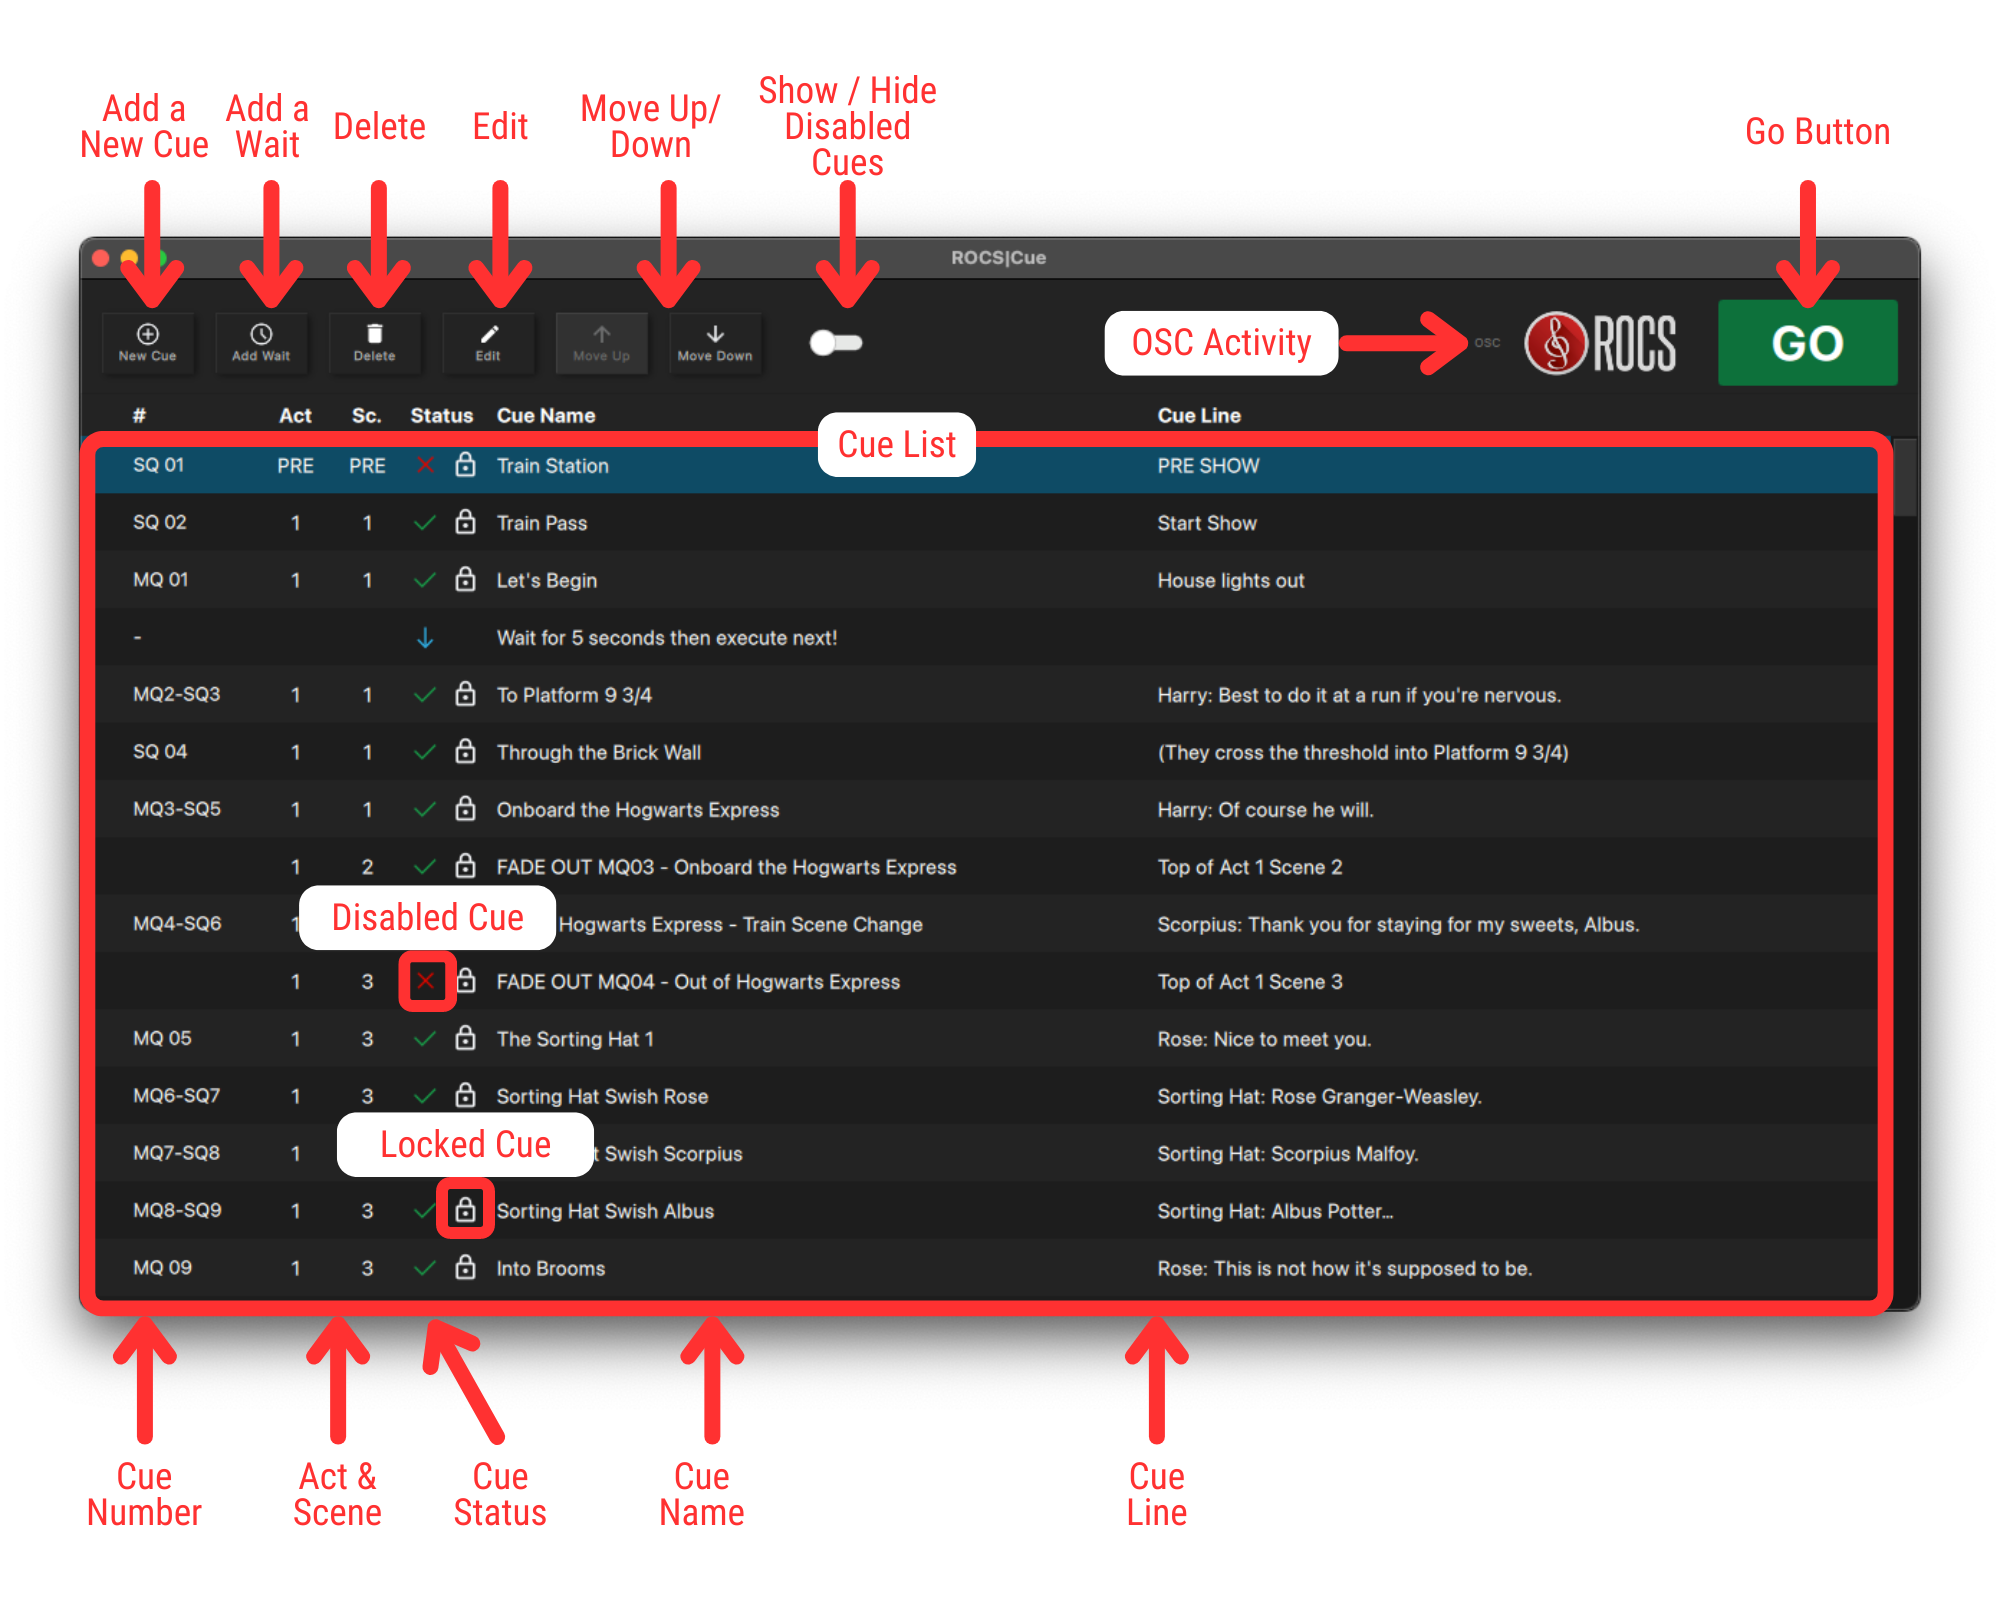
Main Window Buttons
Here is a list of buttons and what they do:
- New Cue – Add a new cue to the Cue List.
- Add Wait – Add a wait time between cues and then automatically start the next cue in the Cue List.
- Delete – Delete a cue (unless the cue has been locked) in the Cue List.
- Edit – Edit the functions and parameters of an existing cue in the Cue List.
- Move Up – Moves the cue up in the Cue List.
- Move Down – Moves the cue down in the Cue List.
- Show\Hide Disabled Cues – Hides or shows all disabled cues in the Cue List.
- OSC Activity – Lights up when the SFX Manager receives an OSC command from the ROCS|Cue Cue List, from QLab, or from another OSC message source.
- Go Button – Plays the cues in the Cue List.
Here is a list of reference lines and what they do:
- Cue List – List of all the music and / or SFX cues.
- Locked Cue – Locked cues prevent their deletion. We recommend that you Disable and Hide an undesired cue instead of deletion, for ease of restoring the cue later if desired.
- Cue Number – Assigned number for cues. Pre-built cues match your show script / cue sheet.
- Act & Scene – Assigned number for Act and Scene. Pre-built cues match your show script / cue sheet.
- Cue Status – Playback status of the show.
- Green check – Enabled cue that will play when you hit the Go button.
- Red X – Disabled cue that will be skipped and won’t play when you hit the Go button (unless specifically selected).
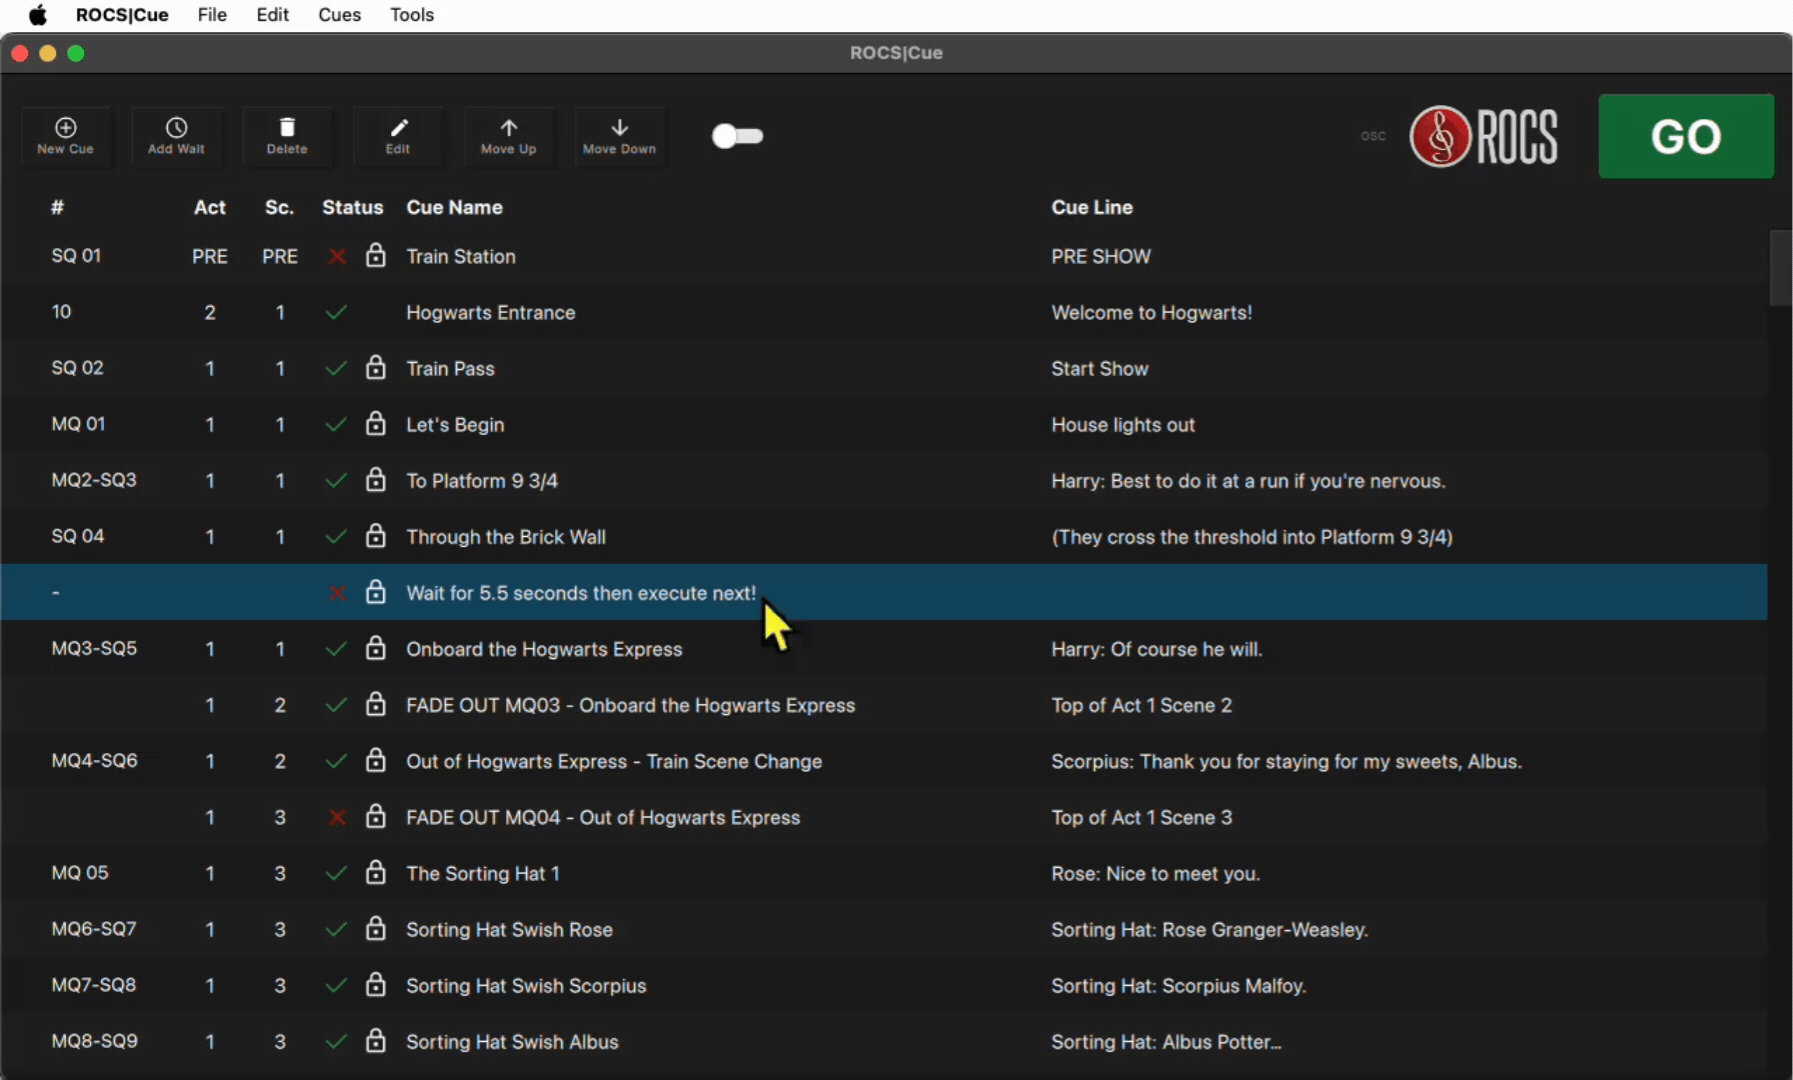
- Blue Down Arrow – Auto-play the next cue after x seconds. Status is for waits only.
- Cue Name – Name of the cue. Pre-built cues match your show script / cue sheet.
- Cue Line – Cue line from the show script / cue sheet.
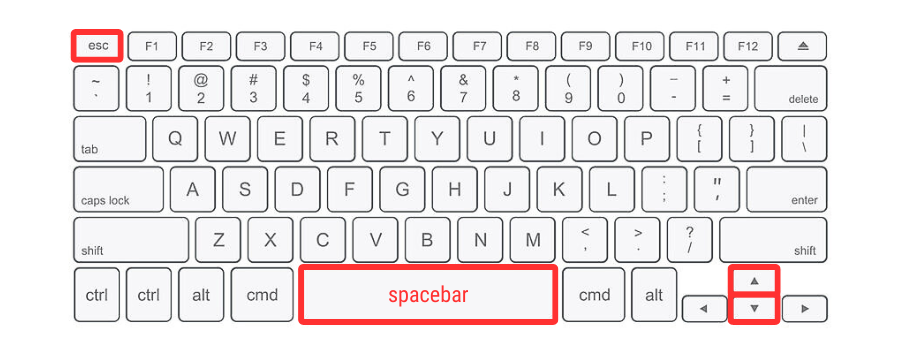
Here is a list of keyboard shortcuts to help you quickly navigate or control cue playback.
| Action | Keyboard Shortcut |
|---|---|
| Stop / Fade* | Escape |
| Go | Spacebar |
| Move the cue list selection bar | Up / Down arrows |
OSC stands for “open sound control.” It is a simple yet powerful network protocol for computers and devices to talk to each other, especially when controlling audio, lights, and other show devices. We use OSC commands from the Cue List to trigger the music and sound effects in the installed audio package in ROCS|Cue.
If you want a great explanation of how OSC works, check out these two amazing articles from ETC by Sam Smallman:
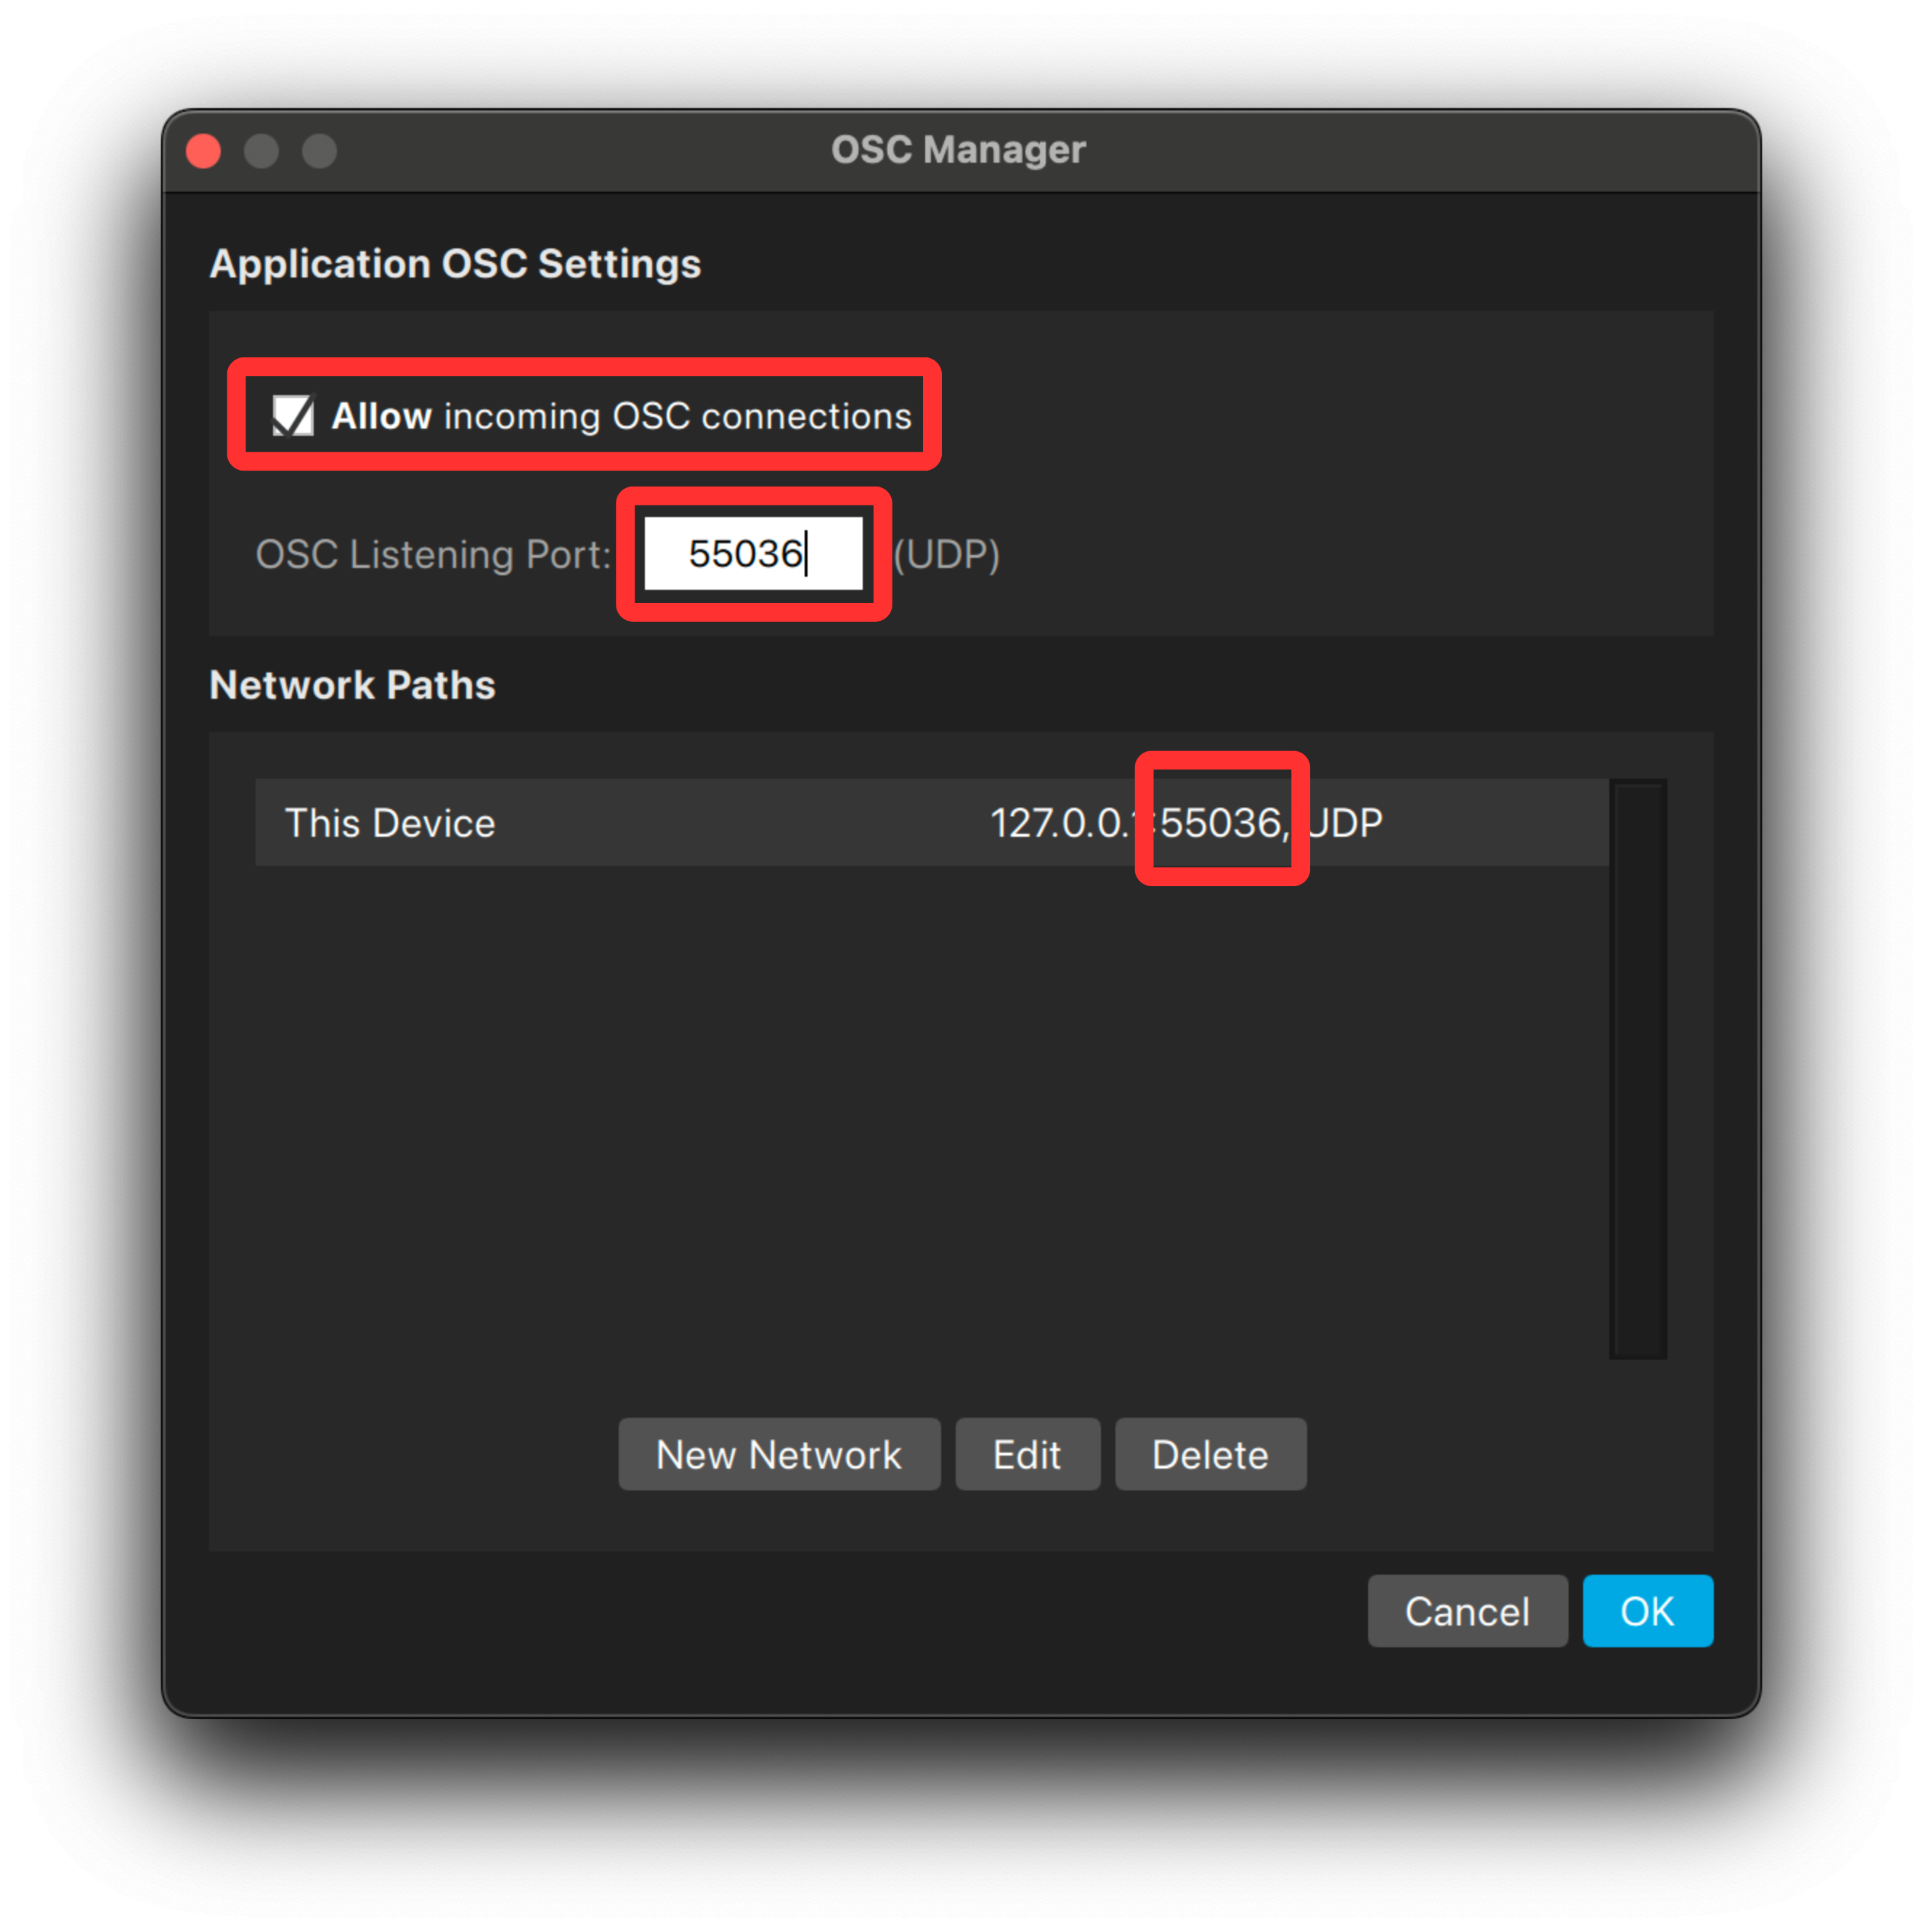
Below is the OSC manager window for ROCS|Cue. The Application OSC Settings is the top section of this window. It allows access to control ROCS|Cue and determines which port ROCS|Cue will “listen” to. The Network Path Outputs is the bottom section of this window. It refers to where the OSC commands from the Cue List in ROCS|Cue are routed.
To access the OSC manager, do the following:
- Open ROCS|Cue.
- Go to Tools in the menu bar.
- Click on OSC Manager.
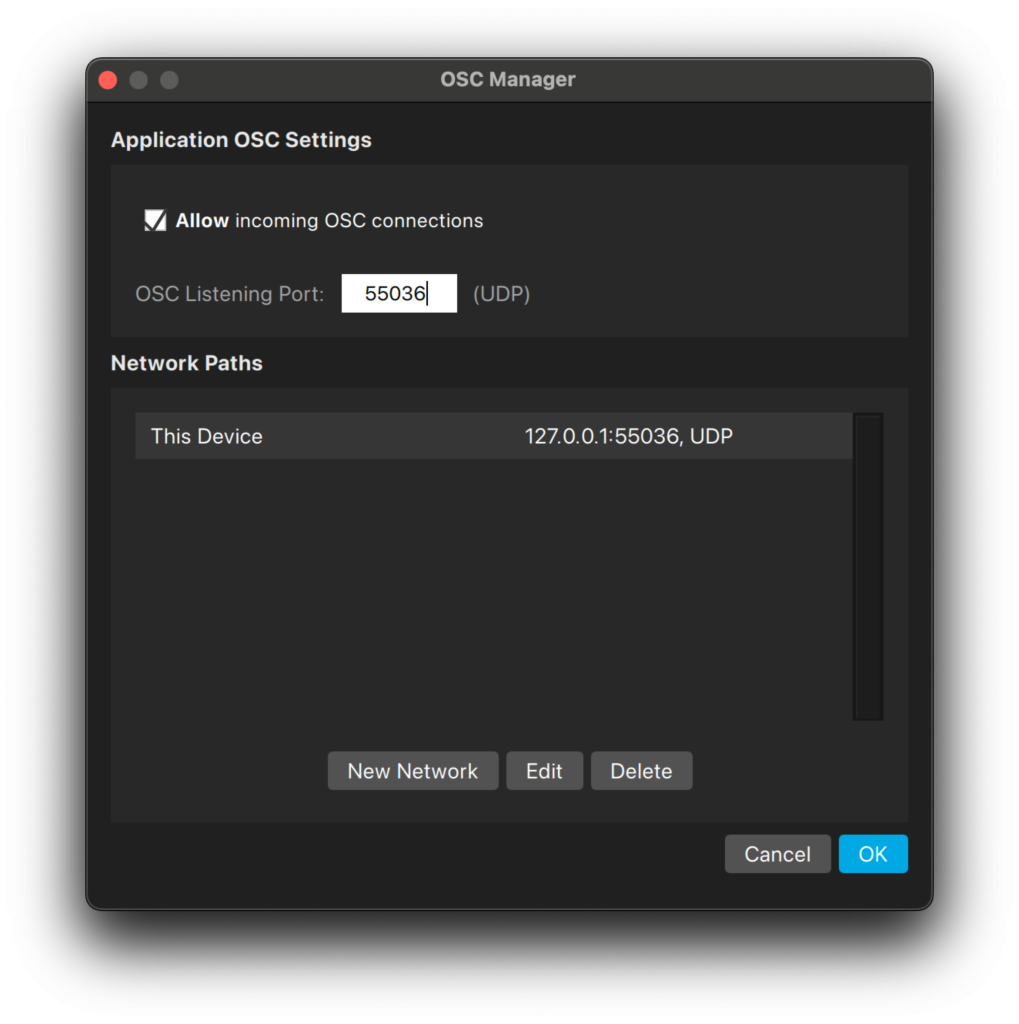
Many productions will use a simple setup where ROCS|Cue sends cues only to the SFX Manager inside of ROCS|Cue, and in this case, the settings should match those shown below.
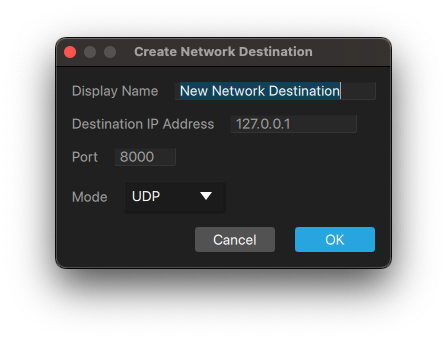
If you desire to control additional devices (lighting console, etc.) you can set up additional New Network Path Outputs here.
To set up a new network path, do the following:
- In the OSC Manager, click New Network.
- Type in the Display Name field.
- Type in the additional device’s IP address in the Destination IP Address field. (If the additional device is another software on the same computer, use “127.0.0.1”).
- Type in the additional device’s listening port.
Below is the SFX manager window for ROCS|Cue.
- Source Files– The actual music or sound effect (SFX) audio files provided by ROCS that make up the show.
- Instance– A specific instance of a source file that has parameters (volume, pan, fade in, fade out, loop). Multiple instances of the same source audio file can be created with different parameters for use at different times during the show.
To access the SFX manager, do the following:
- Open ROCS|Cue.
- Go to Tools.
- Click on SFX Manager.
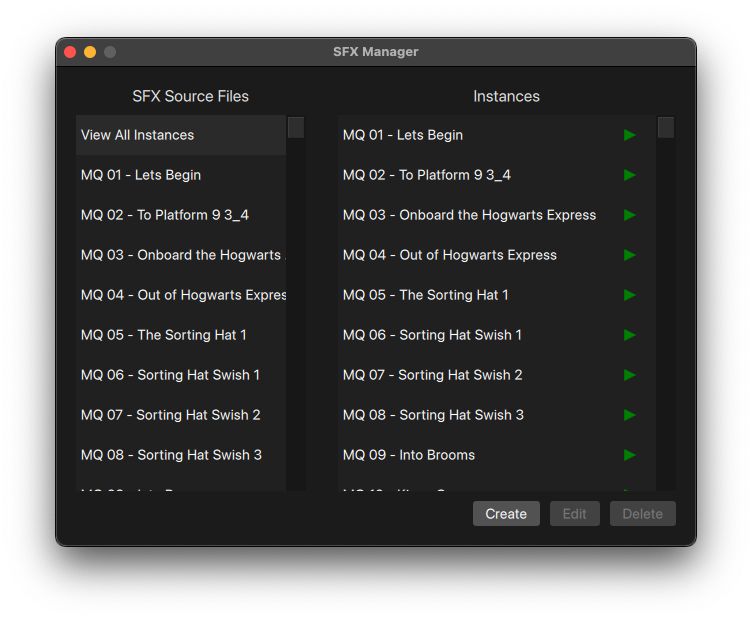
To access an instance in the SFX manager, do the following:
- Select any of the instances from the list.
- Click Edit to see its settings (volume, pan, fade in, fade out, loop).
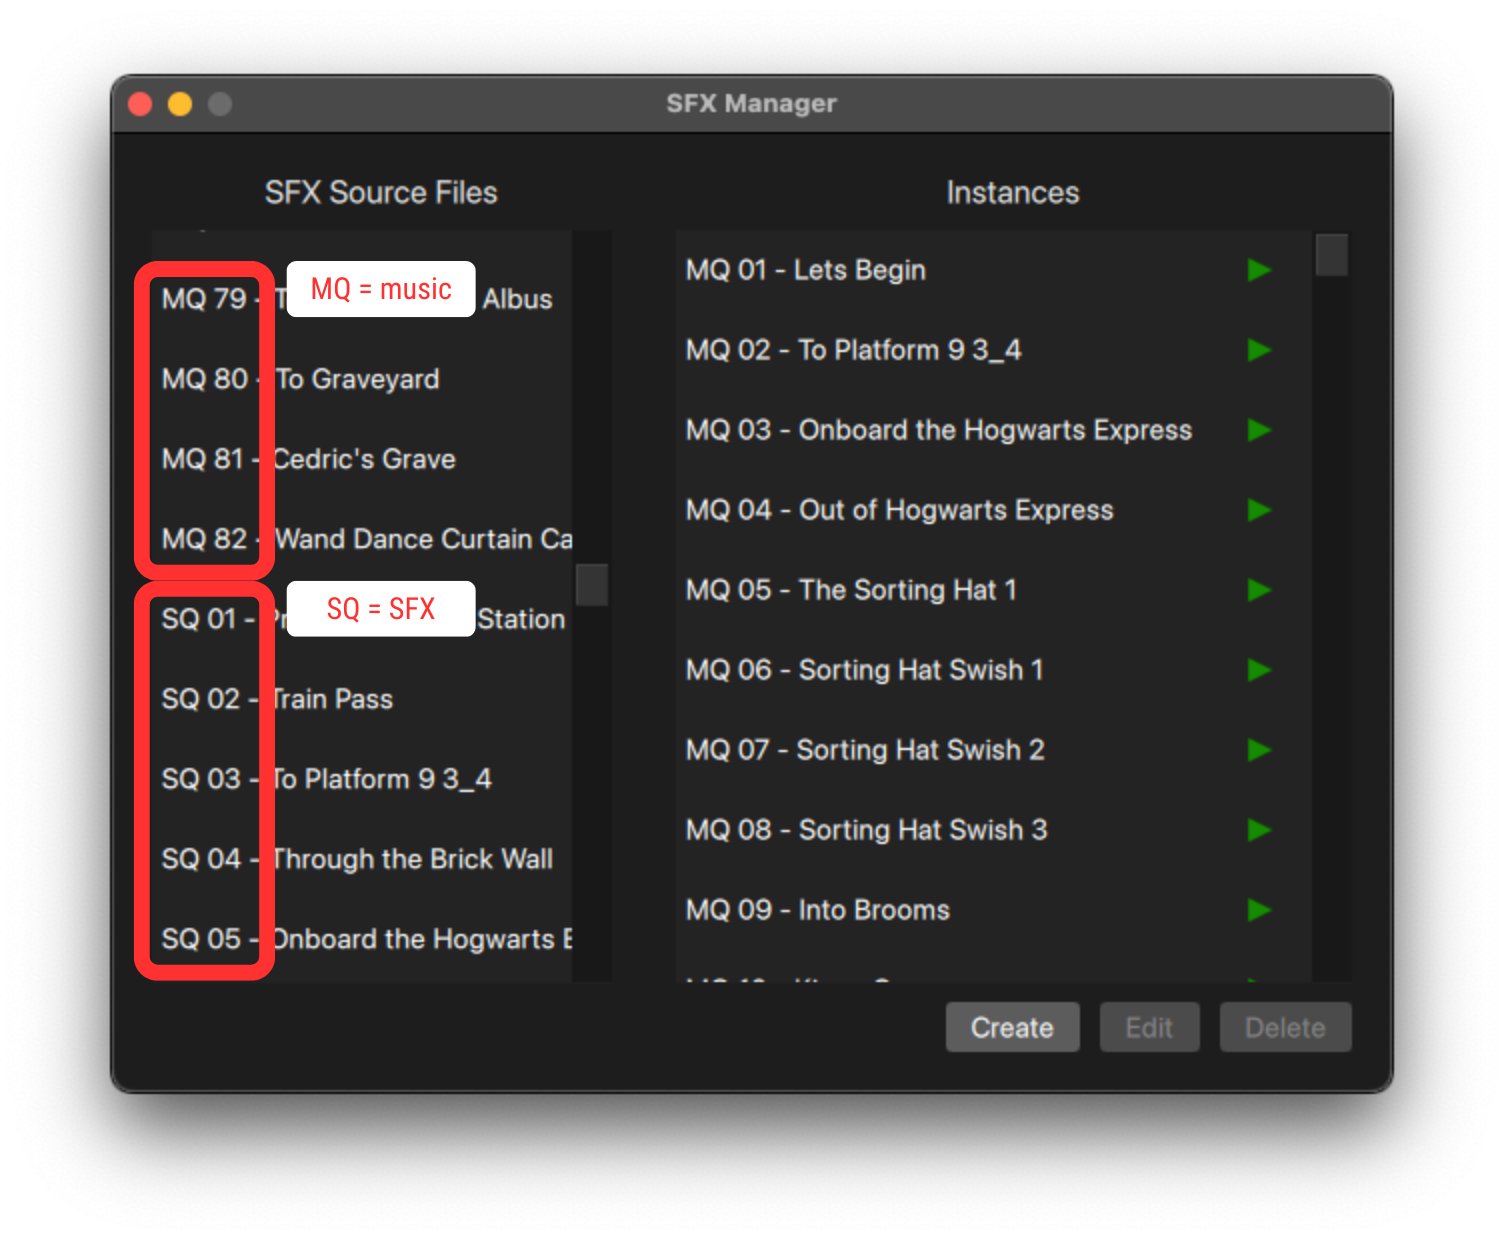
To make it easy to navigate the SFX manager, we have created the following naming conventions for the audio files:
- MQ = music cue
- SQ = sound effect cue
Source Files Naming Conventions
NOTE: If you have the music-only package, you will not see the sound effects in the SFX Manager. If you would like to add on the SFX package at additional cost, please reach out to your licensing rep ASAP and get that ordered! Do not proceed until you have submitted your order and received an updated licensing email. Once you have access, you will need to repeat most of the steps in your implementation checklist.
We recommend that you verify that you have everything you need to get started by making sure you can see the following:
- SFX Source Files– populated when you download your audio package.
- Instances– populated when you download your ROCS|Cue show file and load it in the software.
Audio Package Only
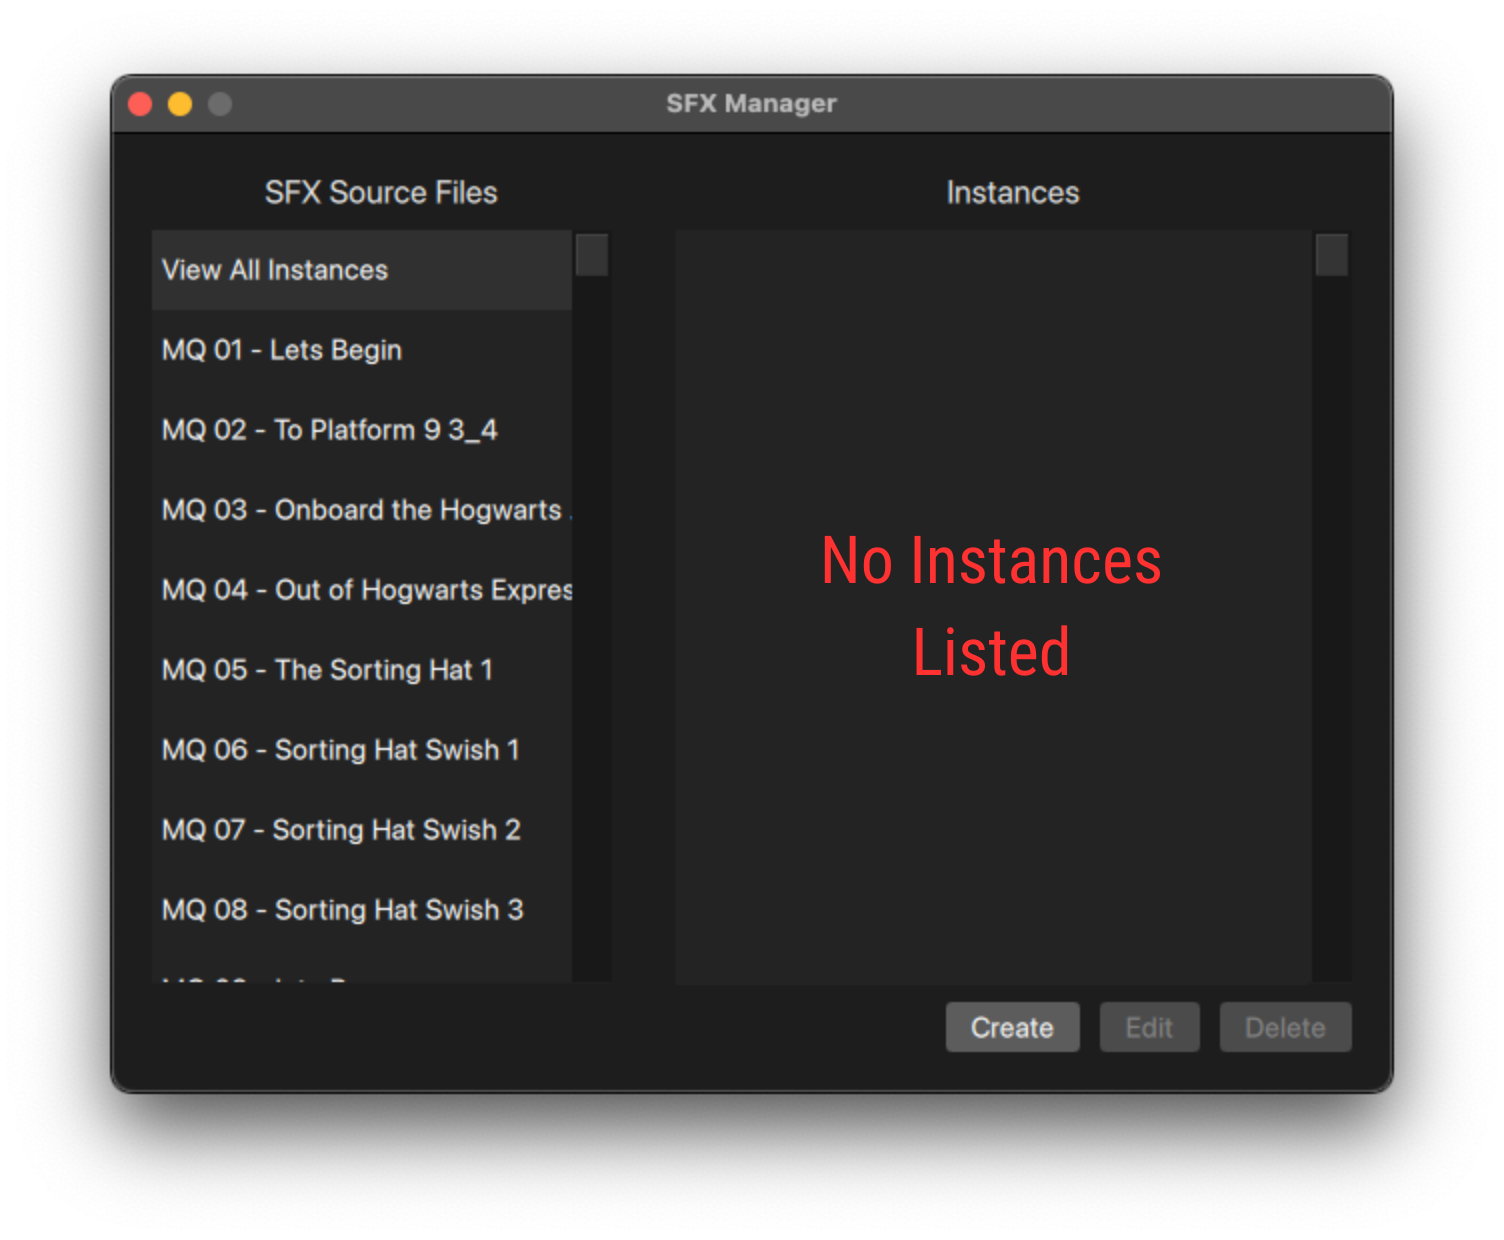
Audio Package with ROCS|Cue Show File
Troubleshooting Errors in the Network Path
Next to the ROCS logo is a small OSC Activity indicator. This illuminates when the SFX Manager in ROCS|Cue receives an OSC command, either from the ROCS|Cue Cue List, QLab, or another OSC software. This indicator can aid in troubleshooting to see if errors are in the OSC path (before the SFX Manager), or the audio path (after the SFX Manager).
OSC Activity Indicator
Here is a diagram of the signal flow inside ROCS|Cue. Even though it’s the same software, you need to send the OSC command back into ROCS|Cue. By default, we have already set this up for you.
- When you hit the Go button in the Cue List, this sends an OSC command to the OSC Listening Port via the Network Path.
- You need to make sure that the This Device Port matches the OSC Listening Port in the OSC Manager for the OSC command to arrive at the SFX Manager where it will play the music and/or SFX instance.
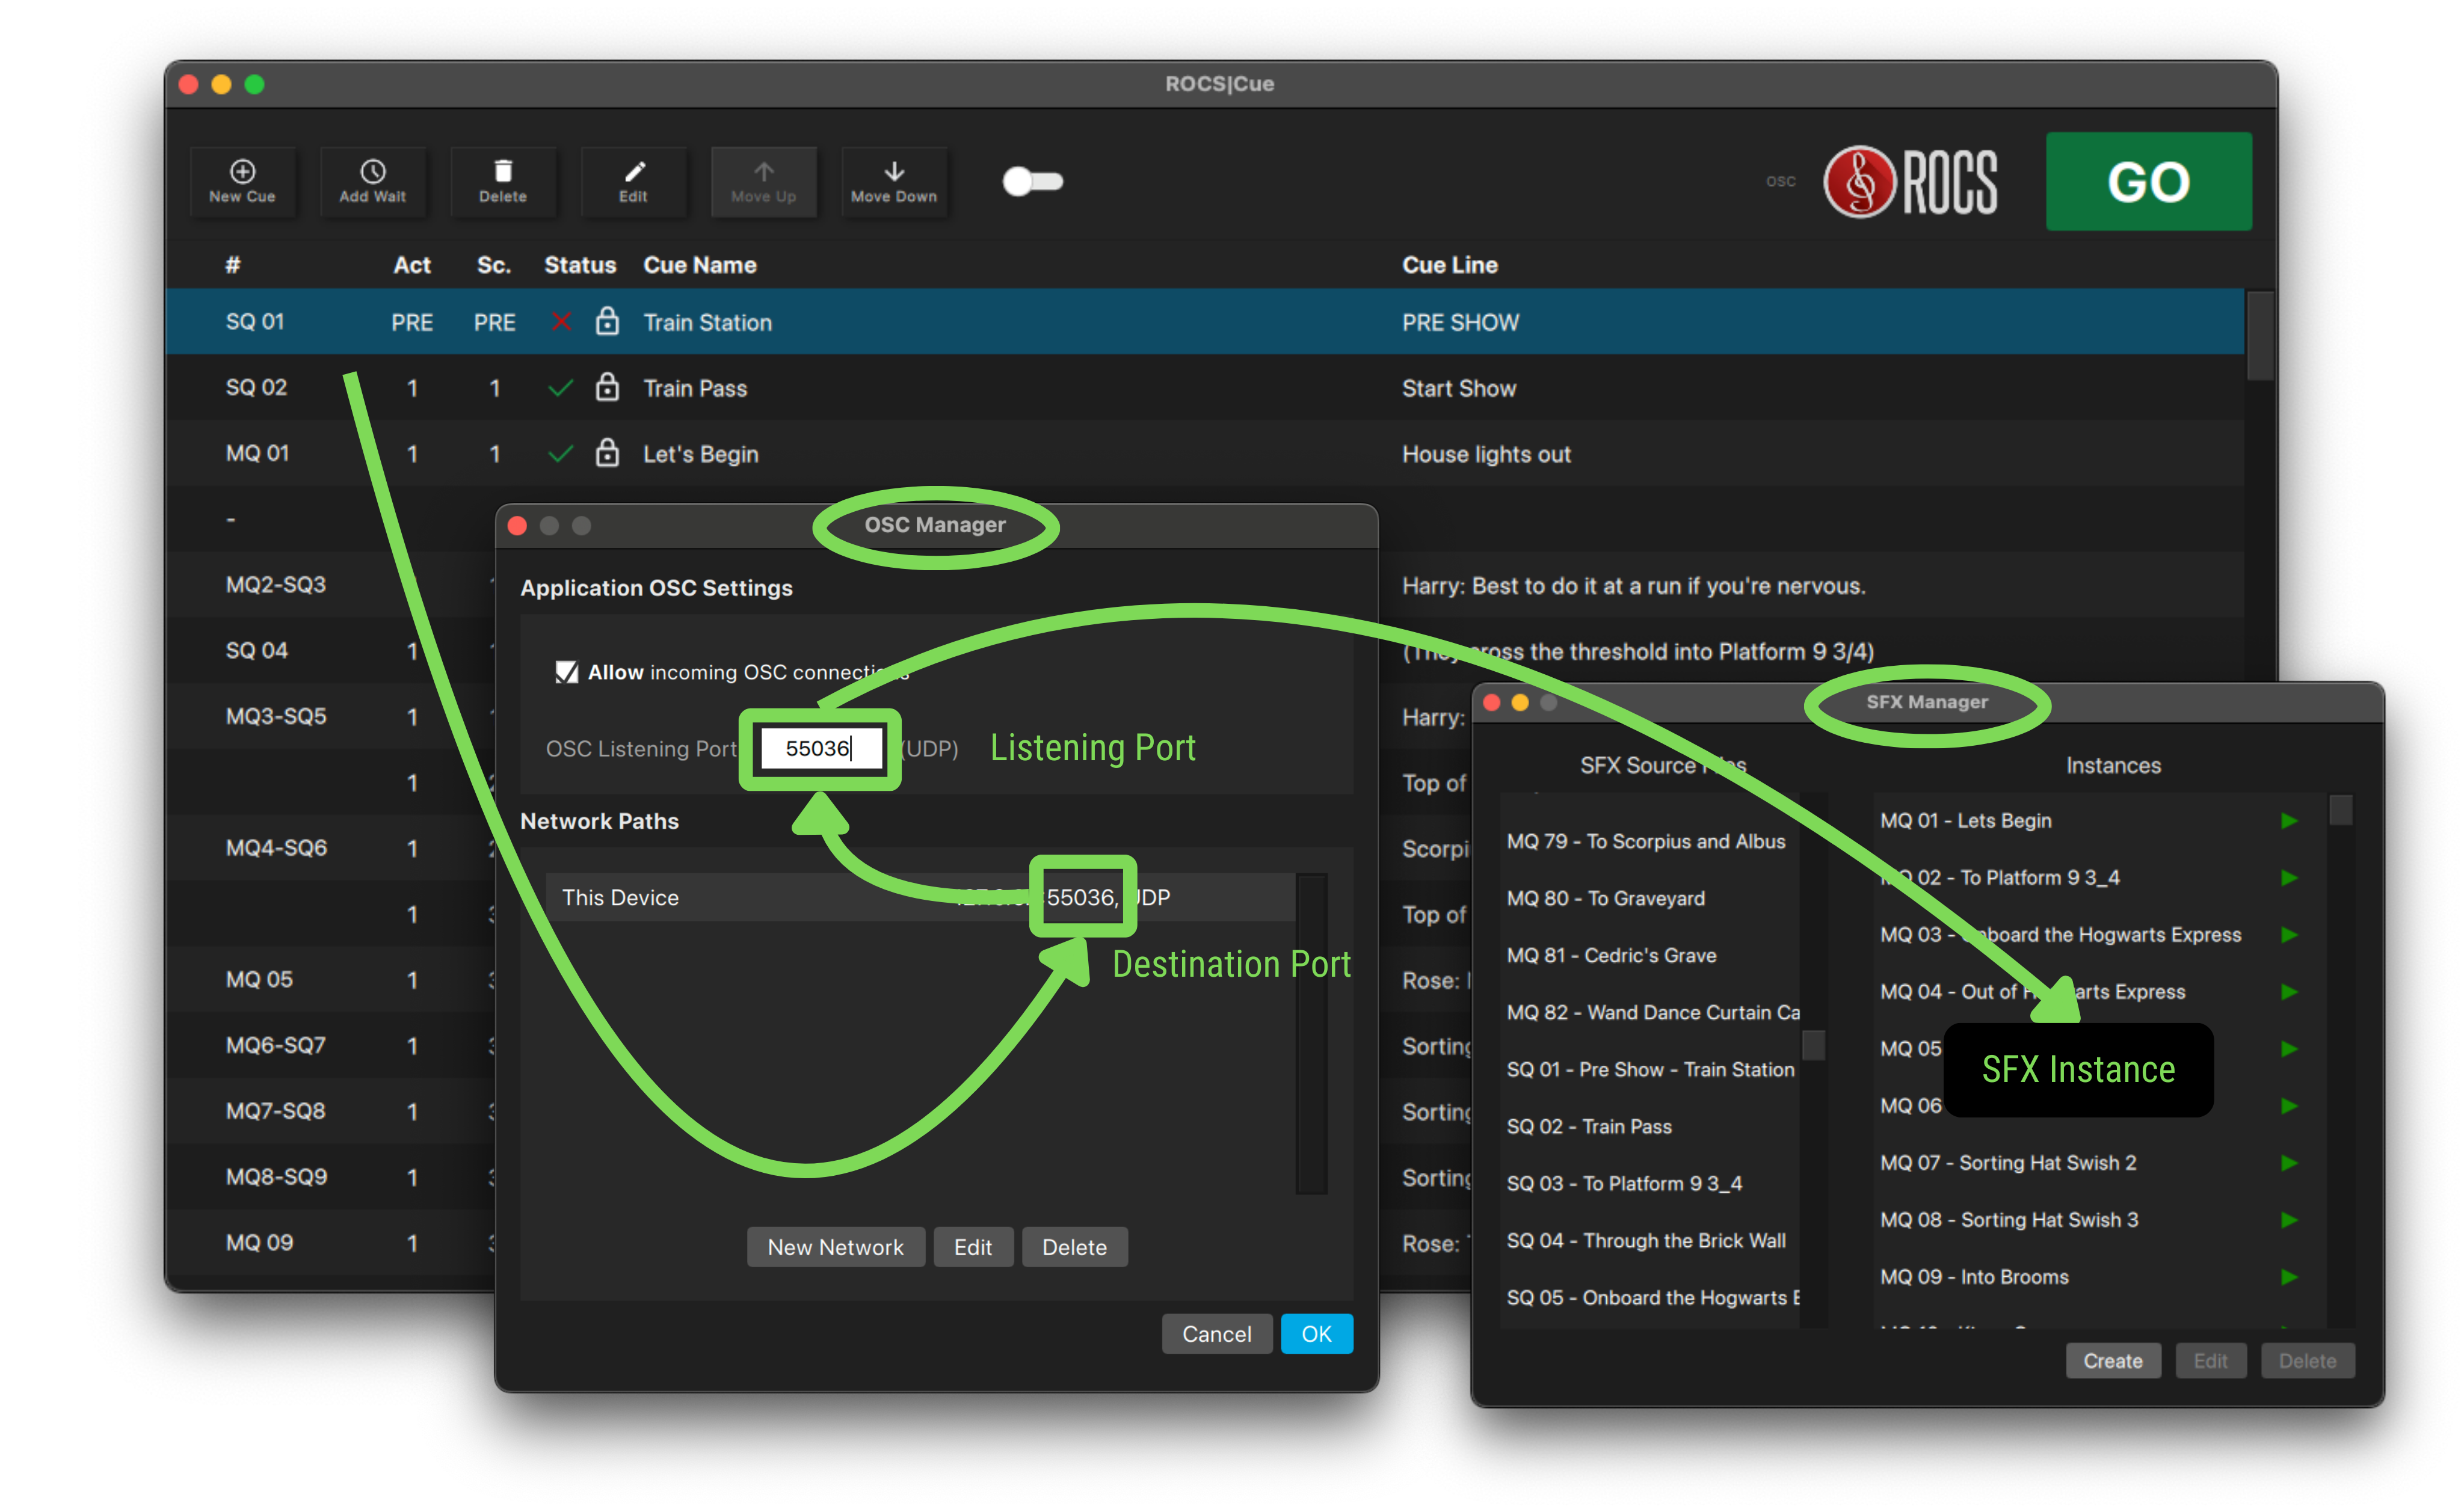
As you look at the signal flow, think of the IP address as the street address of an apartment building. The ports are the individual apartment numbers. Only one listening device can live in any given apartment (port). But multiple other apartments (ports) can send messages (OSC commands) to any single apartment address (listening port). For more info about how this works, check out OSC Explained.
3. ROCS|Cue Overview
A cue is a pre-determined signal or prompt used to trigger the playback of specific production elements, such as music, sound effects, or lights, at a precise moment during a production. A cue can have a name, number, act, scene location, and cue line. The cue is made up of one or more Functions.
There is also an Offset to fine-tune any timings to account for latency. It can also be used as a short delay, for example, when you want to play a lightning light cue and delay the audible thunder sound file. The offset is measured in milliseconds and goes up to 7000 (7 seconds). For delays longer than 7 seconds, please use a Wait command in the main cue list.
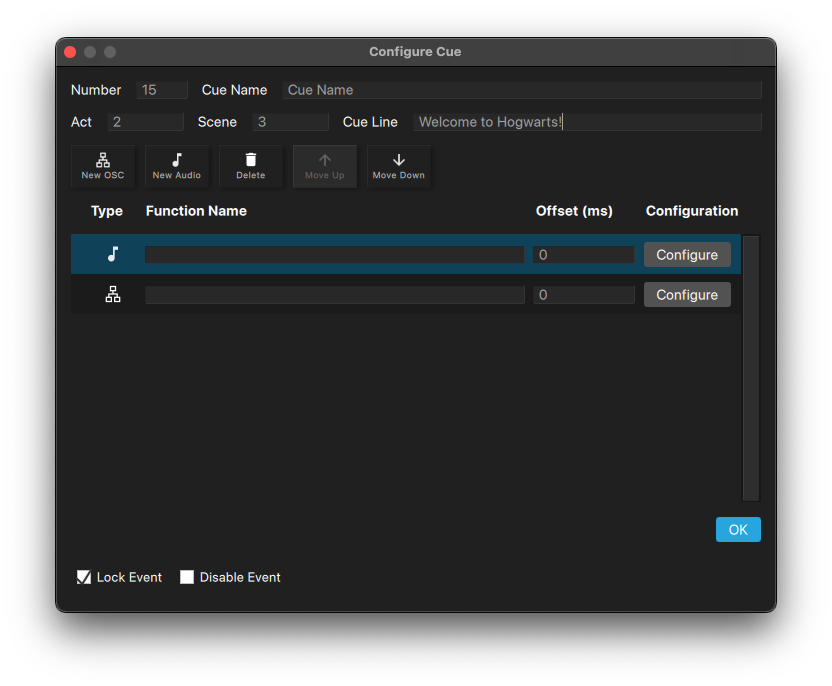
To add a new cue, do the following:
- Select the cue from the Cue List where you want to add a new cue below.
- Click New Cue.
- In the Configure Cue pop-up window, you will fill out the following fields:
- Number
- Cue Name
- Act
- Scene
- Cue Line
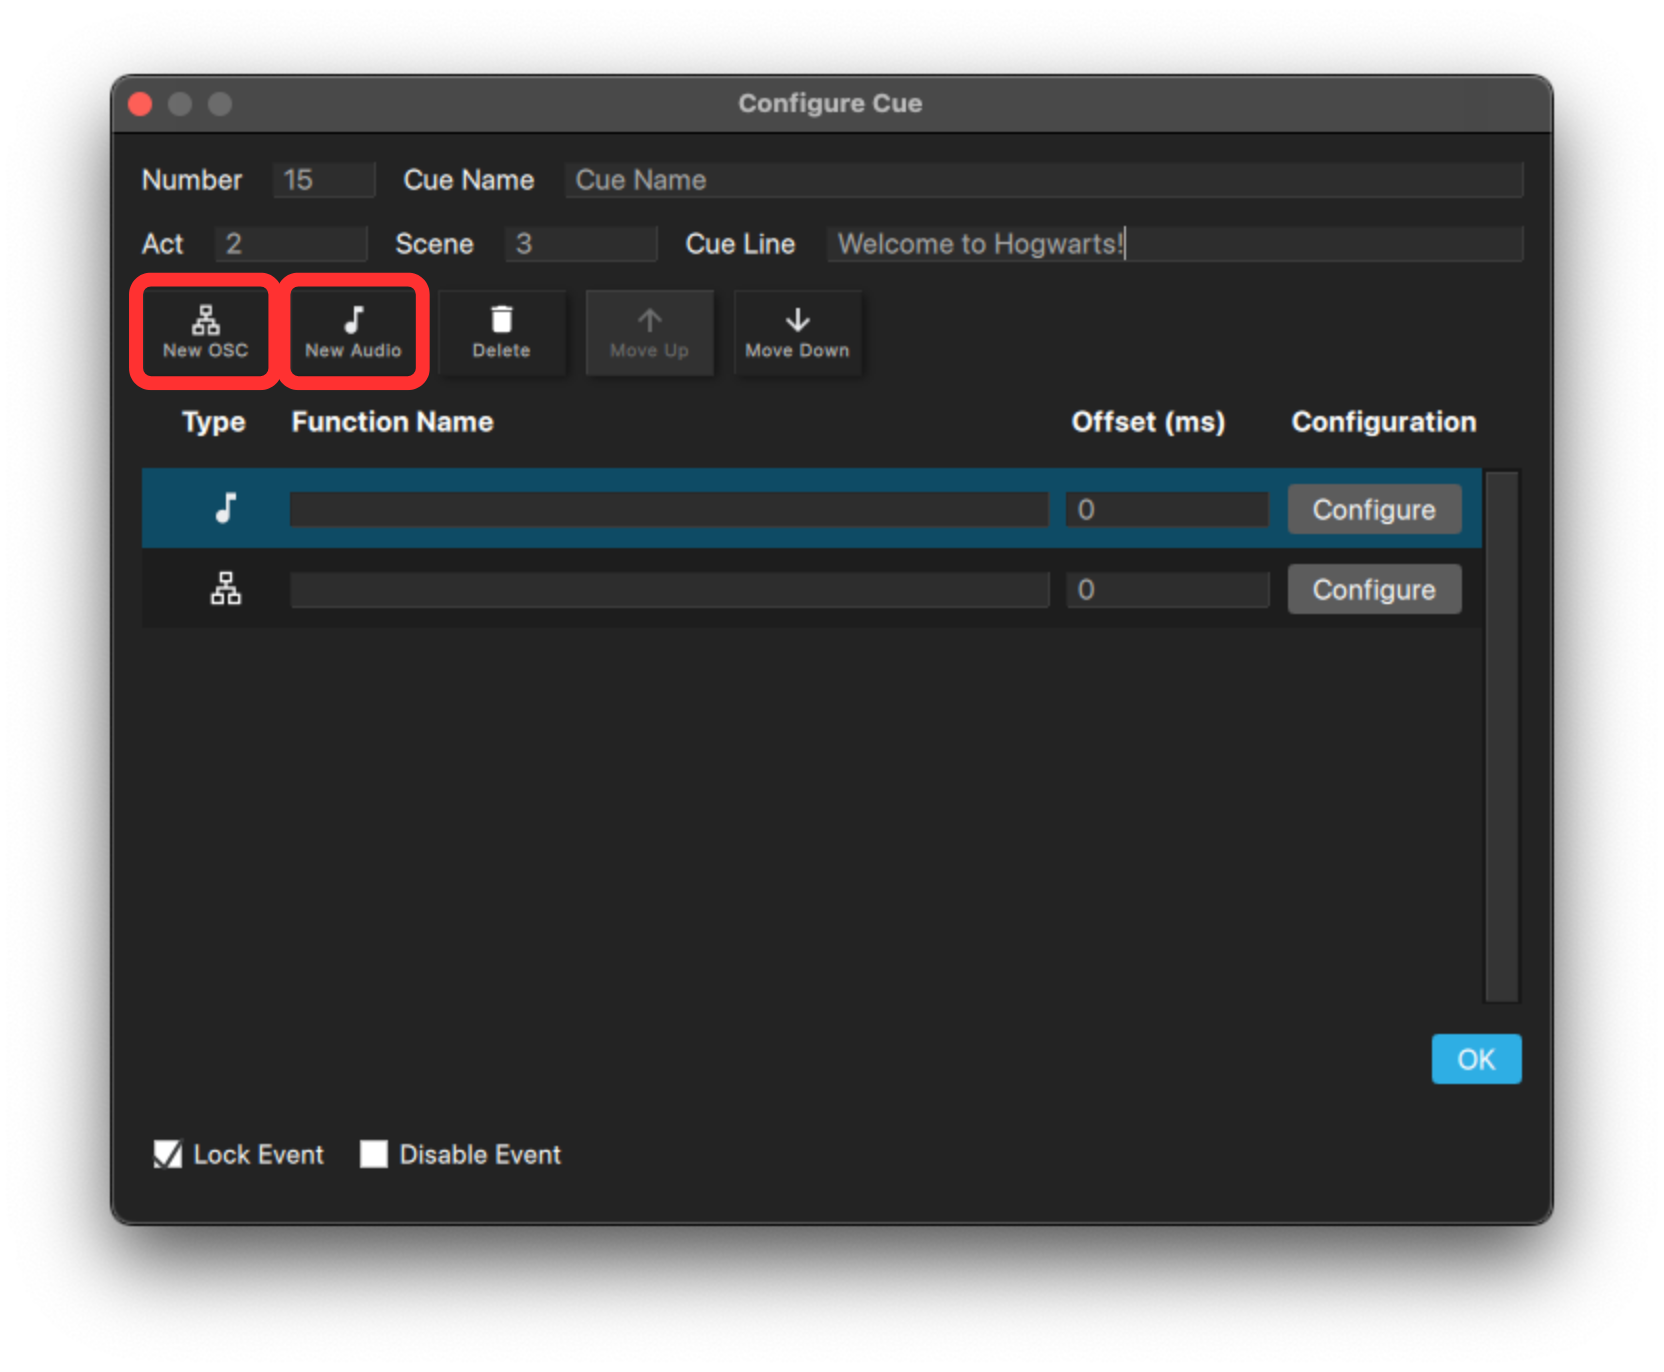
- Select one of the following buttons to add Functions:
- New OSC
- Click to add an OSC command to control any OSC-compatible device, including SFX instances in the ROCS|Cue SFX Manager. For more info on how to set this up, check out Configuring Pre-Built Cues.
- New Audio
- Click to add a custom audio file cue from your device. A custom audio file is one that isn’t provided by ROCS. These could be a pre-show announcement, your own SFX, or any other audio file. For more info on how to set this up, check out Configuring Custom Cues.
- New OSC
- (Optional) Add up to 7 seconds in the Offset (ms) field.
- (Optional) Click the Lock Event checkbox to disable the deletion of the cue. This will add a lock sign next to the cue.
- (Optional) Click the Disable Event checkbox to change the status of the cue from a green checkmark to a red x. This means that it won’t play. This will also allow you to hide this cue when you toggle the disabled cues. This way, you can disable and hide a cue, rather than deleting it, so it is easier to re-enable later.
- Click OK to save and close the Configure Cue pop-up window.

When creating or editing a cue, you will need to add specific functions inside of that cue for it to work. Currently, there are two different cue functions you can choose from:
- New OSC
- Click to edit an OSC command to control any OSC-compatible device, including the pre-built audio files from the SFX Manager.
- New Audio
- Click to add a custom audio file from your device. A custom audio file is any file that you add, which is not provided by ROCS. These could be a pre-show announcement, your own SFX, or any other audio file.
OSC & Audio Function Buttons
NOTE: We currently only support WAV audio files for ROCS|Cue. However, we are planning to add MP3 capability to future iterations of ROCS|Cue. To get info on the latest feature updates and bug fixes, check out the Product Updates support page.
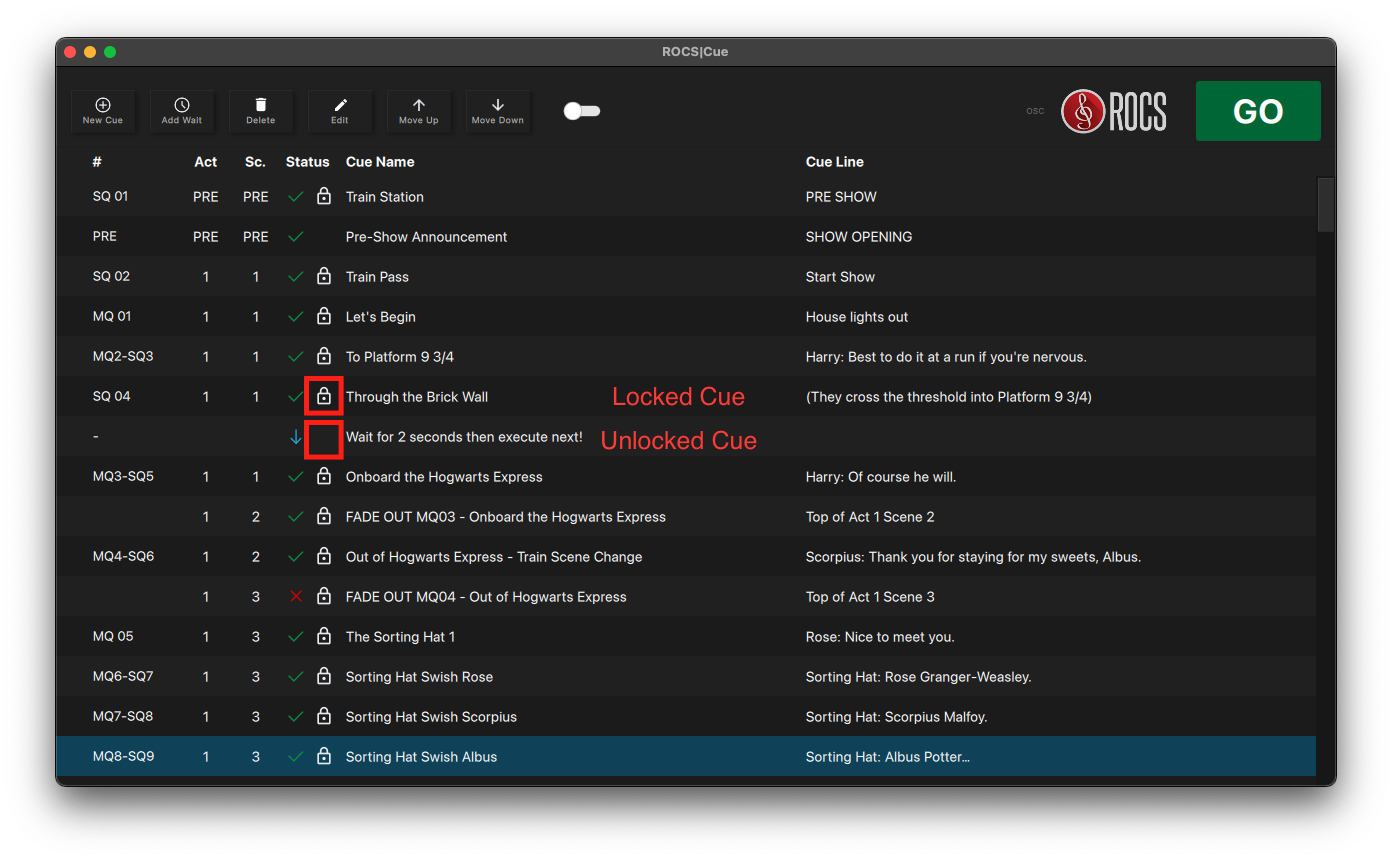
Sometimes you want to automate your cues so the next cue auto-follows based on a timer. This is where adding a wait can be helpful.
To add a wait, do the following:
- Select the cue from the Cue List below which you want to add a wait.
- Click Add Wait.
- Type how many seconds in the Wait (sec) field.
- (Optional) Click the Lock Event checkbox to disable deletion of the cue. This will add a lock sign next to the wait.
- (Optional) Click the Disable Event checkbox to change the status of the wait from a blue arrow to a red x. This means that it won’t play. This will also allow you to hide this wait when you toggle the disabled cues.
- Click OK.
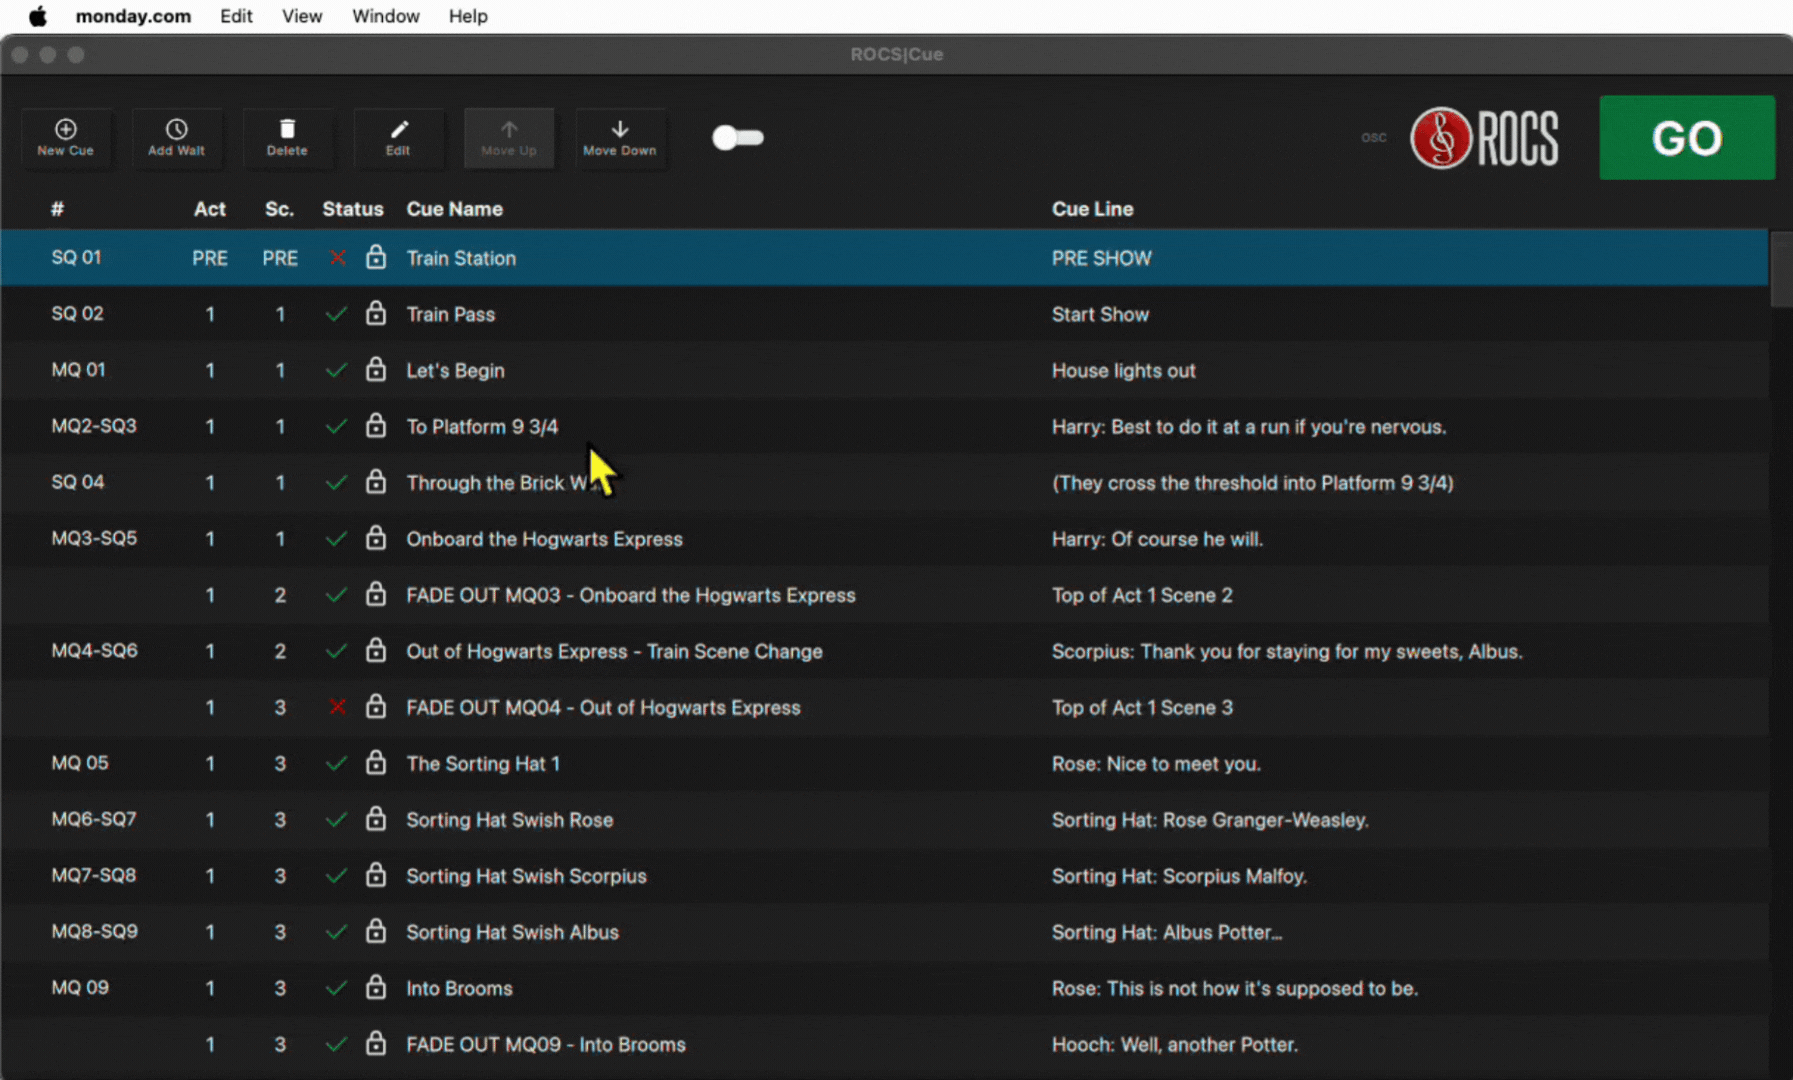
Sometimes, you might encounter a music or sound effect (SFX) that you don’t want to use. You have the option to delete the cue. Be aware that there is currently no undo button so if you delete a cue, it is permanent! However, for any pre-built cues, by default, we have locked those cues to prevent deletion. Instead of deleting any pre-built cues, we recommend you disable the cue instead and use the toggle to hide them so that you don’t have to rewrite a pre-built cue if you decide to restore it.
To delete a cue, do the following:
- Select the cue you want to delete from the Cue List.
- Click the Delete button.
NOTE: Be aware that you cannot delete locked cues. You will need to remove the lock from the cue to enable the deletion. However, when you delete a cue, it is permanent and it can’t be undone. If you delete a cue by accident, you will need to re-create it.
To edit a cue, do the following:
- Select the cue you want to edit from the Cue List.
- Click the Edit button OR double-click.
- In the Configure Cue pop-up window, you can edit the following fields:
- Number
- Cue Name
- Act
- Scene
- Cue Line
- Click the Configure button next to the function type you want to edit.
- OSC Type
- Click to edit an OSC command to control any OSC-compatible device, including the pre-built audio files from the SFX Manager. For more info on how to set this up, check out Configuring Pre-Built Cues.
- Audio Type
- Click to edit a custom audio file from your device. A custom audio file is any file that you add, which is not provided by ROCS. These could be a pre-show announcement, your own SFX, or any other audio file. For more info on how to set this up, check out Configuring Custom Cues.
- OSC Type
- (Optional) Add up to 7 seconds in the Offset (ms) field.
- (Optional) Click the Lock Event checkbox to disable deletion of the cue. This will add a lock sign next to the cue.
- (Optional) Click the Disable Event checkbox to change the status of the cue from a green checkmark to a red x. This means that it won’t play. This will also allow you to hide this wait when you toggle the disabled cues.
- Click OK to save and close the Configure Cue pop-up window.
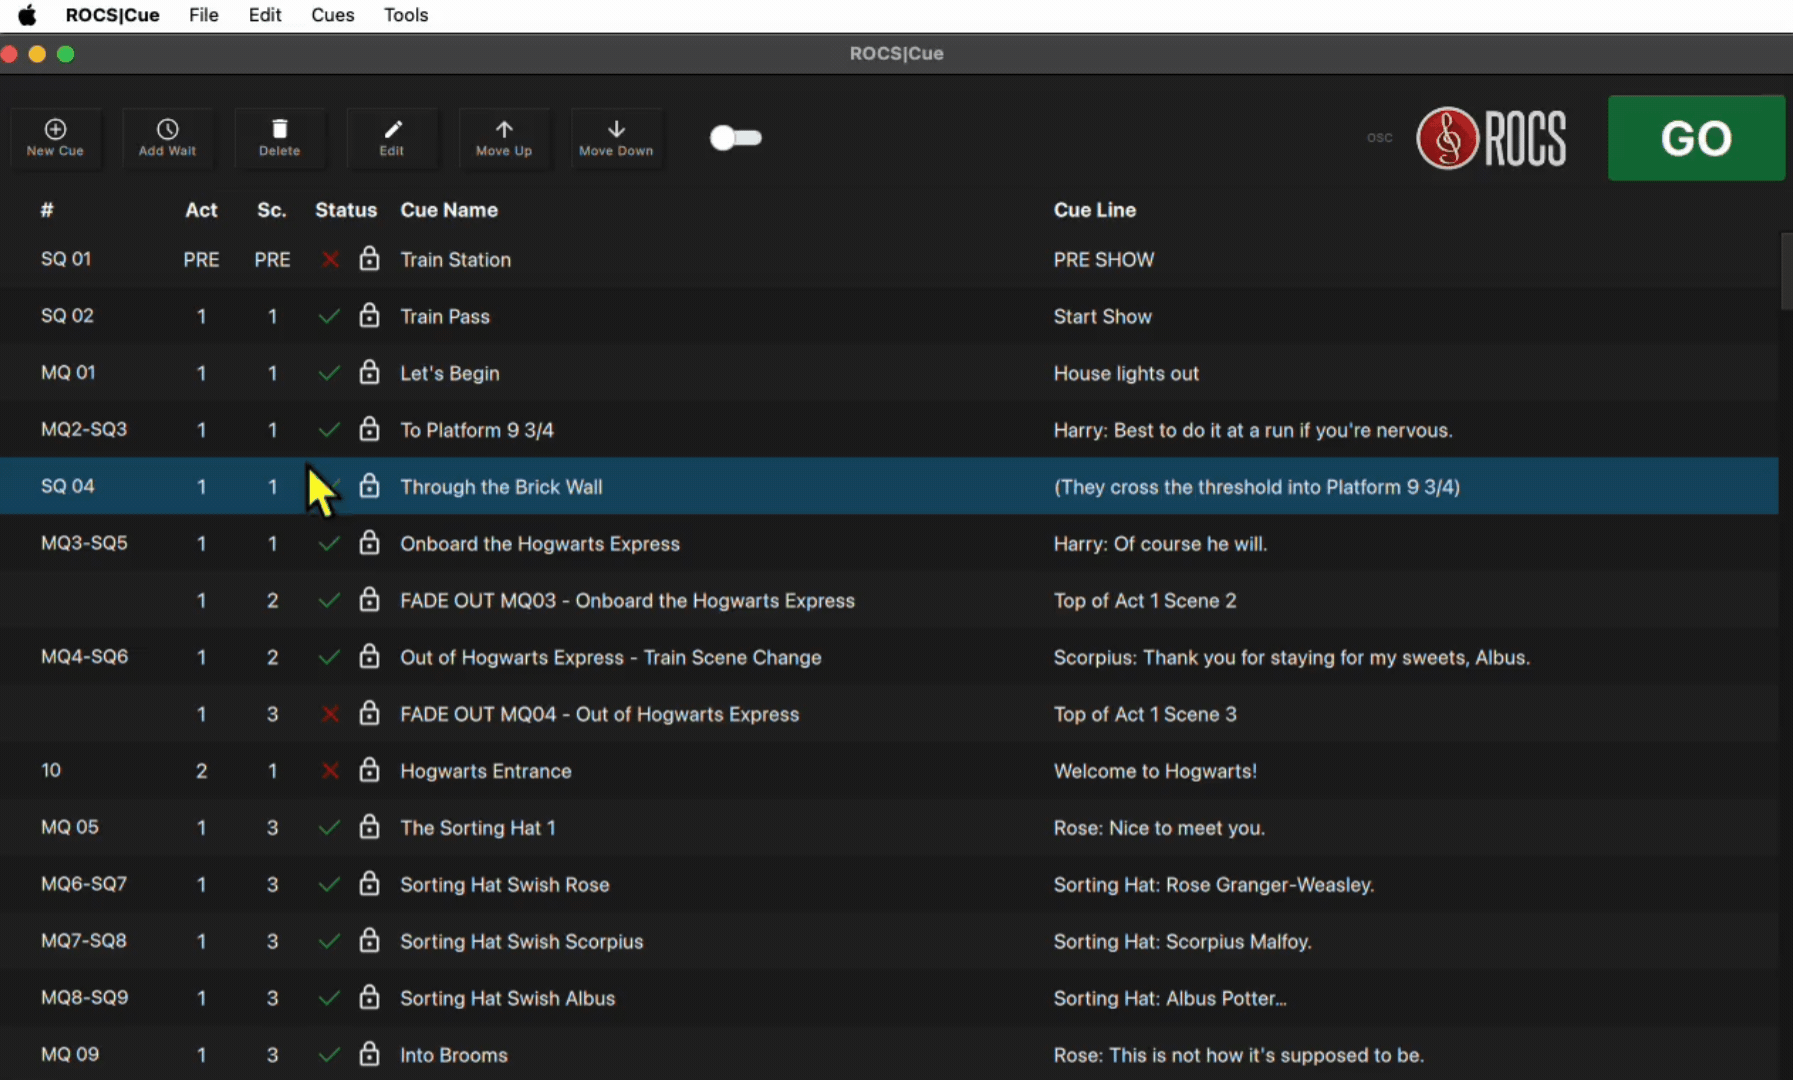
You can use the move buttons up and down to reorder your Cue List for ease of use.
To move a cue, do the following:
- Select the cue you want to move from the Cue List.
- Select either the Move Up or Move Down buttons.
When creating or editing a cue, you can disable the deletion of the cue. This will add a lock sign next to the cue. Notice that by default, for all pre-built cues, we have locked those cues to prevent deletion.
To lock a cue, do the following:
- Select the cue you want to lock from the Cue List.
- Click the Edit button OR double-click.
- Click Lock Event checkbox.
- Click OK to save.
Locked vs. Unlocked Cue
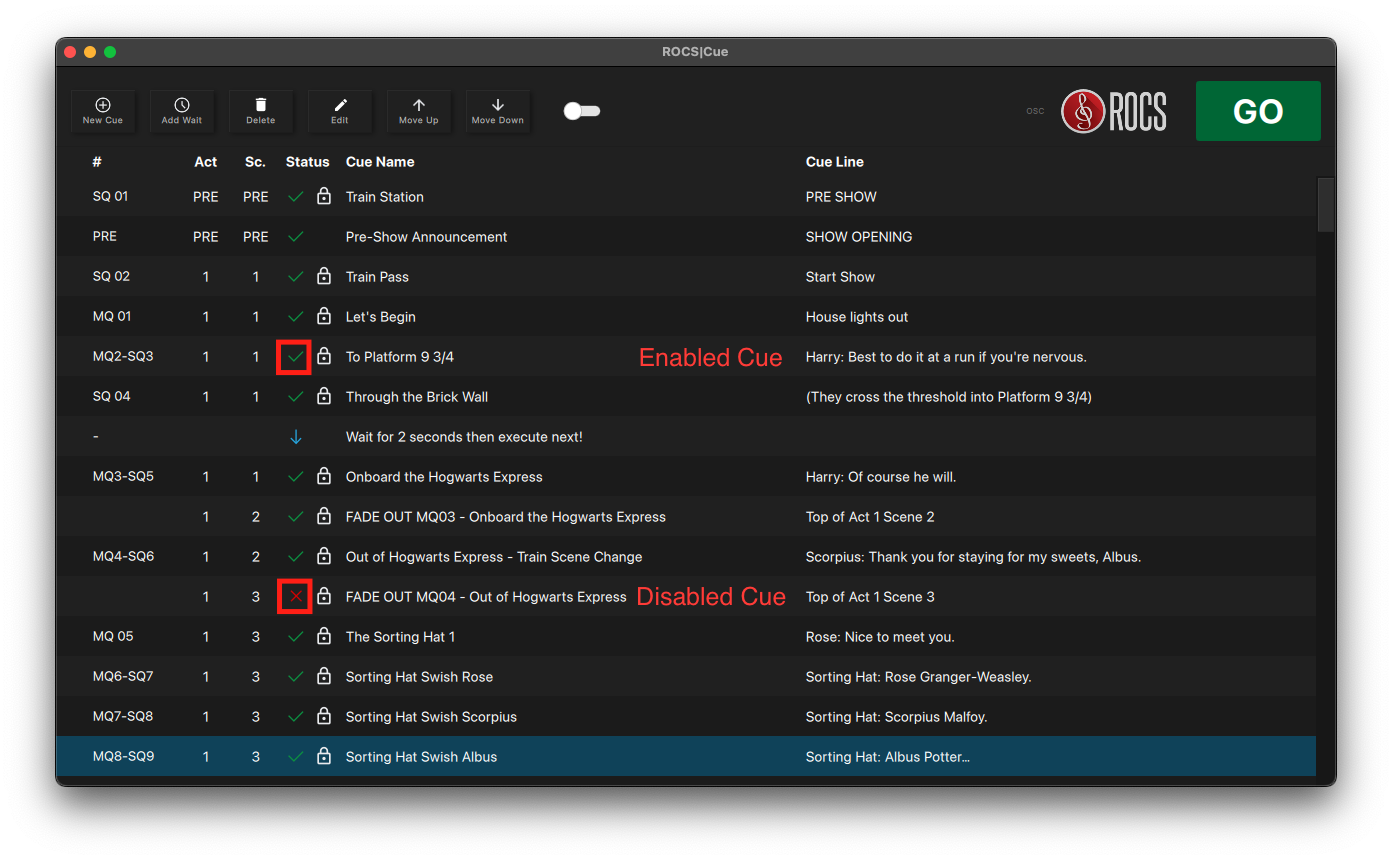
When creating or editing a cue, you can disable the cue to prevent it from being played in the Cue List. unless you specifically select that cue. This will change the status of the cue from a green checkmark to a red x in the Cue List. Disabling cues also allows you to hide these cues when you toggle the disabled cues.
To disable a cue, do the following:
- Select the cue you want to disable from the Cue List.
- Click the Edit button OR double-click.
- Click Disable Event checkbox.
- Click OK to save.
Enabled Cue vs. Disabled Cue
If you have any disabled cues and don’t want them to appear in the Cue List, you can select the toggle to hide them. This will help to clean up your Cue List for ease of use. Likewise, this also works to show the hidden cues.
To show/hide all disabled events, do the following:
- Click the Show/Hide Disabled Cues toggle.

As you work to make edits to your show, you will want to listen to the specific cues you created. This is where the Go button comes in! It allows you to play the cues from your Cue List during your tech rehearsal. This will also be the way you play your show during performances.
To play the cues, do the following:
- Select the cue you want to play.
- Click the Go button OR press the Spacebar on your keyboard.
You will notice that once you click Go, the highlight for the selected cue will move to the next cue automatically. However, it will skip over any disabled cues.
4. Configuring Pre-Built Cues
Creating an Instance in the SFX Manager
When you download and install the audio package and open the ROCS|Cue File, this will automatically populate the list of instances in your SFX Manager. While we have created all the instances you need for your show, you can add new instances to customize your show.
To create an instance, do the following:
- Go to Tools.
- Click on SFX Manager in the drop-down menu.
- Select the SFX Source File you want.
- Click Create OR double-click.
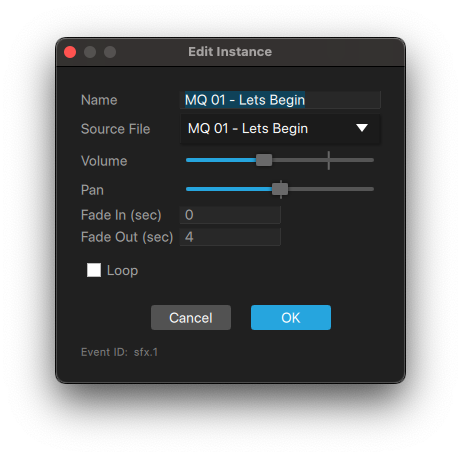
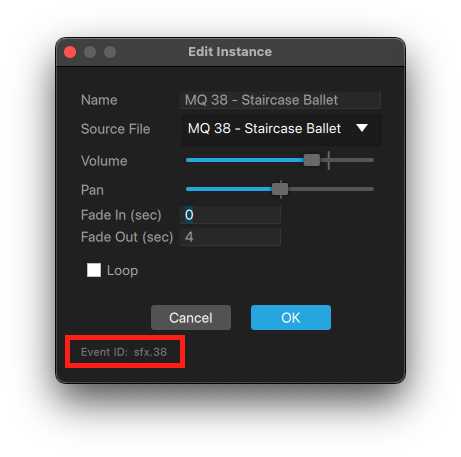
- You can edit the following options:
- Name – Name of the instance. This automatically populates with the same name as the source file.
- Volume – Changes the volume of the instance. Right-click to type a value.
- Pan – Changes whether the instance plays out of the left or right speakers. Right-click to type a value.
- Fade In (sec) – Amount of time for the instance to gradually fade in.
- Fade Out (sec) – Amount of time for the instance to gradually fade out.
- Loop – Allows the instance to play indefinitely.
- Click the Event ID to copy.
- Event ID – Unique name for that specific instance. You need this ID to create the OSC command to play the file.
- Click OK to save and close the Edit Instance pop-up window.
- Click X to close the SFX Manager.
- Add the SFX instance to a cue.

NOTE: If a Fade In is listed as zero (0) that is the same as an abrupt Go command. If a Fade Out is listed as zero (0), that is the same as an abrupt Stop command. This means that no fade will happen. For a fade to happen, it needs a value above 0 because a fade happens over time.
Editing an Instance in the SFX Manager
When you download and install the audio package, and open the ROCS|Cue File, this will automatically populate the list of instances in your SFX Manager. While we have set the defaults for you, you can edit existing instances to customize your show.
To edit an instance, do the following:
- Go to Tools.
- Click on SFX Manager in the drop-down menu.
- Select the Instance you want to edit.
- Click Edit OR double-click.
- You can edit the following options:
- Name – Name of the instance. This automatically populates with the same name as the source file.
- Volume – Changes the volume of the instance. Right-click to type a value.
- Pan – Changes whether the instance plays out of the left or right speakers. Right-click to type a value.
- Fade In (sec) – Amount of time for the instance to gradually fade in.
- Fade Out (sec) – Amount of time for the instance to gradually fade out.
- Loop – Allows the instance to play indefinitely.
- Click the Event ID to copy.
- Event ID – Unique name for that specific instance. You need this ID to create an OSC command to play the file.
- Click OK to save and close the Edit Instance pop-up window.
- Click X to close the SFX Manager.
- Add the SFX instance to a cue.
NOTE: If a Fade In is listed as zero (0), that is the same as an abrupt Go command. If a Fade Out is listed as zero (0), that is the same as an abrupt Stop command. This means that no fade will happen. For a fade to happen, it needs a value above 0 because a fade happens over time.
Within ROCS|Cue, we use OSC commands to trigger music and sound effects from your audio package. Here is a list of OSC commands you can use in ROCS|Cue:
| Action | OSC Command |
|---|---|
| Play / Fade In Cue | /rocs/sfx/sfx.#/play |
| Stop / Fade Out Cue | /rocs/sfx/sfx.#/stop |
| Fade To (a different audio level)* | /rocs/sfx/sfx.#/fadeto (#db) (#time) |
If a Fade In is listed as zero (0) that is the same as an abrupt Go command. If a Fade Out is listed as zero (0), that is the same as an abrupt Stop command. This means that no fade will happen. For a fade to happen, it needs a value above 0 because a fade happens over time.
To use the Fade To OSC command, replace #db with the specific volume and #time with the number of seconds it takes to fade to that volume.
- Example: sfx/sfx.55/fadeto -20 6
In the example, this Fade To will change the volume to -20 decibels below full scale (listed as 0.0) and take 6 seconds to get to that level.
When you download and install the audio package and open the ROCS|Cue File, this will automatically populate the list of instances in your SFX Manager.
If you want to add an SFX Instance as a function in a cue, you need the Event ID from the instance in the SFX Manager. An Event ID is a unique name for that specific instance. You need this ID to create an OSC command.
Instance Event ID
ROCS|Cue OSC Command
To add an SFX instance as a function, do the following:
- Create an instance in SFX Manager and remember the Event ID number (example: sfx.55).
- Select or Add the Cue where you want to add the instance.
- Click Edit OR double-click.
- Click the New OSC button.
- Type the name of the Function.
- (Optional) Type in the time for Offset (ms).
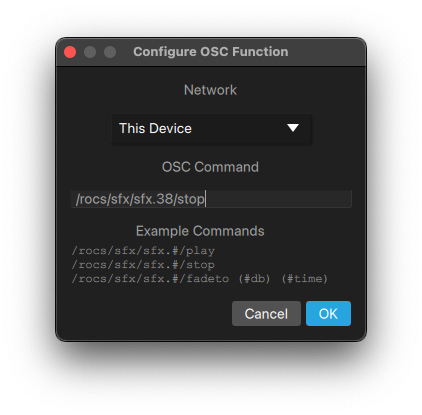
- Click Configure.
- Paste one of the following OSC commands into the OSC Command field.
- Use the OSC Commands Dictionary to tell the tool what to do with that function (play, stop, fadeto). Copy and paste one of the following OSC commands:
- /rocs/sfx/sfx.#/play
- /rocs/sfx/sfx.#/stop
- /rocs/sfx/sfx.#/fadeto (#db) (#time)
- Replace the sfx.# with the Event ID.
- Example: /rocs/sfx/sfx.55/play
- Example: /rocs/sfx/sfx.55/stop
- Example: /rocs/sfx/sfx.55/fadeto -20 6
- Click OK to save and close the Configure OSC Function pop-up window.
- Click OK to save and close the Configure Cue pop-up window.
NOTE: Whenever you add an OSC command as a function, we always recommend that you test that the cue is working as intended by playing the cue in the Cue List.
5. Configuring Custom Audio Cues
Custom Audio File Storage Location
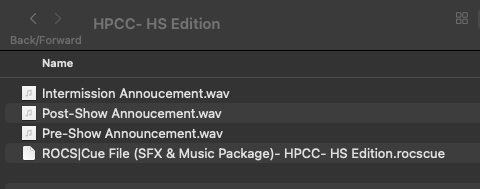
If you want to add custom audio files, such as a pre-show announcement, you need to save the WAV files to your local device. For the audio files to work, you need to save your ROCS|Cue file and the audio files in the same folder on your computer.
For example:
- Folder
- ROCS|Cue File
- Audio file 1
- Audio file 2
- Audio file 3
- Etc.
NOTE: We currently only support WAV audio files for ROCS|Cue. However, we are planning to support MP3s in future iterations of ROCS|Cue. To get info on the latest feature updates and bug fixes, check out the Product Updates support page.
Adding Non-ROCS Audio to a Cue
If you want to add custom audio (non-provided by ROCS) to a cue, you need to have the WAV file saved to your local device. This should be in the same folder as your ROCS|Cue show file for it to work.
To add an audio file as a function, do the following:
- Select the Cue where you want to add the custom audio file.
- Click Edit OR double-click.
- Click the New Audio button.
- Type the name of the Function.
- (Optional) Type in the time for Offset (ms).
- Click Configure.
- Next to Source File, select Choose.
- In the pop-up window, navigate to the folder you originally created where all of your audio files are located.
- Select the audio file you want.
- Click Open.
- You can edit the following options:
- Command – The default is Play, but you can change it to Stop.
- Volume – Changes the volume of the instance. Right-click to type a value.
- Pan – Changes whether the instance plays out of the left or right speakers.
- Fade In (sec) – Amount of time for the instance to gradually fade in.
- Fade Out (sec) – Amount of time for the instance to gradually fade out.
- Click OK to save and close the Custom Audio Parameters pop-up window.
- Click OK to save and close the Configure Cue pop-up window.
NOTE: If a Fade In is listed as zero (0), that is the same as an abrupt Go command. If a Fade Out is listed as zero (0), that is the same as an abrupt Stop command. This means that no fade will happen. For a fade to happen, it needs a value above 0 because a fade happens over time.
Whenever you add a function, we always recommend that you test that the cue is working as intended by playing the cue in the Cue List.
NOTE: We currently only support WAV audio files in ROCS|Cue. However, we are planning to support MP3s in future iterations of ROCS|Cue. To get info on the latest feature updates and bug fixes, check out the Product Updates support page.
6. Saving ROCS|Cue Changes
When you receive your show, everything you need will be pre-programmed. We understand that you might want to customize your show. Therefore, ROCS|Cue provides the ability to make edits and add custom audio to fit your production. As you make changes to your show, make sure to save your ROCS|Cue file often.
To save your ROCS|Cue file, do the following:
- Go to File in the menu.
- Click Save.
NOTE: We do not currently have an undo button, auto-save, or version history. However, we are planning to add additional capability to future iterations of ROCS|Cue. To get info on the latest feature updates and bug fixes, check out the Product Updates support page.
Saving a Copy of Your ROCS|Cue File
When you receive your show, everything you need will be pre-programmed. We understand that you might want to customize your show, so in the software, you can make edits to fit your production. As you make changes to your show, make sure to save your ROCS|Cue file often. We recommend using Save As to create your own backups, as deleting a pre-built cue makes it difficult to add back.
To save a copy of your ROCS|Cue file, do the following:
- Go to File.
- Click Save As.
- In the pop-up window, give your file a new name in the Save As field. We recommended adding a version at the end. For example: Show Name, version 1.
- In the Where/ Location drop-down menu, navigate to the folder you originally created where all of your audio files are downloaded.
- Make sure to include .rocscue at the end of the file name so it will work.
- Click Save.
NOTE: We do not currently have an undo button, auto-save, or version history. However, we are planning to add additional capability to future iterations of ROCS|Cue. To get info on the latest feature updates and bug fixes, check out the Product Updates support page.
For the most part, the ROCS|Cue file should be managed by a single person (whoever will be the ROCS|Cue operator for the performances). We recommend the fewer people working in the show file, the better. This is to avoid confusion or loss of work. However, we do understand that sometimes, multiple people need to be working on the same file for the show production. Just be sure to keep track of which version you’re working on with your production team.
To send a copy of your ROCS|Cue file to someone else, do the following:
- Make sure to save a copy of your ROCS|Cue file. Because there isn’t version history for ROCS|Cue, we recommend that you add the version to the title to avoid confusion.
- For example: Show Name, version 1
- Sending the ROCS|Cue file
- Save the file to your cloud drive (like Google Drive, OneDrive, Dropbox, etc.) and send a share link to the person you want. You can also email the ROCS|Cue file.
- Sending custom audio files
- If you have created any custom audio, those files need to be sent to the other person as well for the ROCS|Cue file to work properly. Make sure that they save the audio files in the same folder as the ROCS|Cue file.
- The other person needs to complete all steps in the download checklist. However, instead of using the original ROCS|Cue show file, they need to download and use the updated one that you sent to them.