Introducing Stage|Tracks
The Stage|Tracks software provides world-class, fully orchestrated, performance tracks brought to your theater. To avoid confusion, there are two different applications:
- Stage|Tracks
- The fully functional desktop version.
- It integrates seamlessly with our rehearsal tool Show|Ready.
- ROCS|Player (previously known as Stage|Tracks Mobile)
- A simple player for mobile devices that’s only available for Legacy Shows.
This page will describe the fully functional desktop version. Don’t worry- once you have used Show|Ready, the desktop version of Stage|Tracks is easy!
Before diving into this user manual, we recommend that you read this page first:
Menu
- Main Window
- Transport
- Song Info
- Go to Bar
- Playlist (previously known as “Song List”)
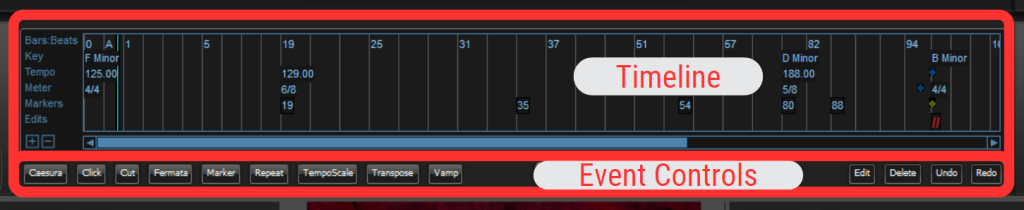
- Timeline
- Event Controls
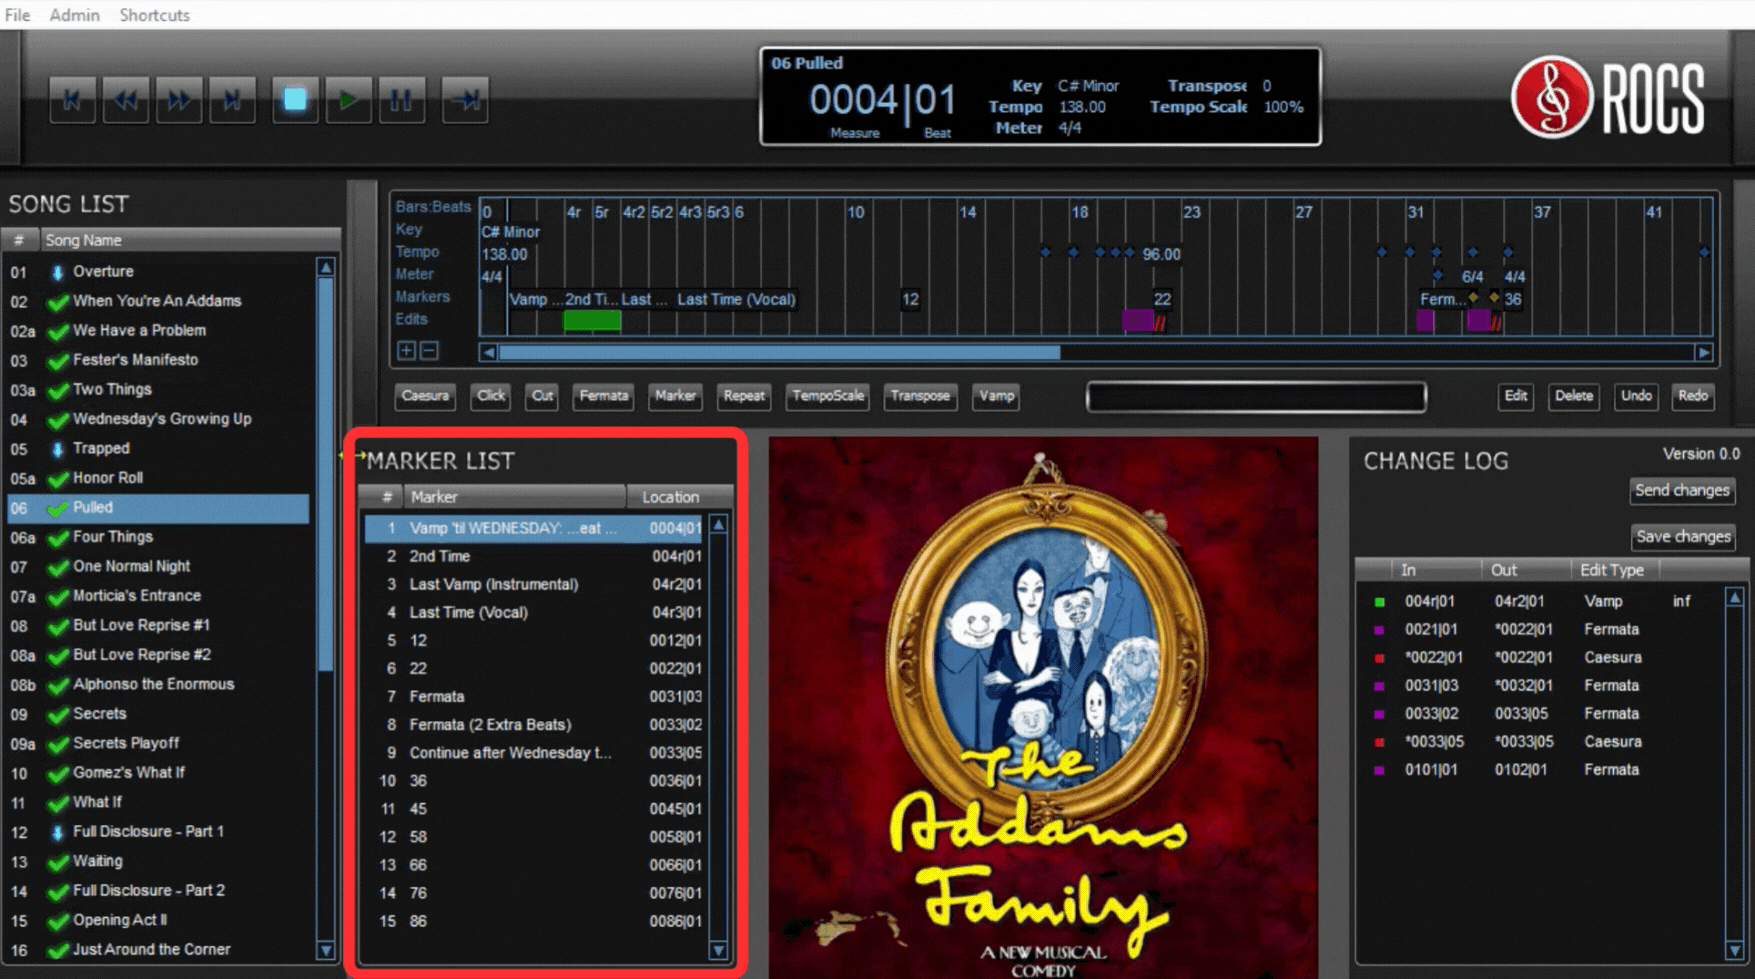
- Marker List
- Event List (previously known as “Change Log)
1. Managing Your Stage|Tracks License
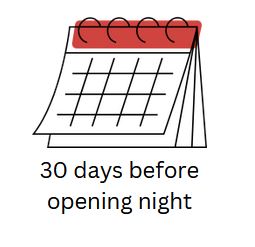
Thirty days before your opening night, Right on Cue Services (ROCS) will automatically send you the following email from licensing@rightoncueservices.com with your access codes.
Licensing Email
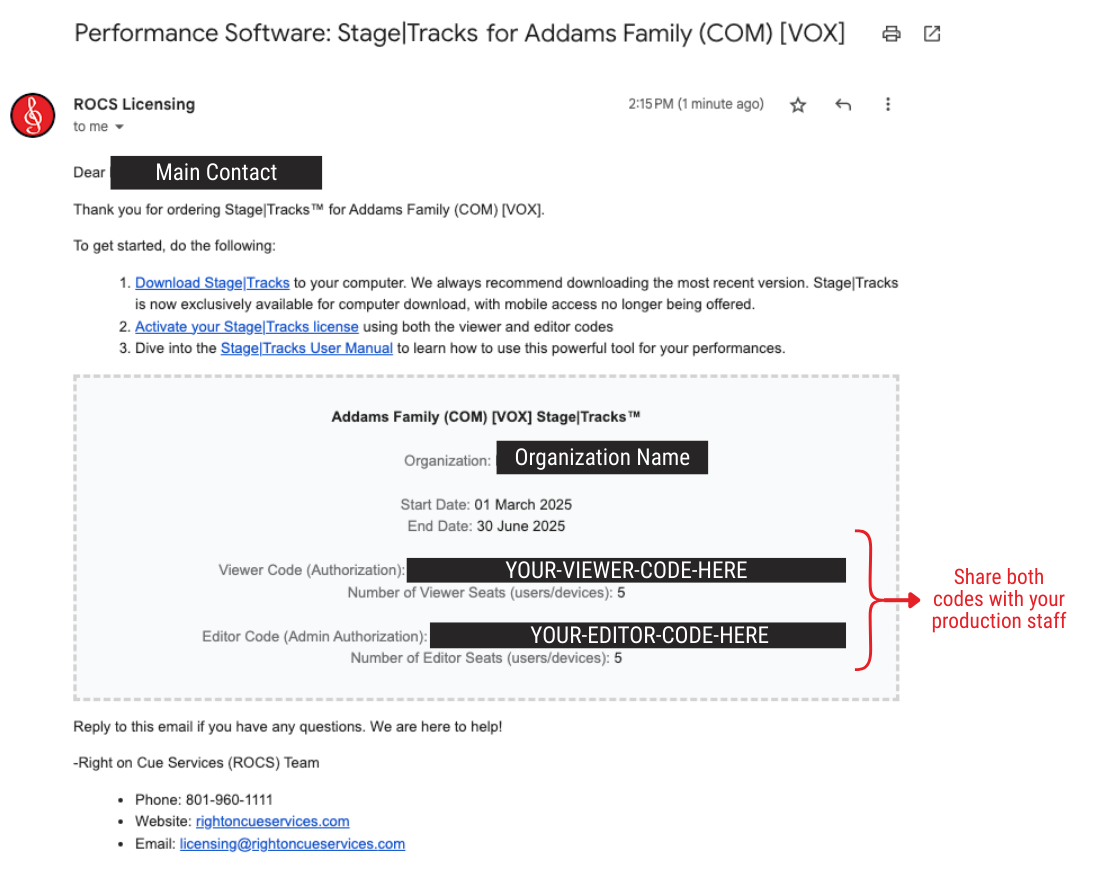
Once you have both codes, we recommend sending the codes to the relevant members of your production staff (up to 5 total users/devices). This will allow your production staff to play and edit your show in Stage|Tracks. Like Show|Ready, you will input these codes into the Stage|Tracks software to get access to your show.
The different codes might be confusing, so let’s explain how they work:
- Viewer Code
- This code grants play access to Stage|Tracks.
- Directors should share this code with their production staff.
- You can share this code with a total of five users.
- Anyone with this code can play the music unlimited times during your contract period (see the start and end date on your licensing email).
- Previously known as authorization code.
- Viewer Code & Editor Code
- Using both these codes together grants edit access to Stage|Tracks.
- Directors should share this code with their production staff.
- You can share this code with a total of five users. We limit this to five users because you don’t want many people to have access to make edits to your show.
- Anyone with this code can play the music unlimited times during your contract period (see the start and end date on your licensing email).
- Previously known as authorization and admin authorization code.
If you hit your seat limit, please reply to your licensing email with your request, and Right on Cue Services (ROCS) will be happy to help.

We always recommend downloading the most recent version of Stage|Tracks.
To download the software for MacOS or Windows (desktop or laptop):
- Go to our Downloads page for the most up-to-date software.
Activating Your Stage|Tracks License
The first time you launch Stage|Tracks on Mac or Windows, a pop-up window will appear asking you to agree to the Right on Cue Services (ROCS) software license agreement and input your access codes.
- Click “View the ROCS Software License Agreement” to review it.
- Select the checkbox next to “I agree” to accept the terms and conditions.
Using Your Access Codes

Next, paste your access codes to activate your show. Stage|Tracks will then download your show on Mac or Windows in preparation for editing and rehearsal.
To grant the director and production staff play access, they will need to do the following:
- In the Viewer Code field, paste the access code.
- Click the Activate button, and your show will download.
To grant the director and production staff editor access, they will need to do the following:
- In the Viewer Code field, paste the access code.
- In the Admin Editor Code field, paste the admin code.
- Click the Activate Admin button, and your show will download.
NOTE: Be aware that every time you enter the access code for the same show, it will consume one of the seats granted to your organization. If more seats are needed, please reply to your licensing email with your request, and ROCS will be happy to help.
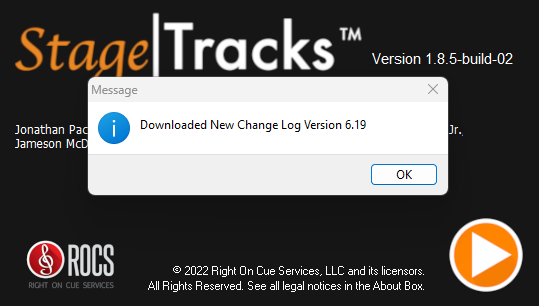
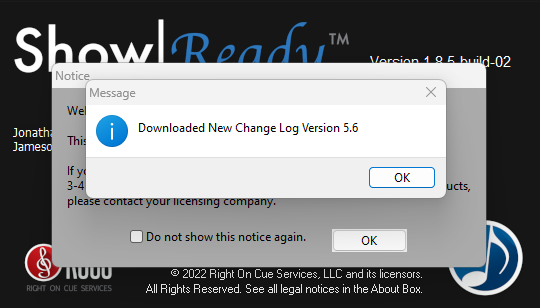
When you open Stage|Tracks in Mac or Windows, if you have recently made changes in Show|Ready, a pop-up window will appear with the notification “Downloaded New Event Log Version [number].” Click OK to close.
Code Expiration Reminder Email
As a courtesy, we have an automated email reminder that is sent one week before your access codes are set to expire. This email is designed to help you stay on top of your schedule and avoid any interruptions to your show production. We believe this reminder will provide you with greater peace of mind.
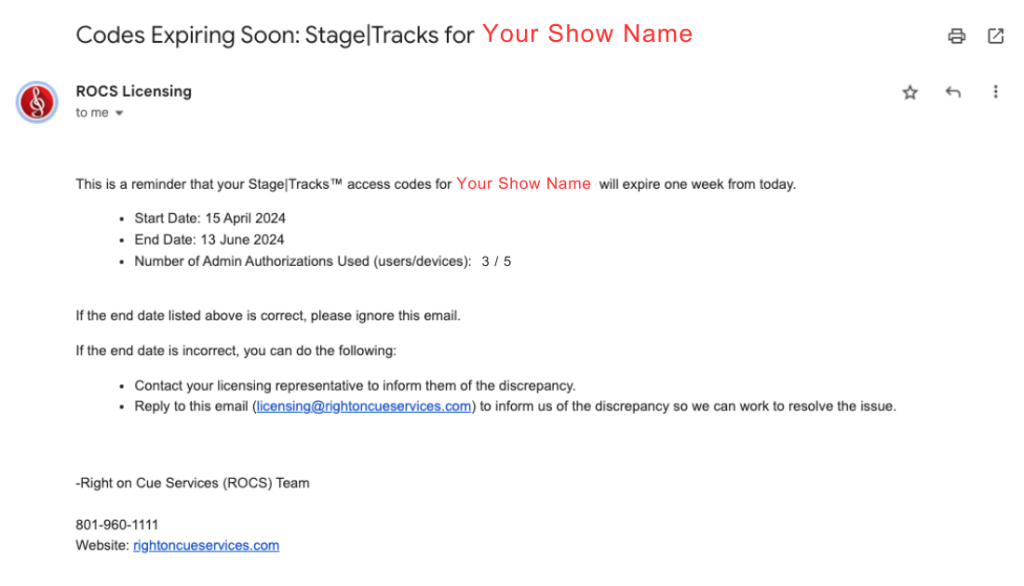
NOTE: This email is sent to the main point of contact on the account.
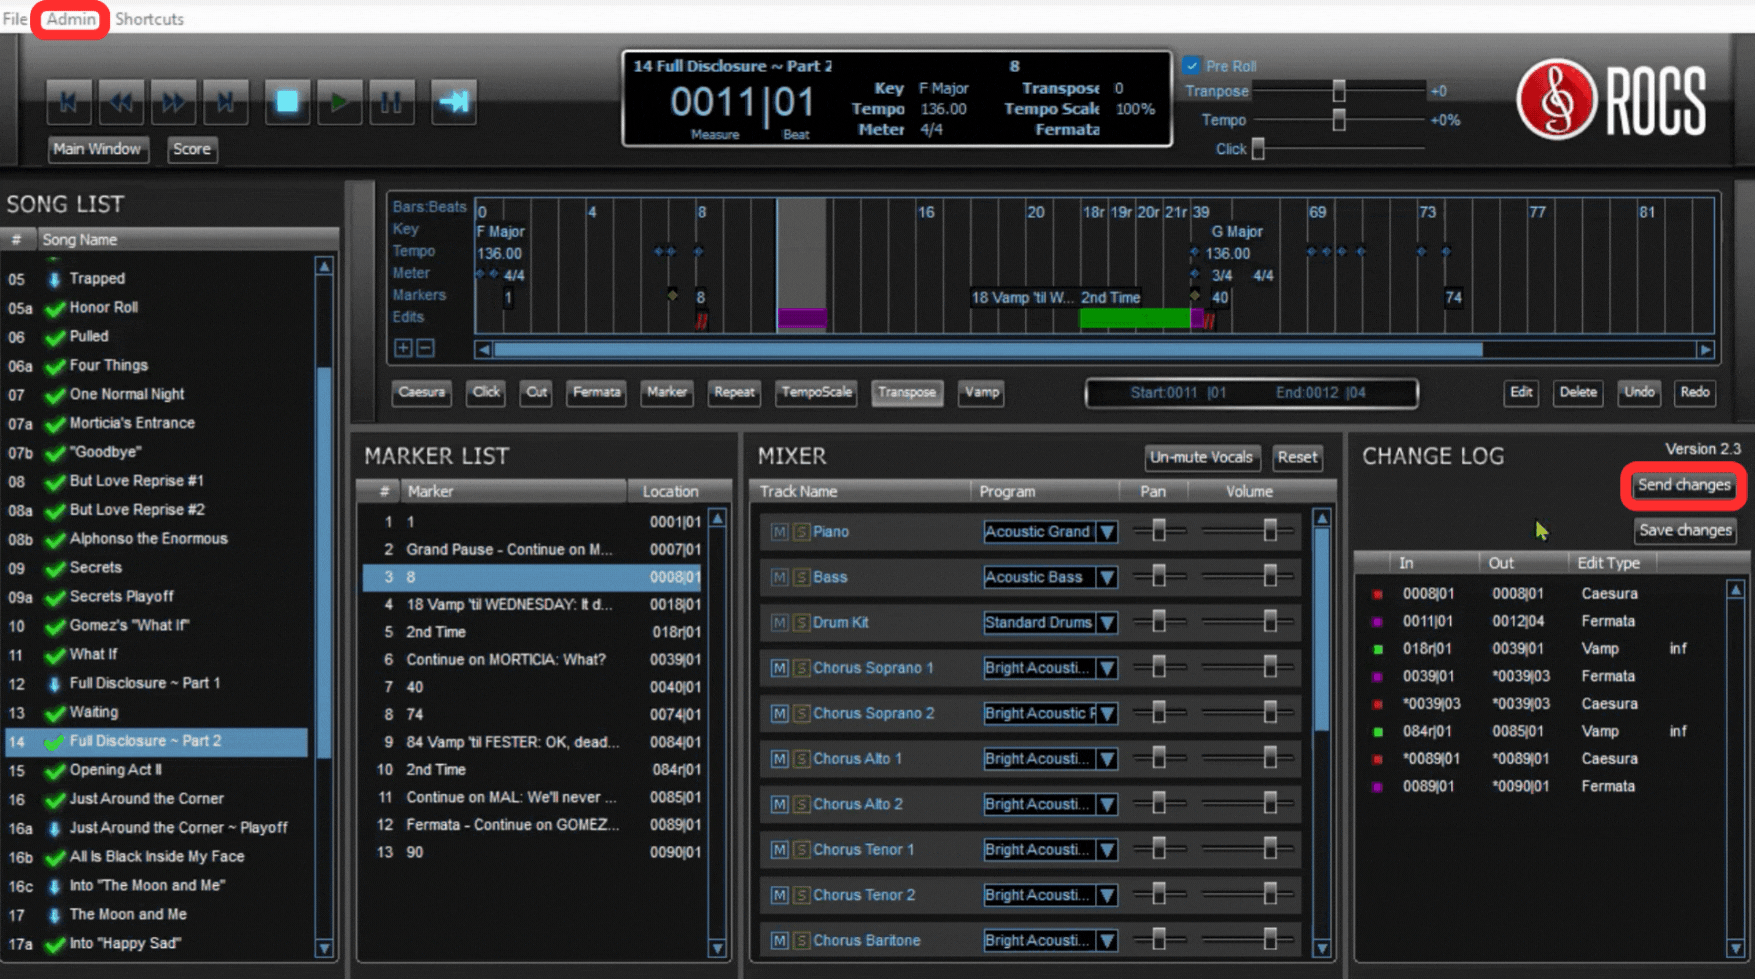
2. Navigating Stage|Tracks
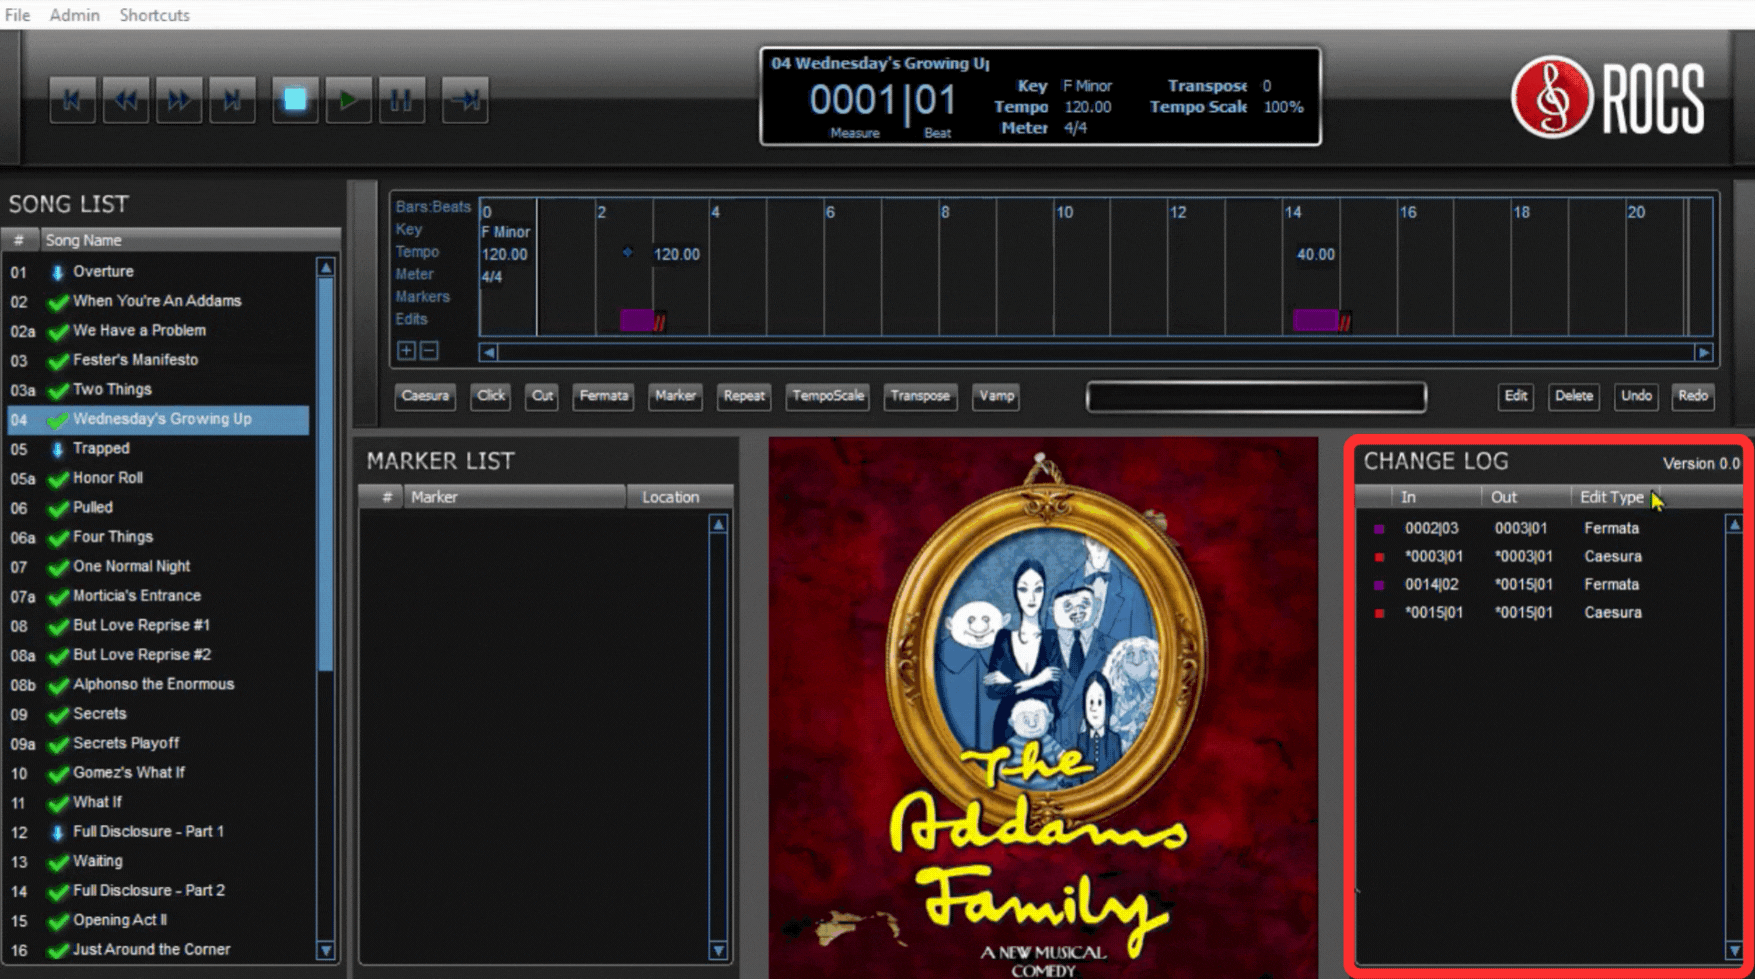
Below is the main window for Stage|Tracks. We will deep dive into each section below to learn more.
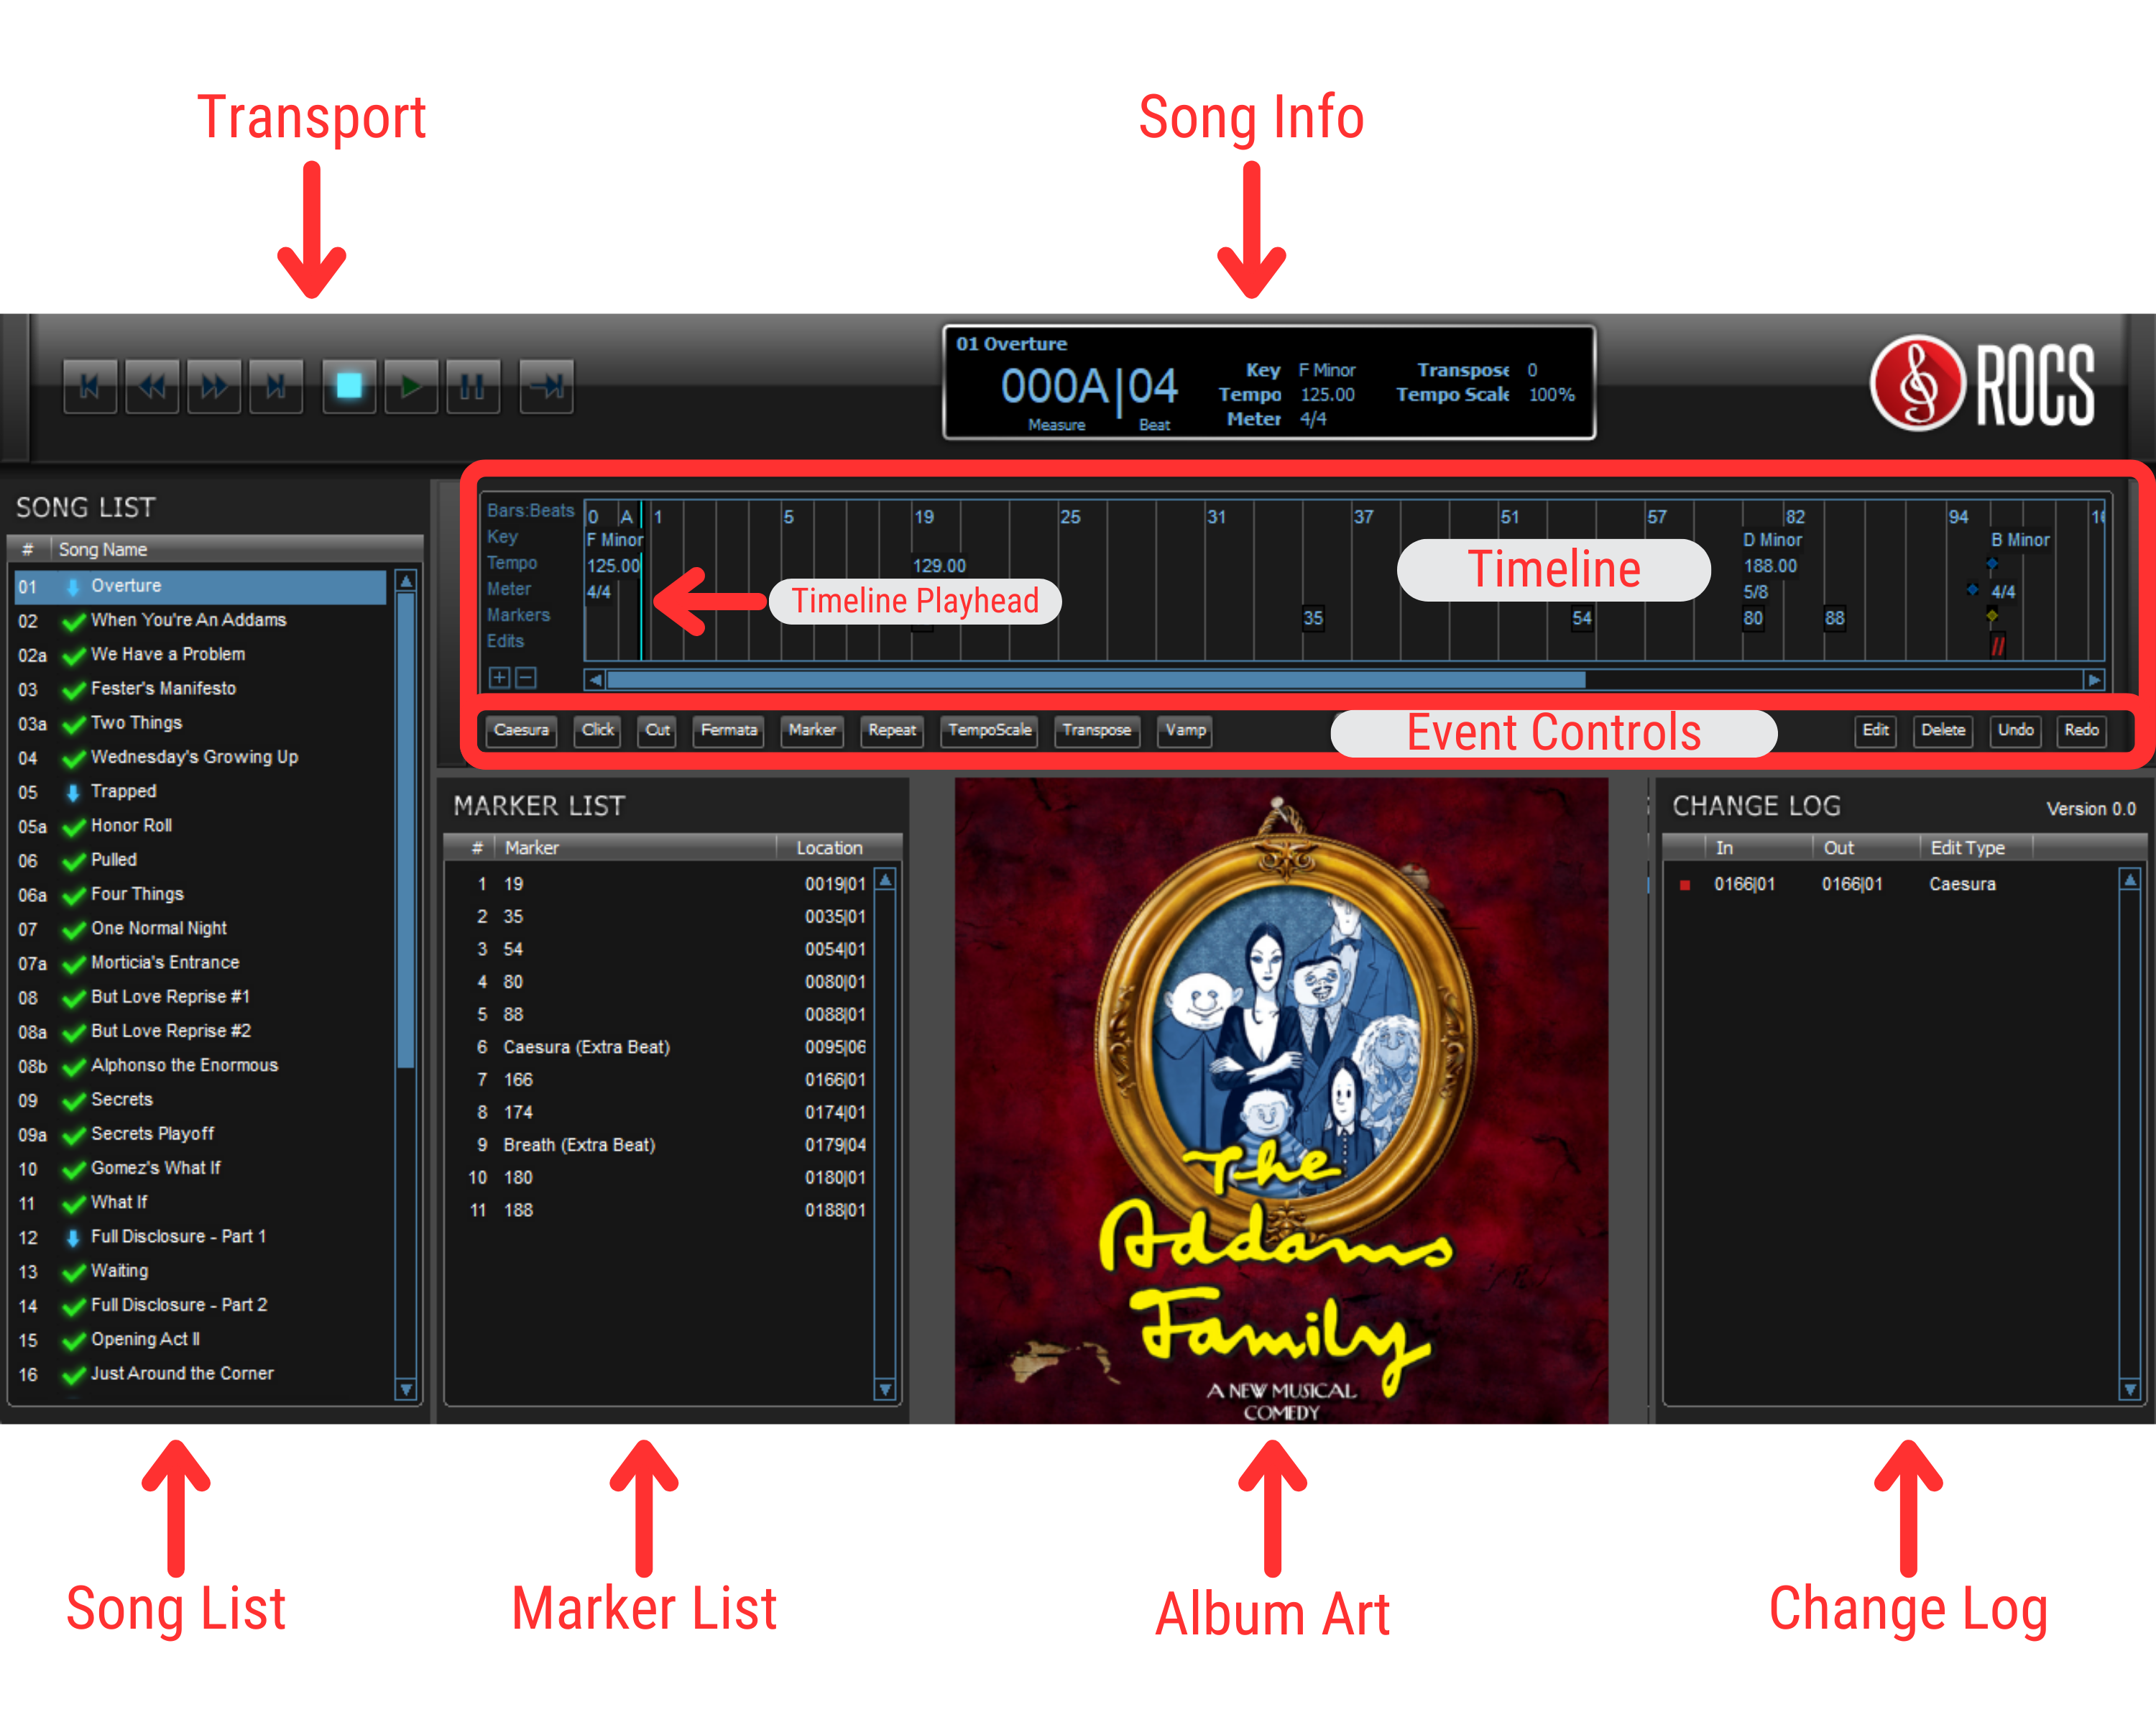
This section controls the playback of the selected song and allows you to navigate your show easily. While similar to a traditional audio player, be aware that some features differ.
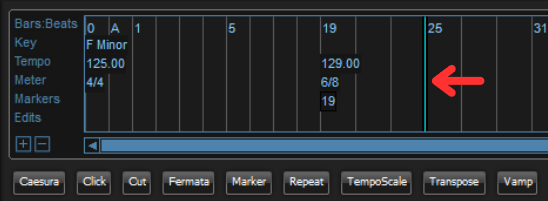
By Transport allows you to navigate your show easily. When you use this, the Timeline Playhead (vertical cyan bar) will automatically move in the Timeline.
Timeline Playhead

Transport Buttons
Here is a list of all of the Transport buttons and what they do:
- Previous Song – go to the previous song in the Playlist.
- Previous Marker – go to the previous marker in the Marker List.
- Next Marker – go to the next marker in the Marker List.
- Next Song – go to the next song in the Playlist.
- Stop – stop the music and return the Timeline Playhead to the beginning of the Timeline.
- Play – play / resume the music in the Timeline.
- Pause – pause the music at that point in the Timeline.
- | Escape Event – a multi-use button that does the following:
Many of the buttons above have keyboard shortcuts to make it faster for you to navigate. To learn more, check out Keyboard Shortcuts.
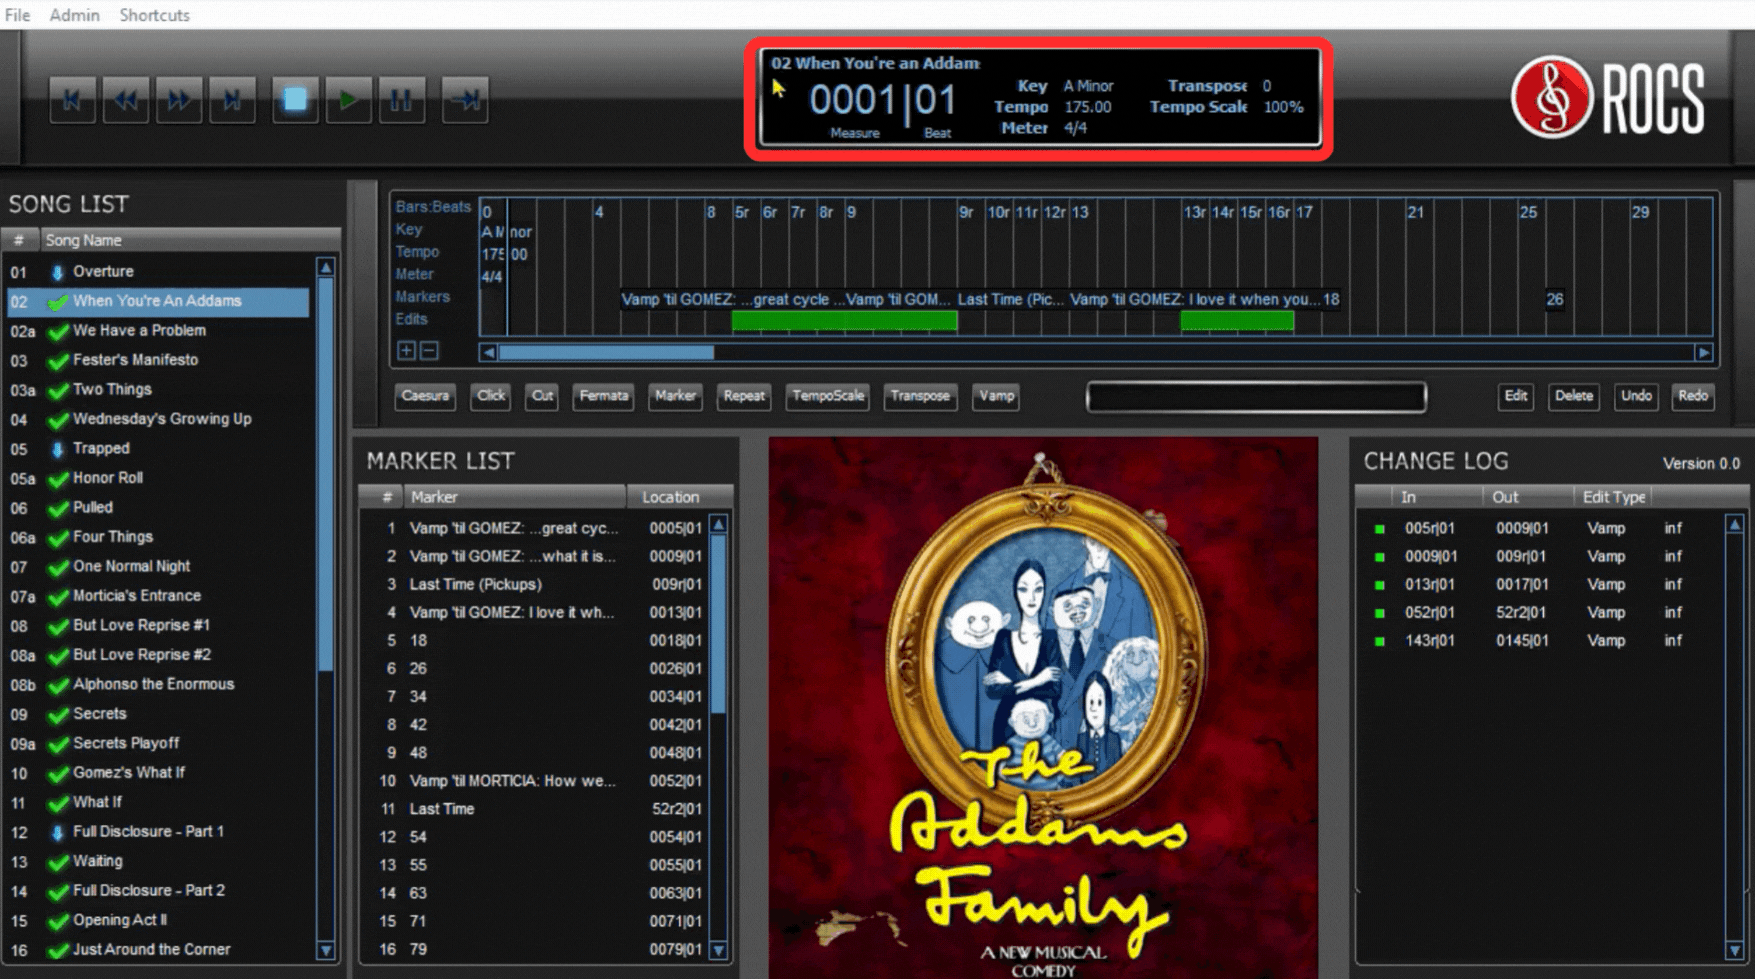
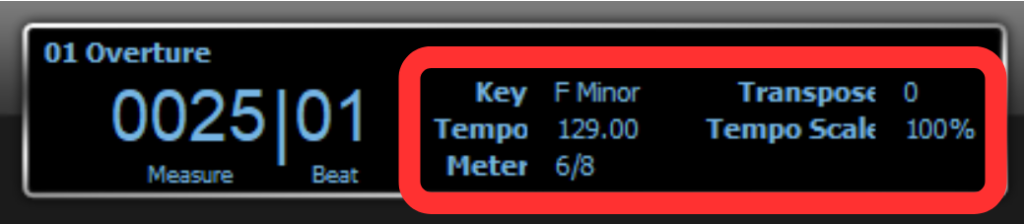
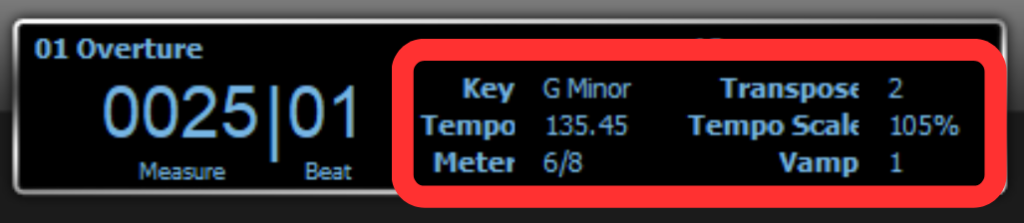
This section contains several pieces of information about the selected song. It consists of the song number, song name, marker number, marker name, measure | beat, key, tempo, meter, transposition, tempo scale, repeats, and vamps (if applicable). By default, all events in Stage|Tracks match exactly as listed in the score.
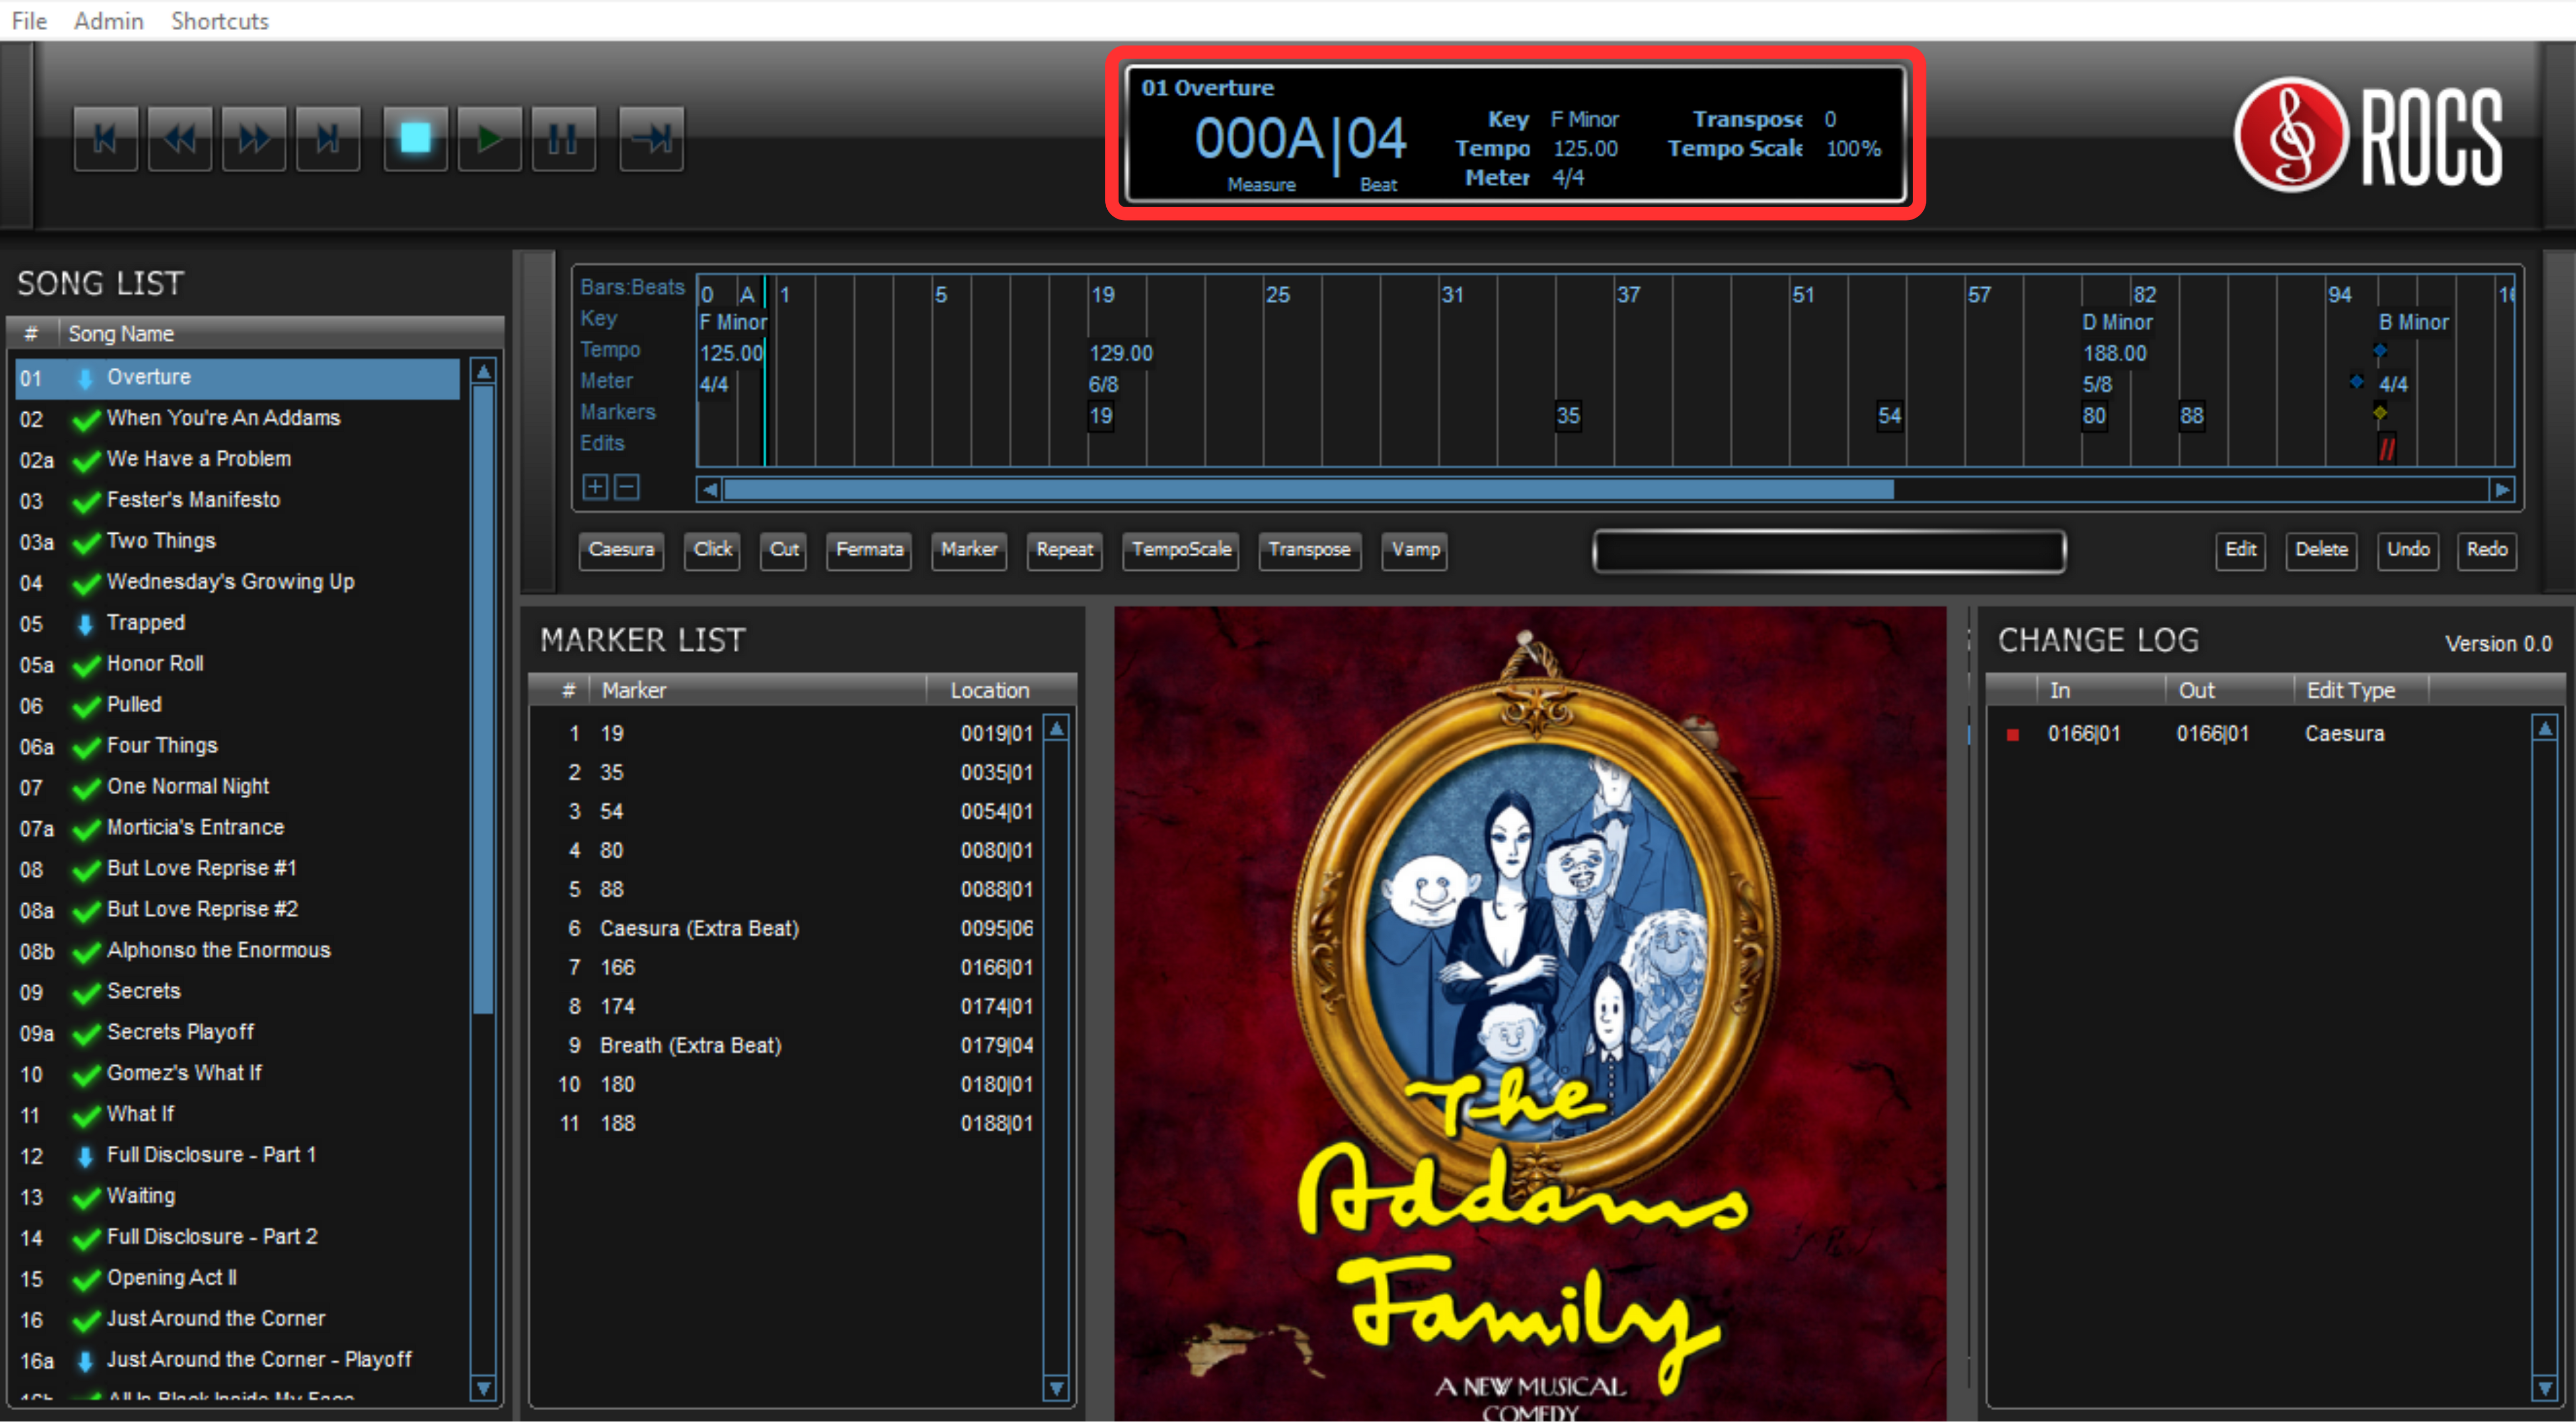
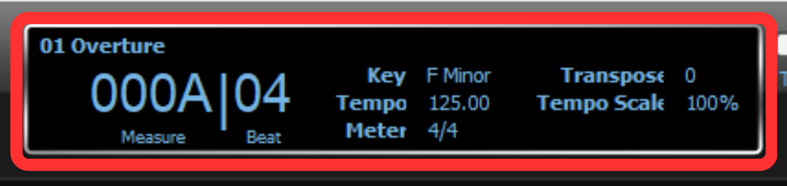
In the Song Info section, the Go to Bar lets you instantly jump to a specific bar within the selected song, so you don’t need to scroll in the Timeline. When you use this, the Timeline Playhead (vertical cyan bar) will automatically move to that specific bar in the Timeline.
Go to Bar
Timeline Playhead
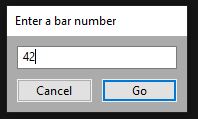
To use the Go to Bar function, you will do the following:
- In the Song Info section, click the Measure | Beat numbers OR press the Tilde (~) key on your keyboard (above the Tab button on most keyboards).
- A pop-up window will appear. Type the measure in the Enter a Bar Number text box.
- Click Go OR press Enter on the keyboard.
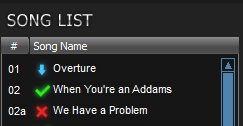
By default, all events in Stage|Tracks match exactly as listed in the Score. However, when measures repeat in a song, those measures will be marked with an additional “r” (or “r2,” etc.) that represents “repeat,” allowing each measure in the software to have a unique name.
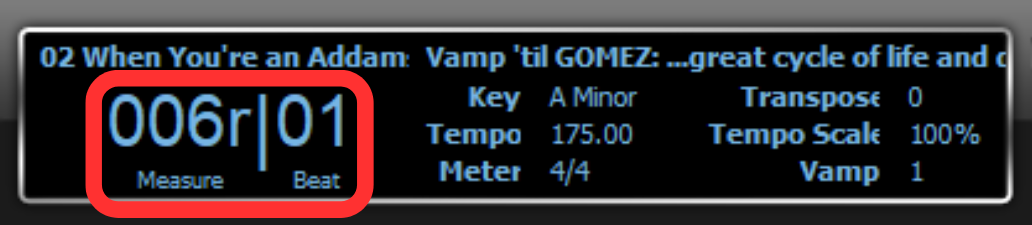
When you make changes to the transposition (key) or tempo scale, it’s reflected in the Song Info. It will also show markers, repeats, and vamps.
Score Defaults
After Edits
Playlist (Previously Known as “Song List”)
This section displays the name and number of each song. It includes information about the playback state. By default, all events in Stage|Tracks match exactly as listed in the score (except for some possible punctuation differences because of the limitation of characters in file names).
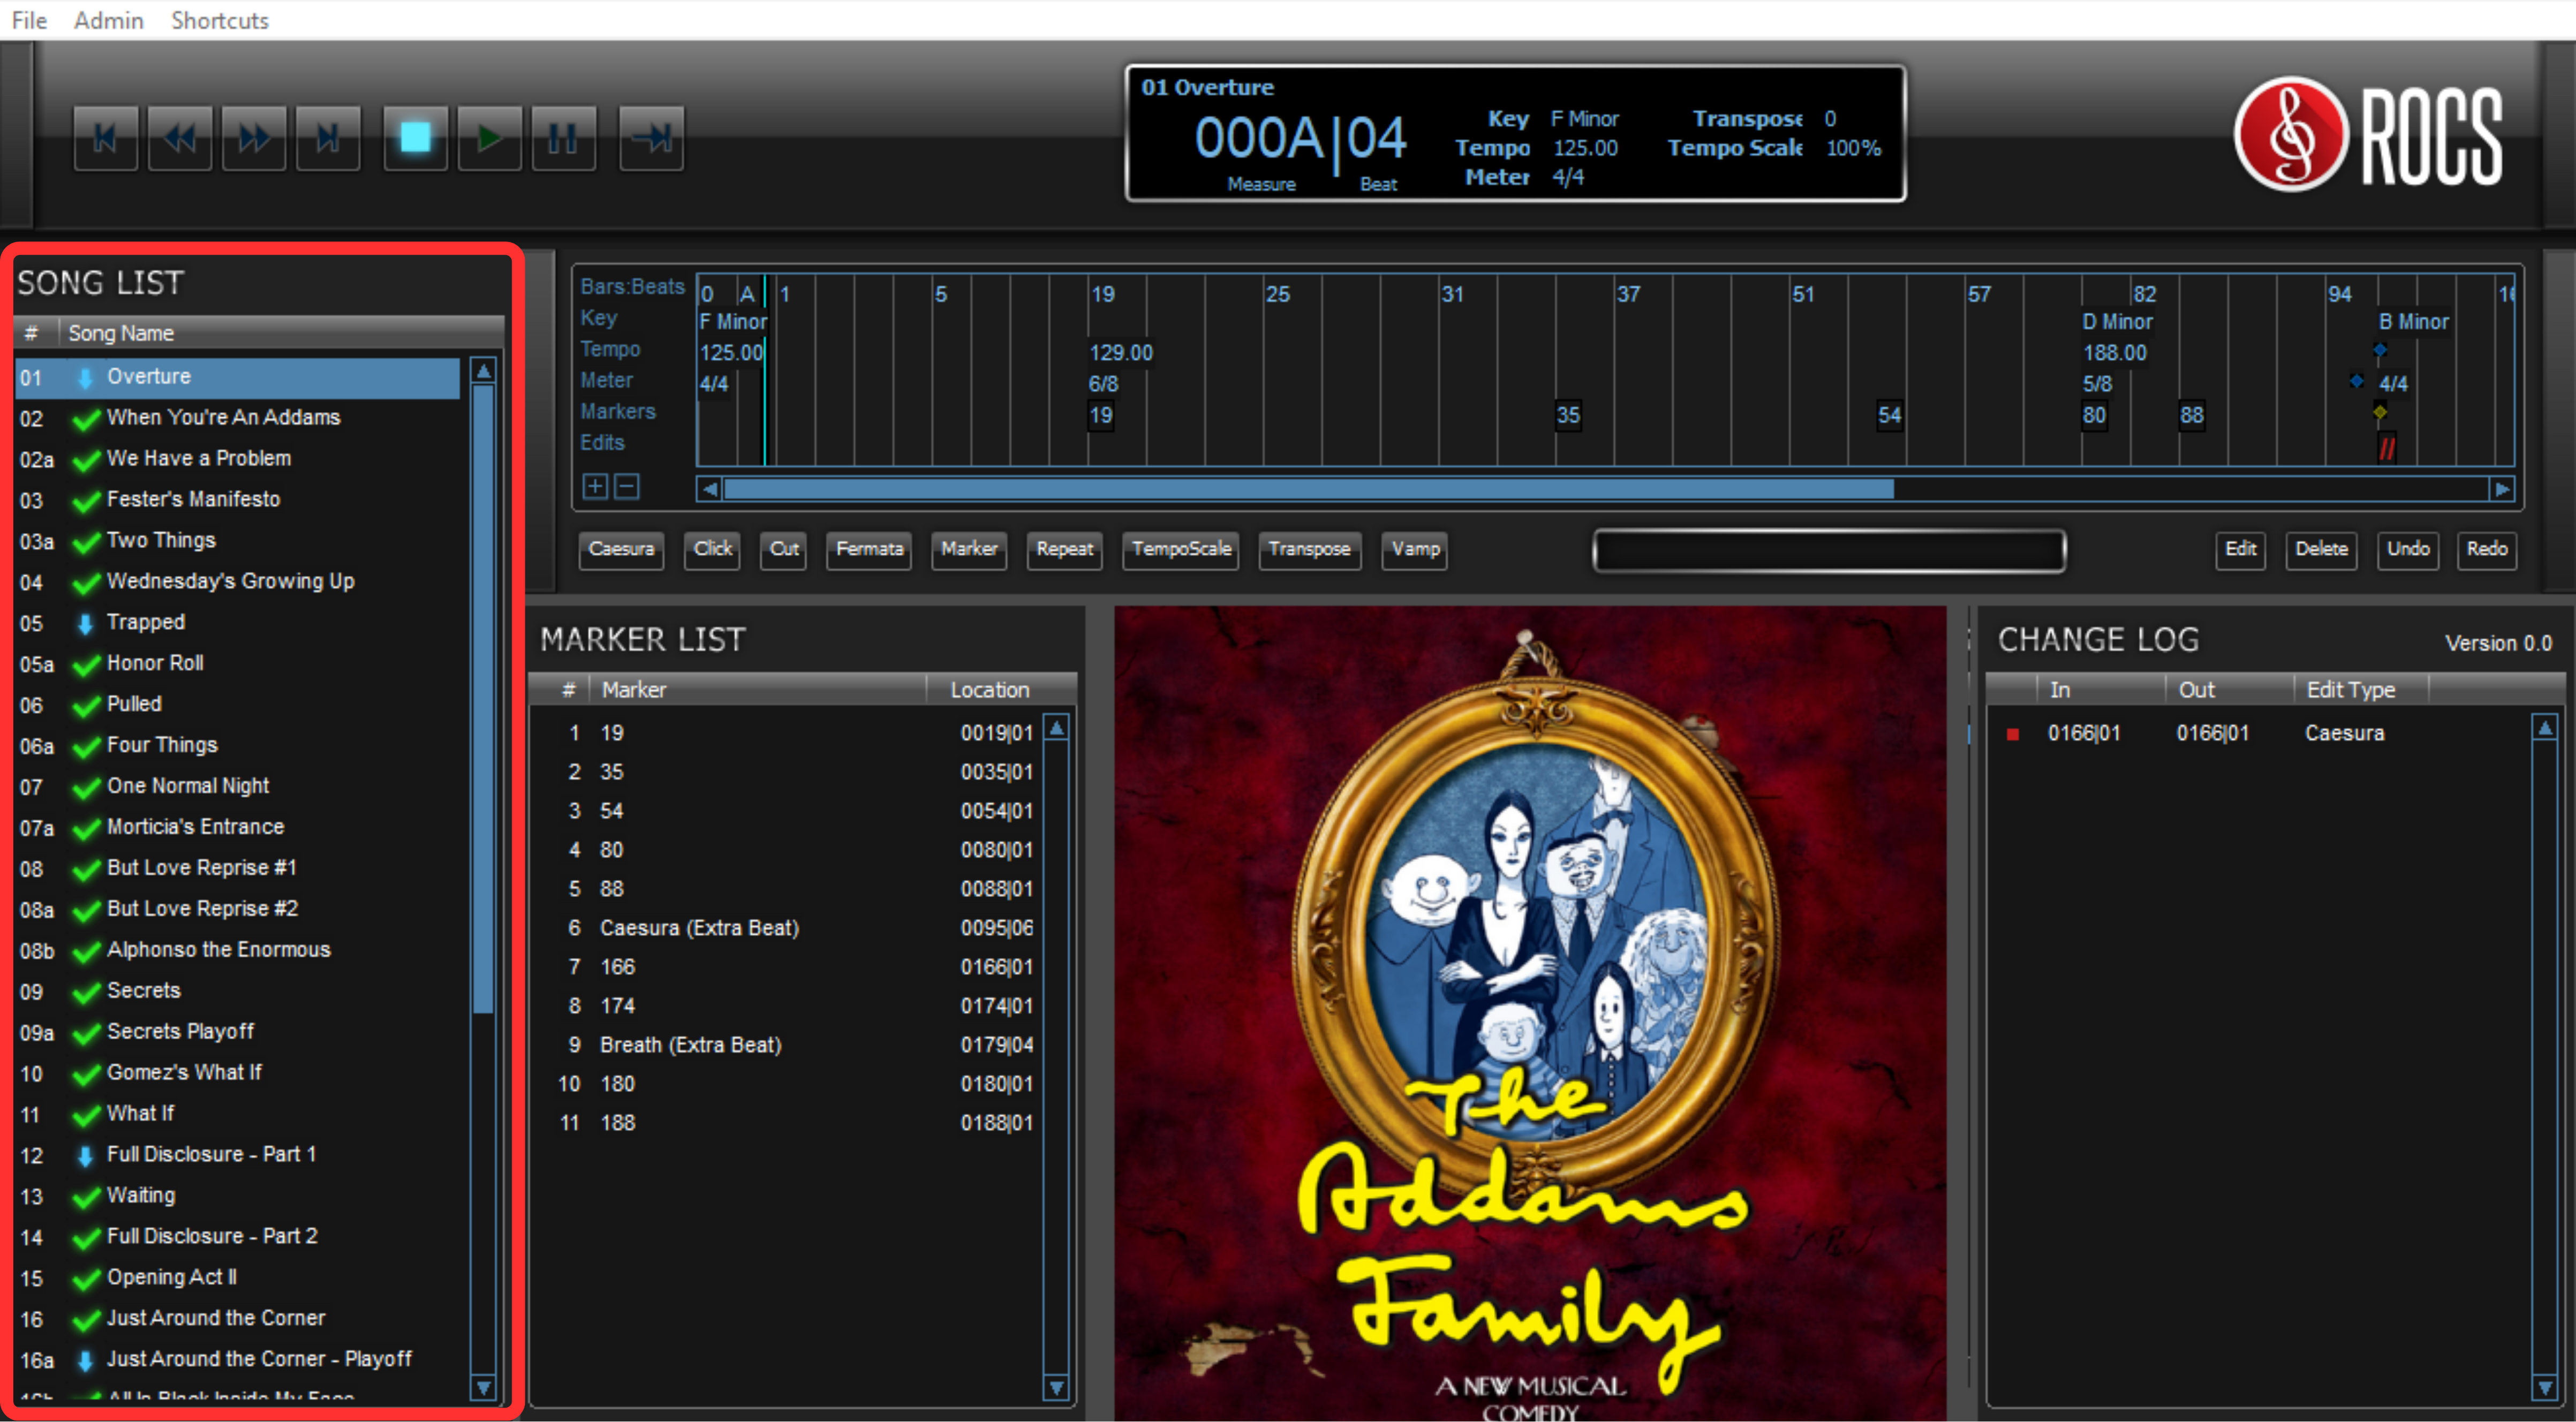
The Selected Song indicates you have loaded it for playback, represented as a highlighted blue bar.
Selected Song
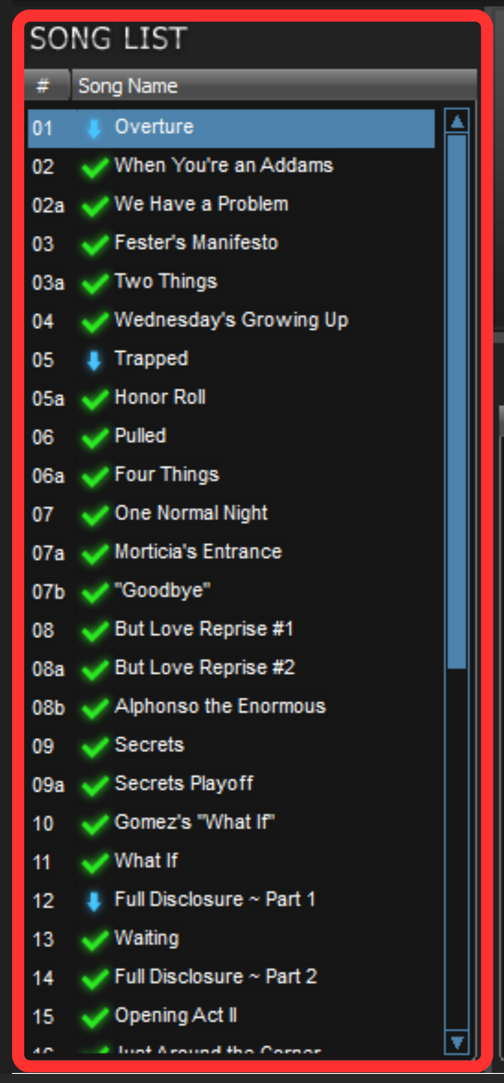
Next to the song name, the symbols show the Playback State. These symbols determine the behavior of which song loads next or if playback continues automatically. To utilize this function, click on the symbol in the Playlist to change the playback state.
Playback State
Here is a list of the Playback State Symbols and what they do:
– automatically plays the next song (attacca). – queues the next song, and you need to trigger the song to play it. – song is skipped.
NOTE: You can save changes made in this section to your device. However, these changes won’t upload to the cloud (ROCS server) or be sent to your production staff or cast members.
This section represents every event in the show in chronological order. By default, all events in Stage|Tracks match exactly as listed in the score.
The Timeline Playhead shows the software’s current position in the song, represented as a vertical cyan bar in the Timeline.

Timeline Zoom Buttons
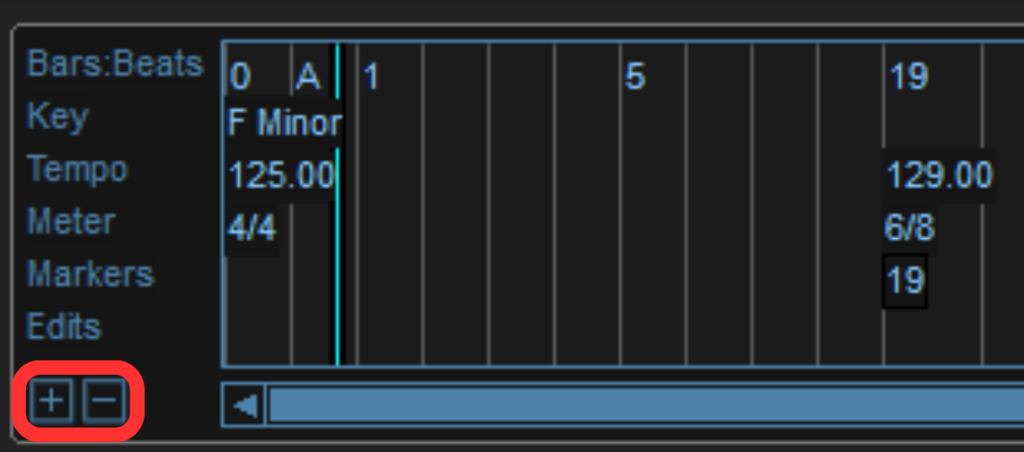
Here are the Timeline Zoom buttons and what they do:
- + allows you to zoom in
- In the timeline, click the + button.
- Press the Plus on your keyboard.
- – allows you to zoom out
- In the timeline, click the – button.
- Press the Minus on your keyboard.
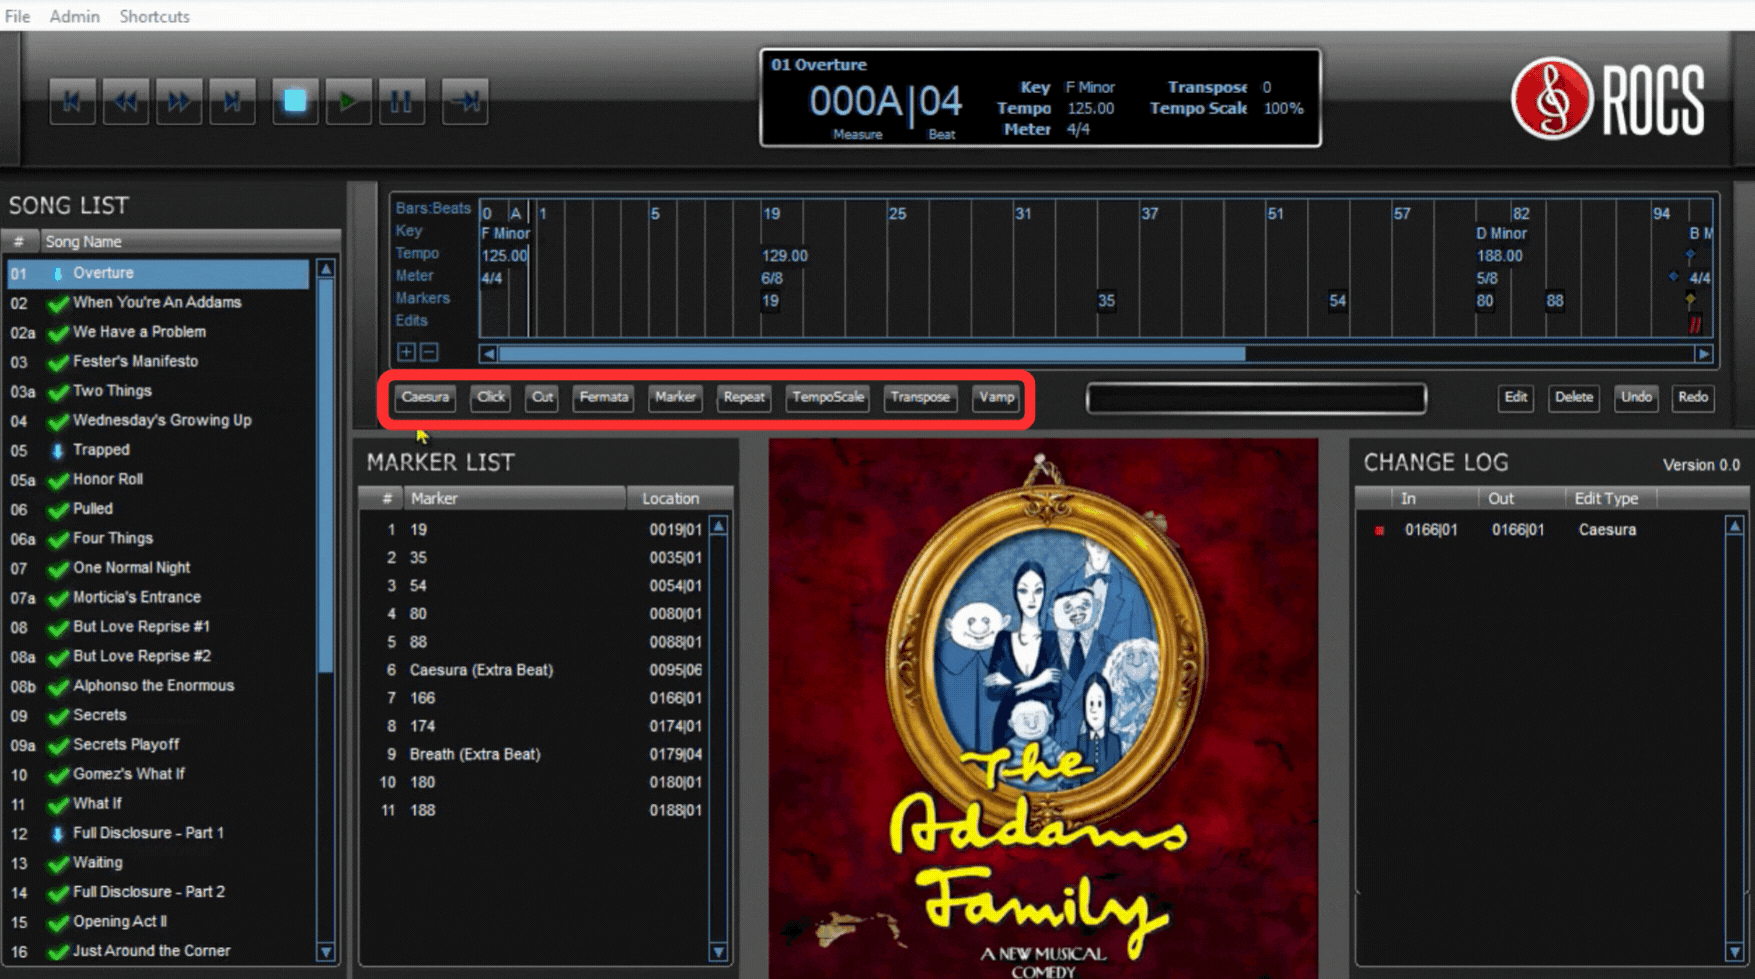
This section contains all the buttons a director will need to customize their show. Adding or modifying events is restricted to directors (or anyone with the Editor Code). When directors make changes using the Event Controls, they can save and send those changes to their production staff and cast members.

Event Controls

Here is a list of Event Controls and what they do:
- Caesura– adds a pause at a specific point of a song.
- Click – changes the subdivision of the click track in a section of a song.
- Cut– removes a section from a song.
- Marker – adds a comment in the song for reference.
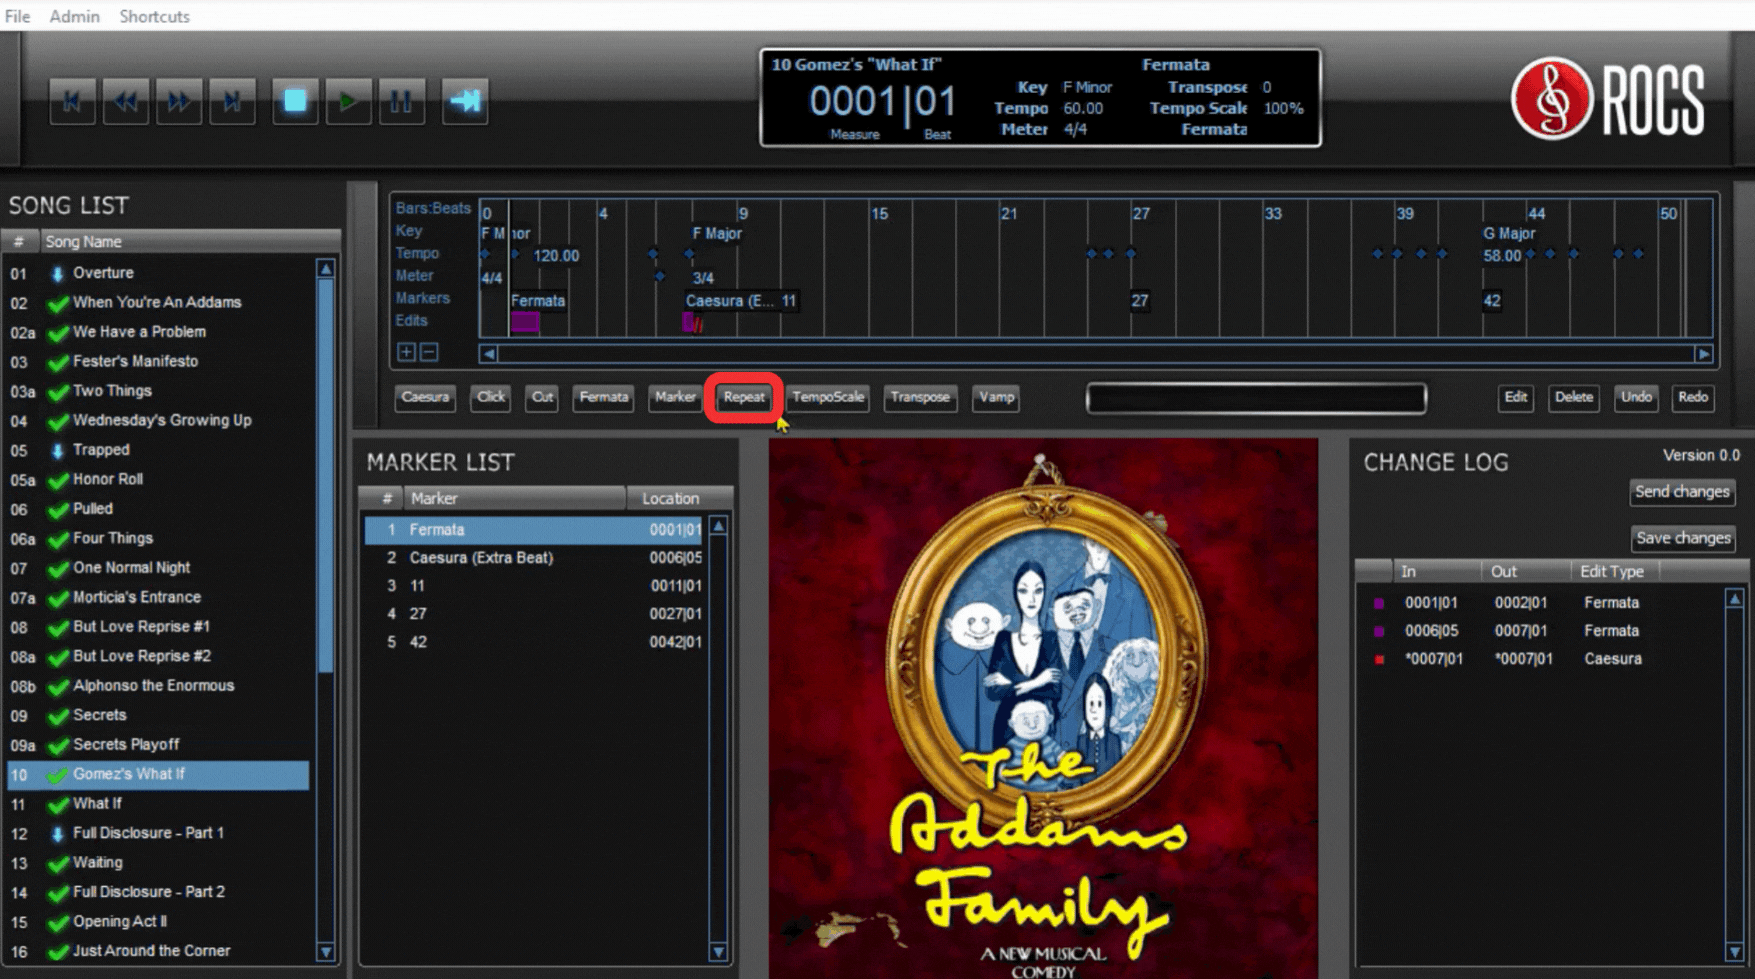
- Repeat – defines a section of the timeline to repeat a fixed number of times.
- Skip – allows you to trigger a jump to the end of a section of a song.
- Tempo Scale – changes the speed in a section of a song.
- Transpose – changes the key in a section of a song.
- Vamp – defines a section of the timeline to repeat indefinitely, until you trigger exiting the vamp.
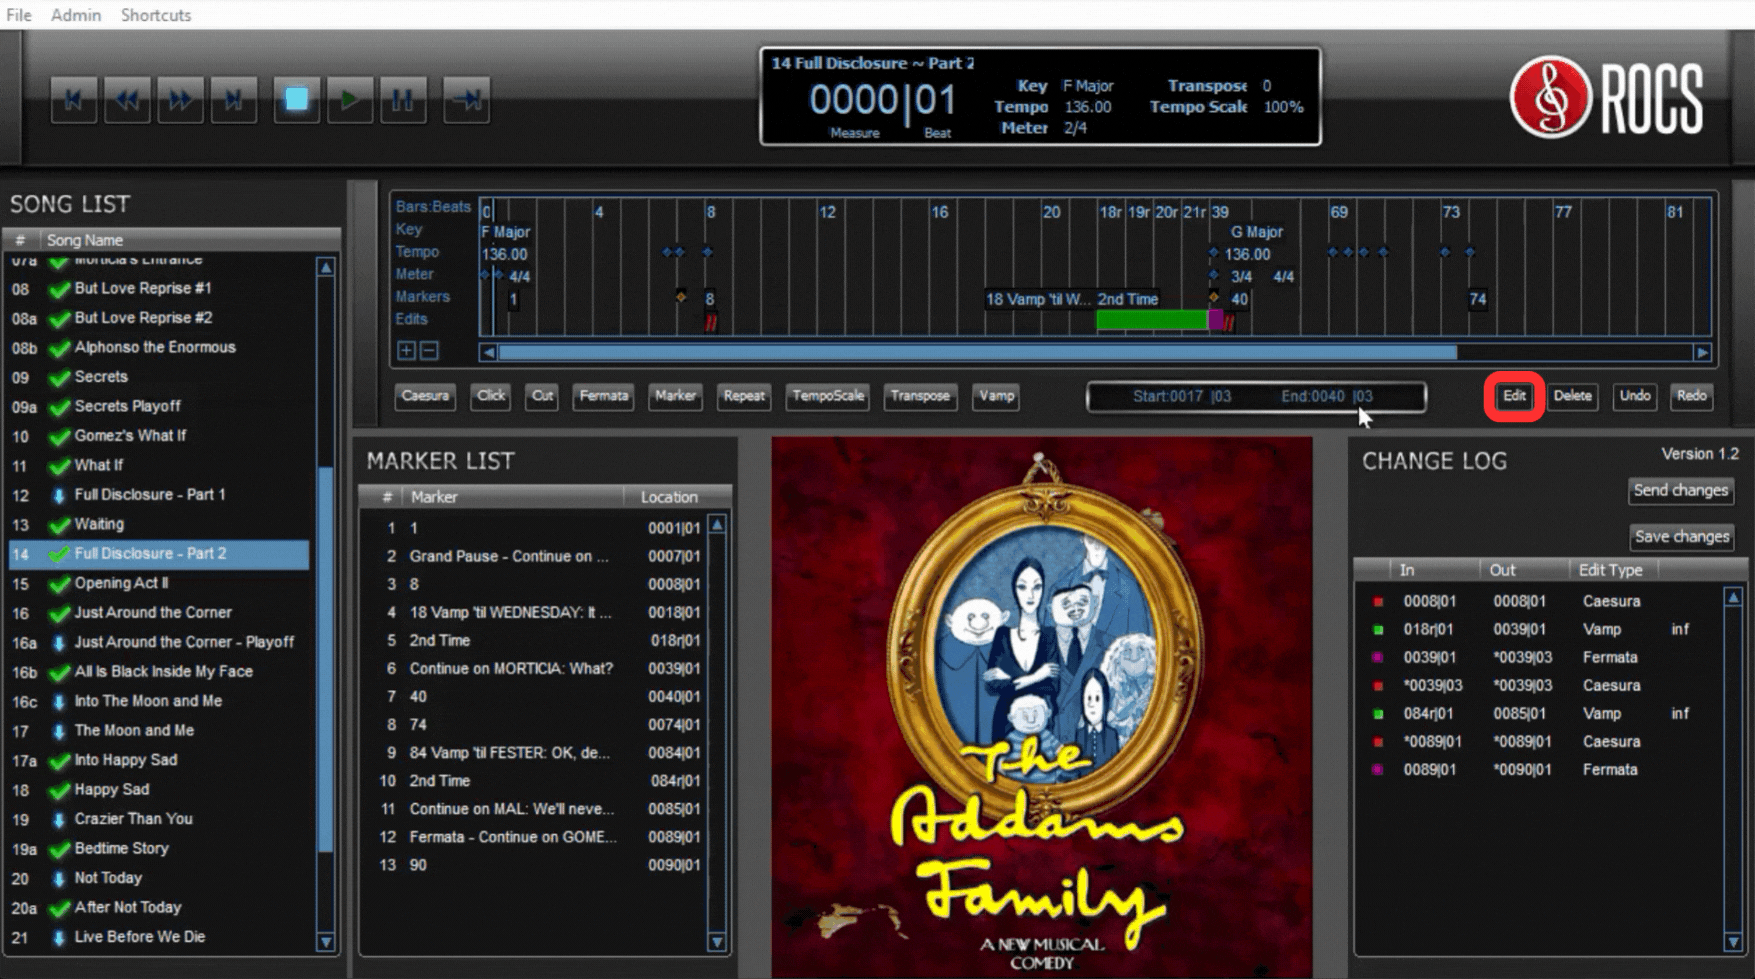
- Edit – modifies any existing event.
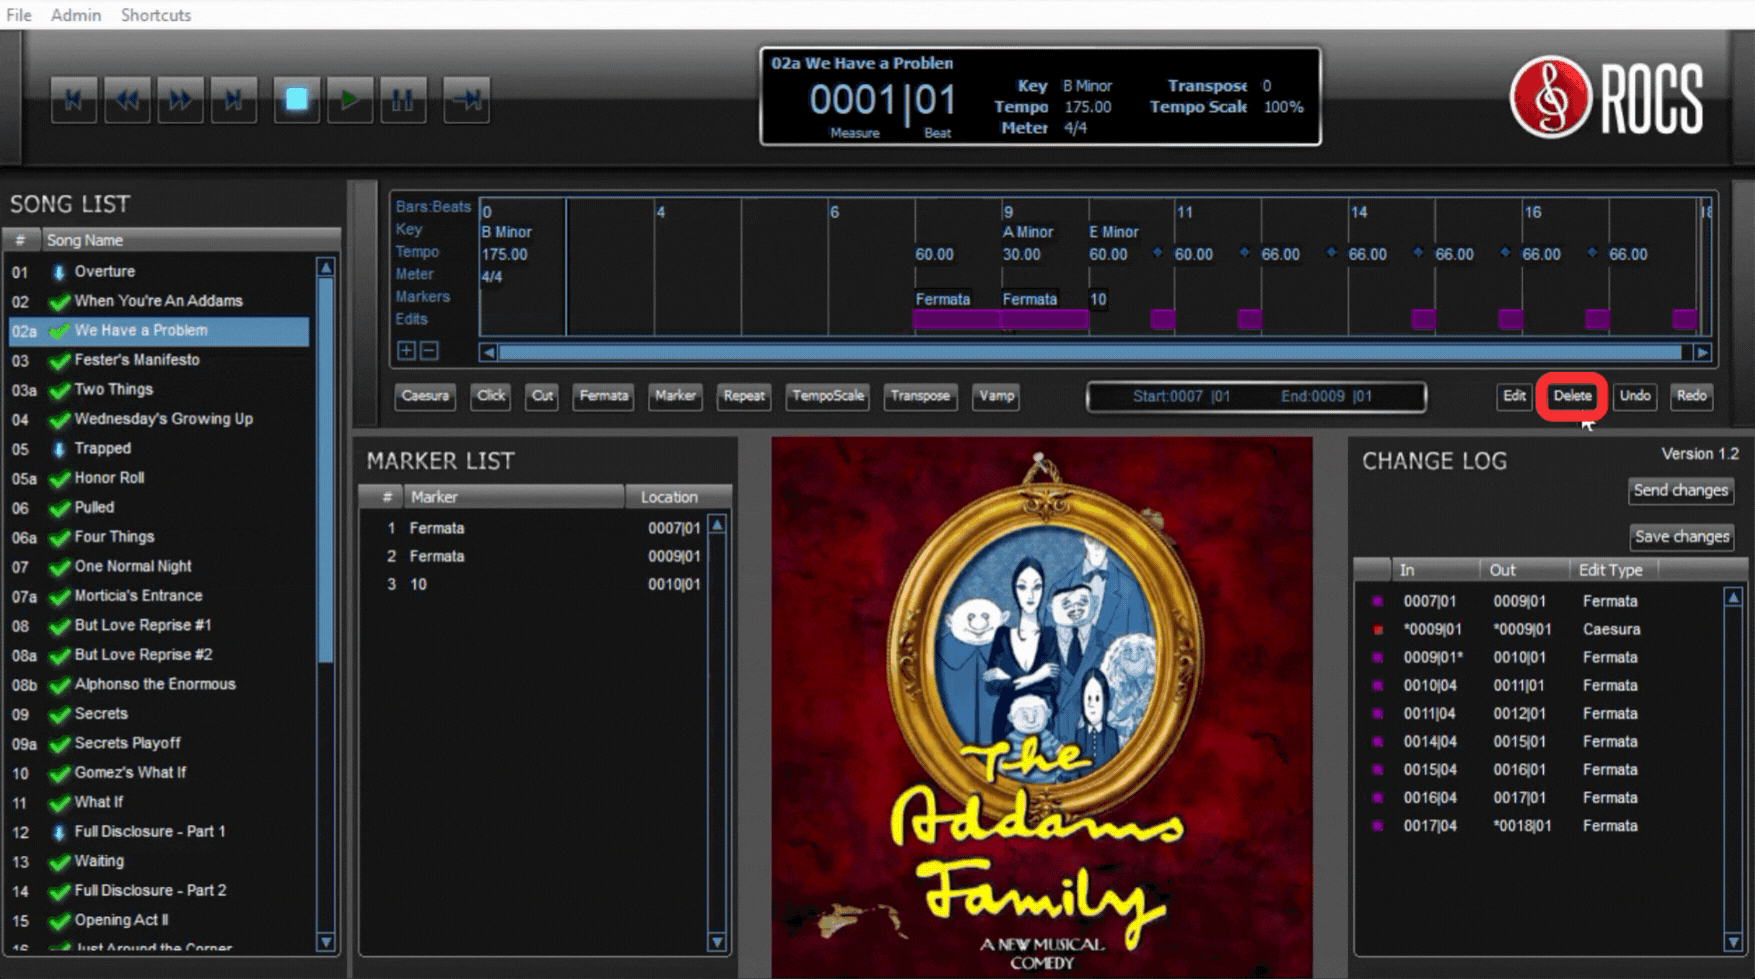
- Delete – deletes any existing event.
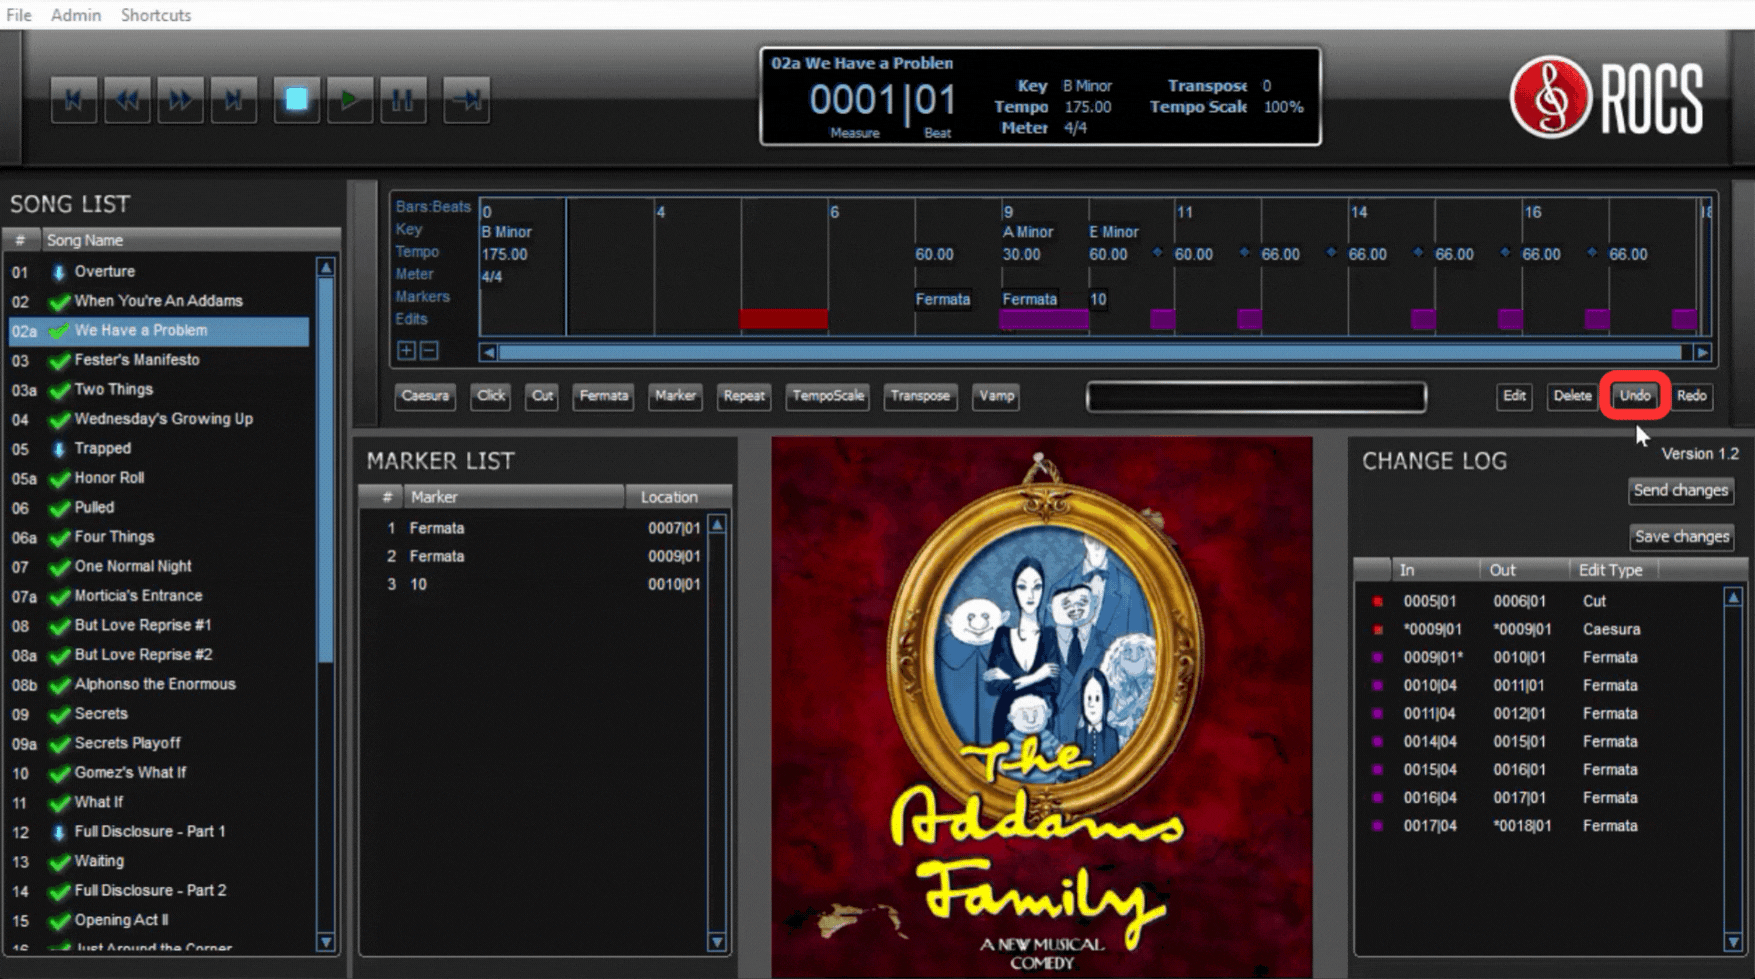
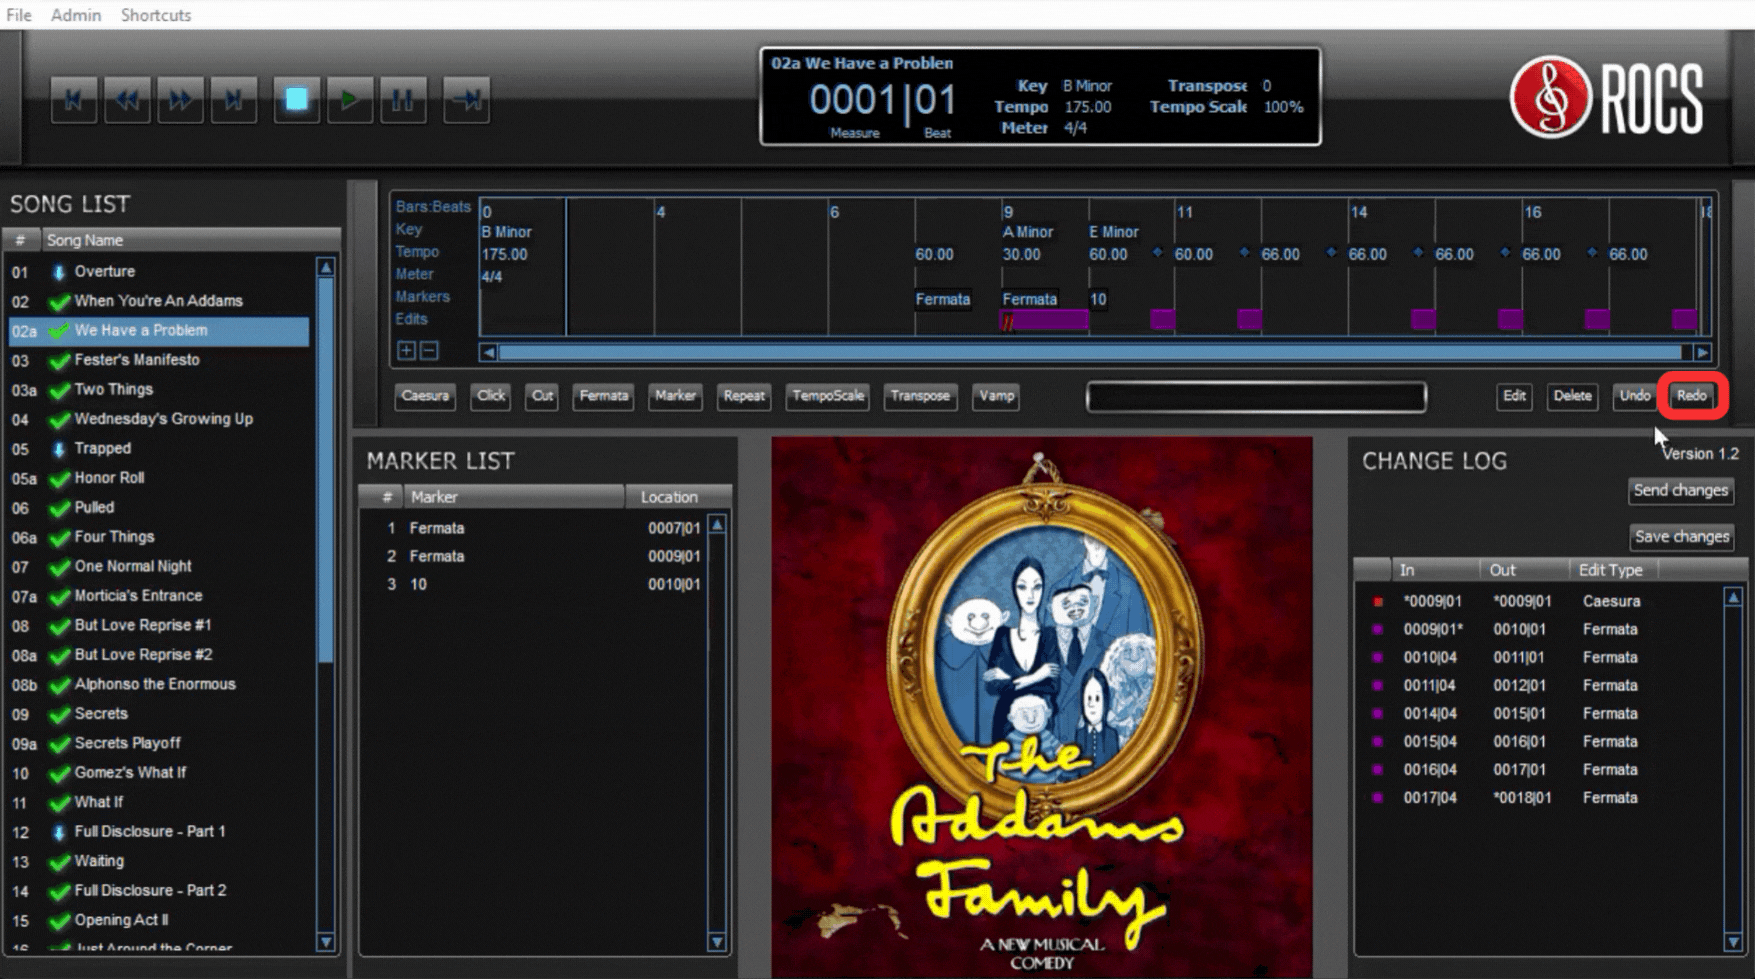
- Undo – removes the most recent event(s) added.
- Redo – adds back the most recent event(s) added.
For more information on how to use these event controls, check out:
This section displays comments for the selected song. Each marker includes a number, name, and bar | beat location. By default, all events in Stage|Tracks match exactly as listed in the score.
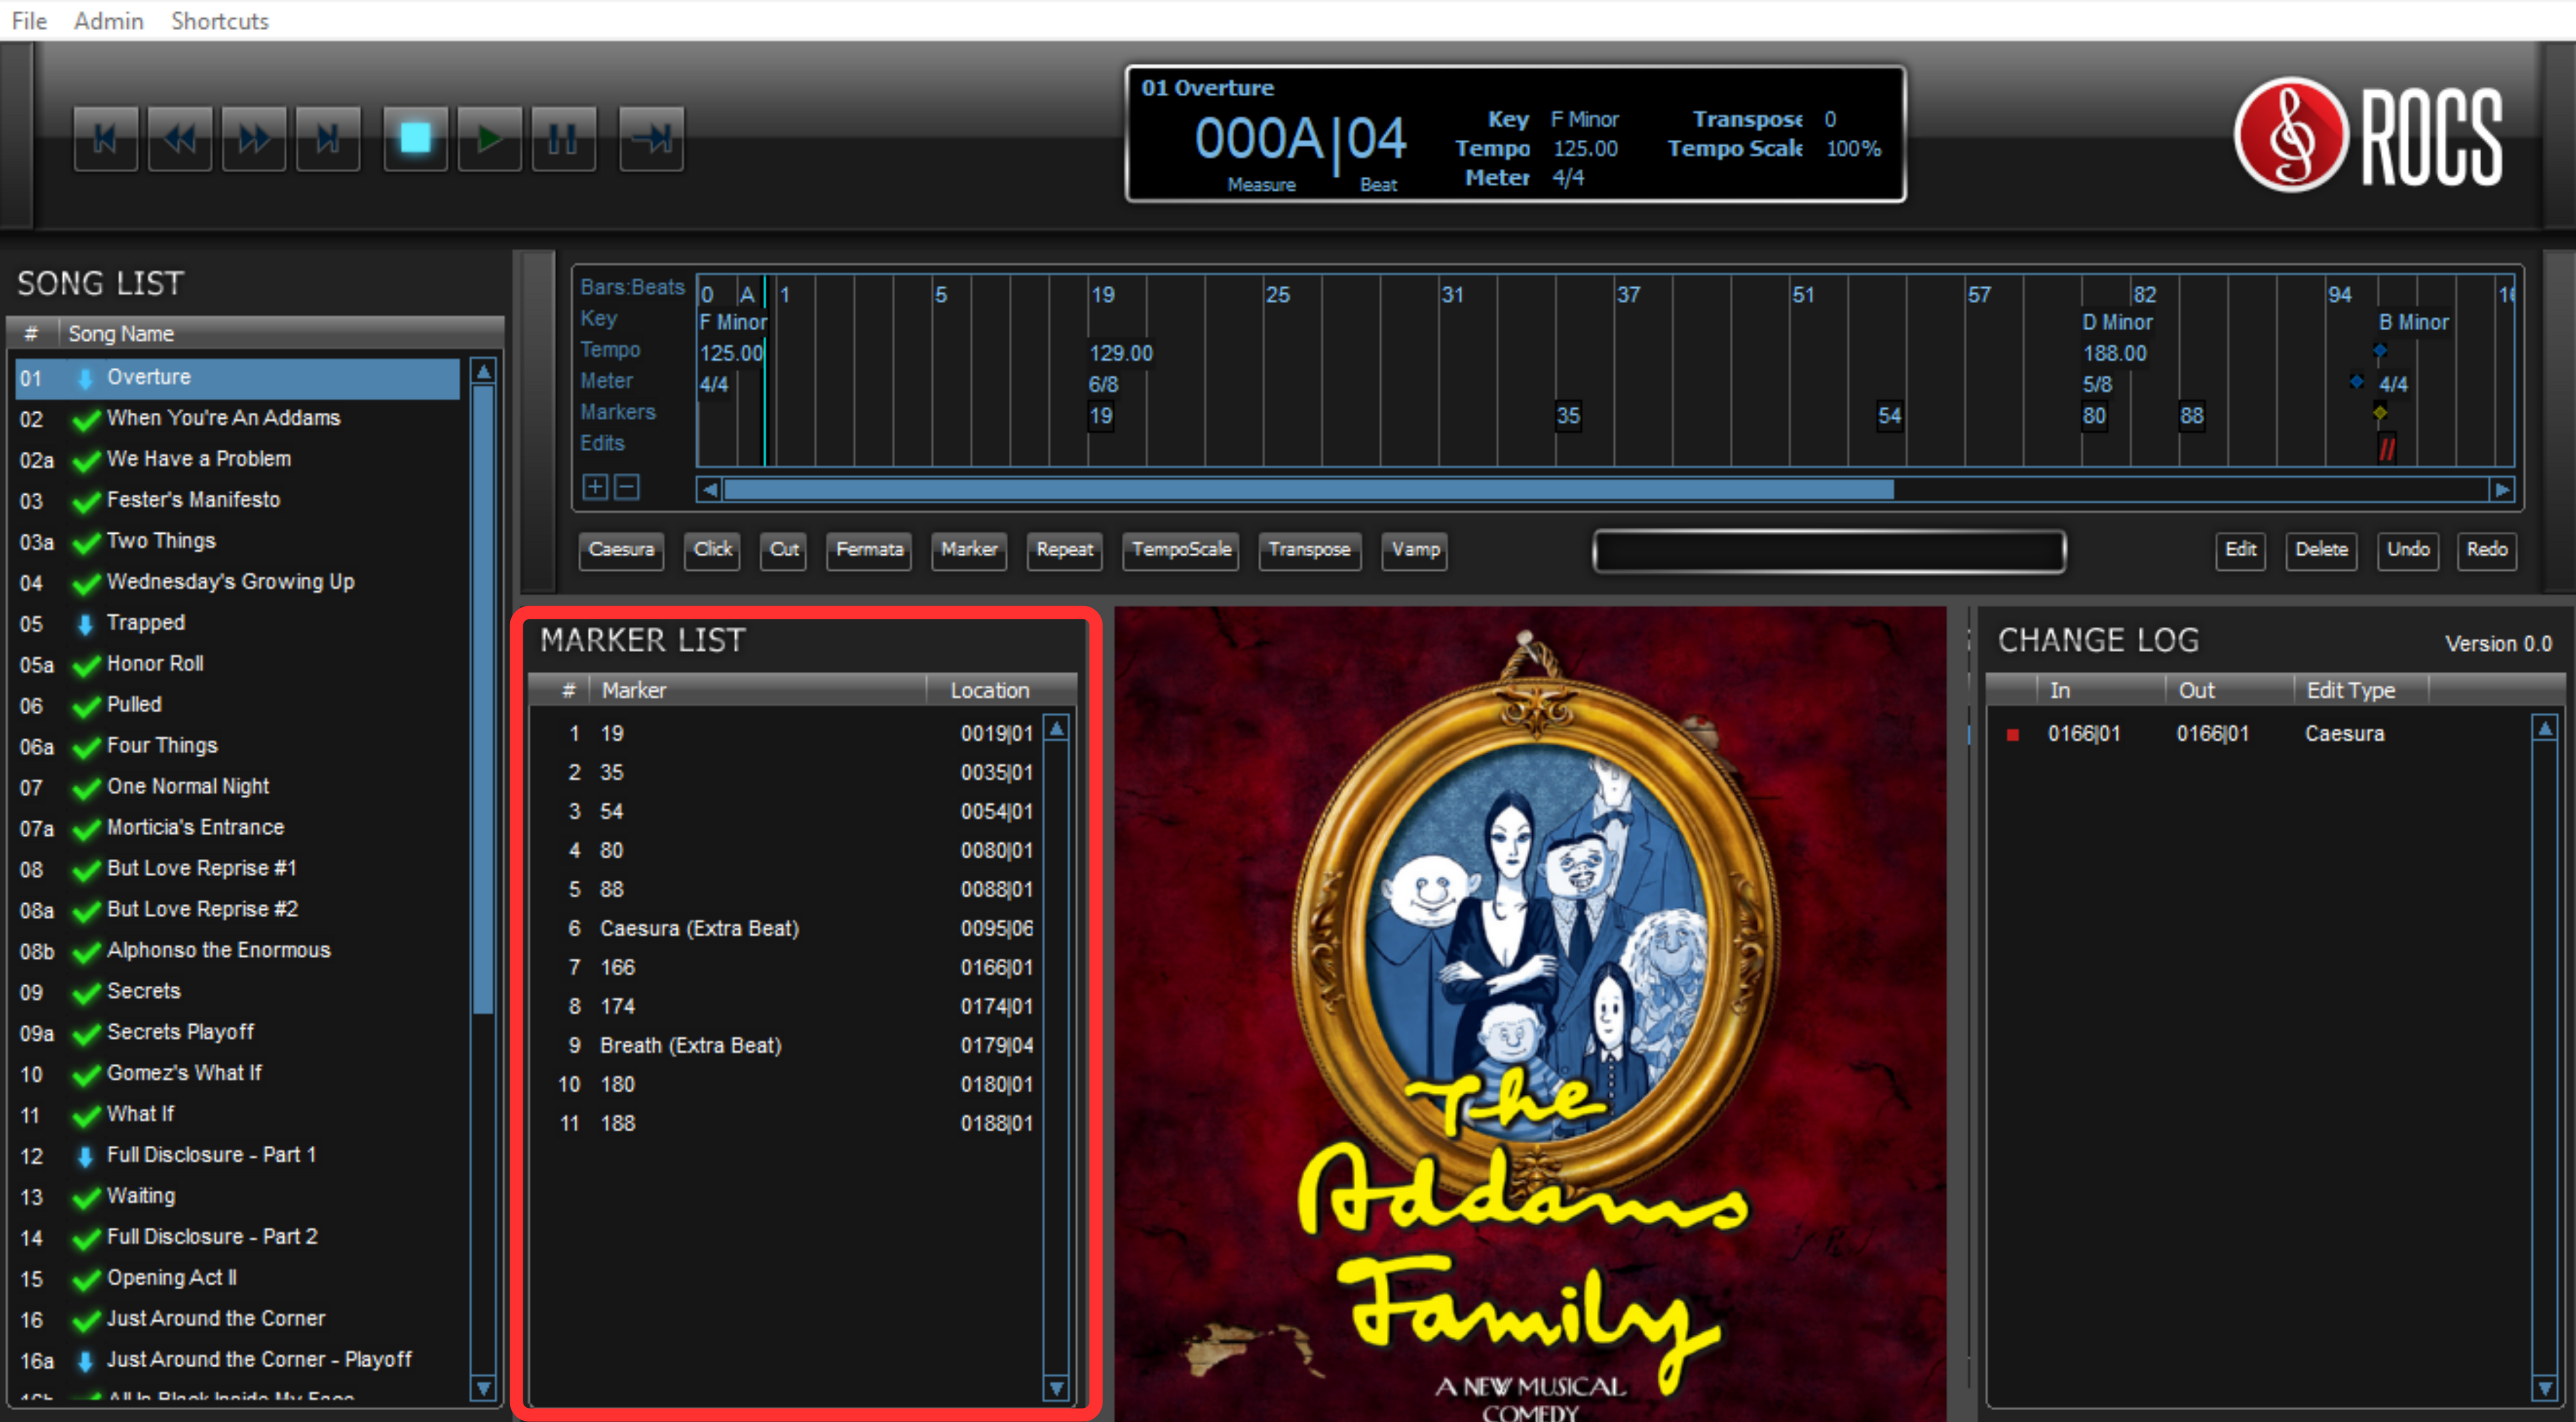
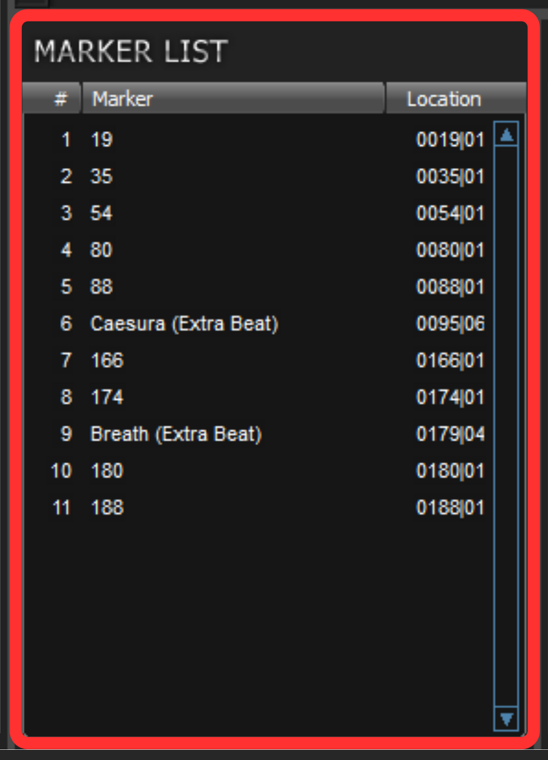
The marker list allows you to jump to that location in the song. To utilize this function, click on a specific marker within the list. Doing so will automatically move the Timeline Playhead (vertical cyan bar) to that location on the Timeline.
Timeline Playhead
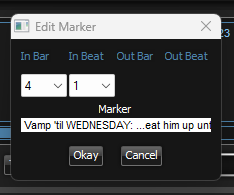
To edit a marker, you will do the following:
- In the Marker List, double-click the marker OR click the Edit button from the Event Controls.
- In the pop-up window, type any changes in the text field.
- Click Okay to save.
Editing a Marker
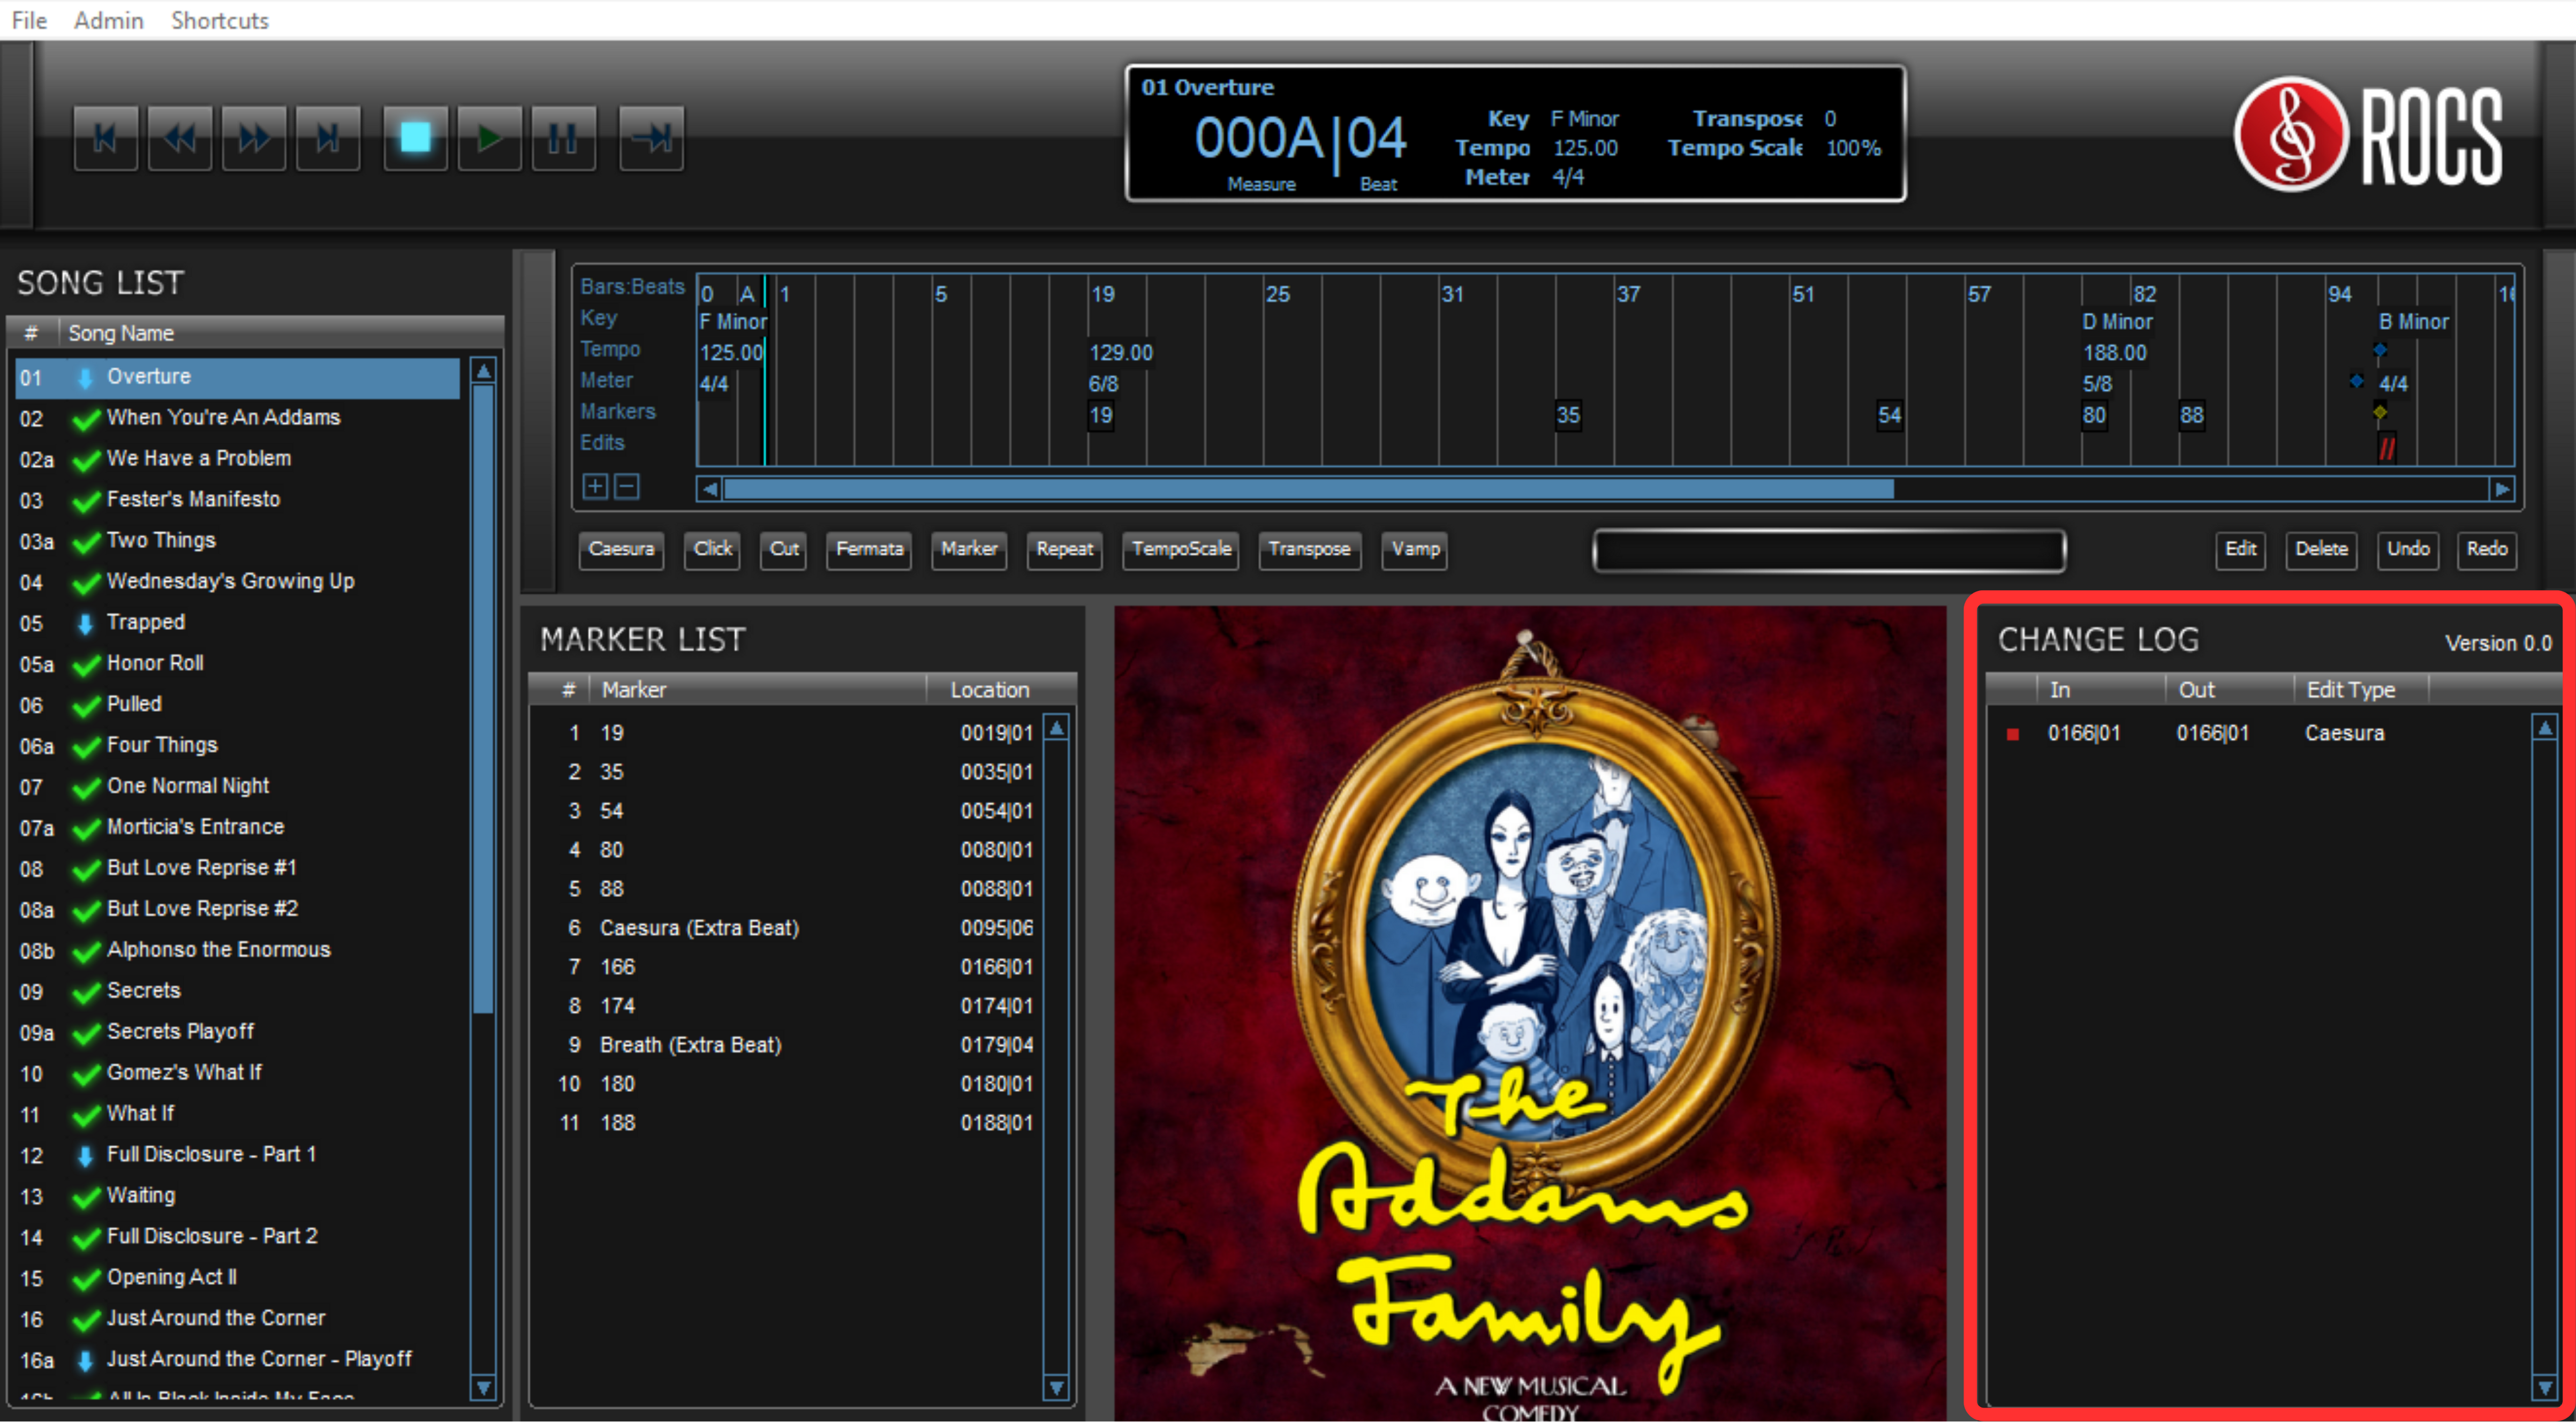
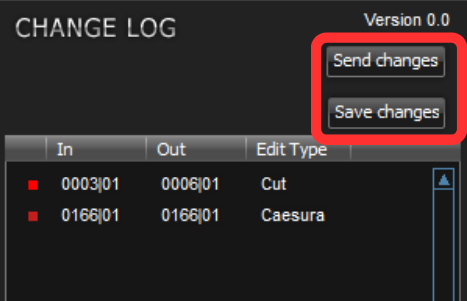
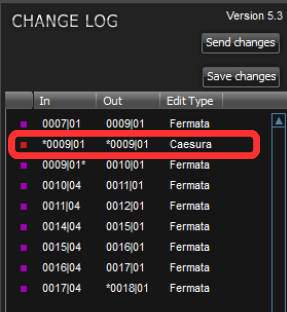
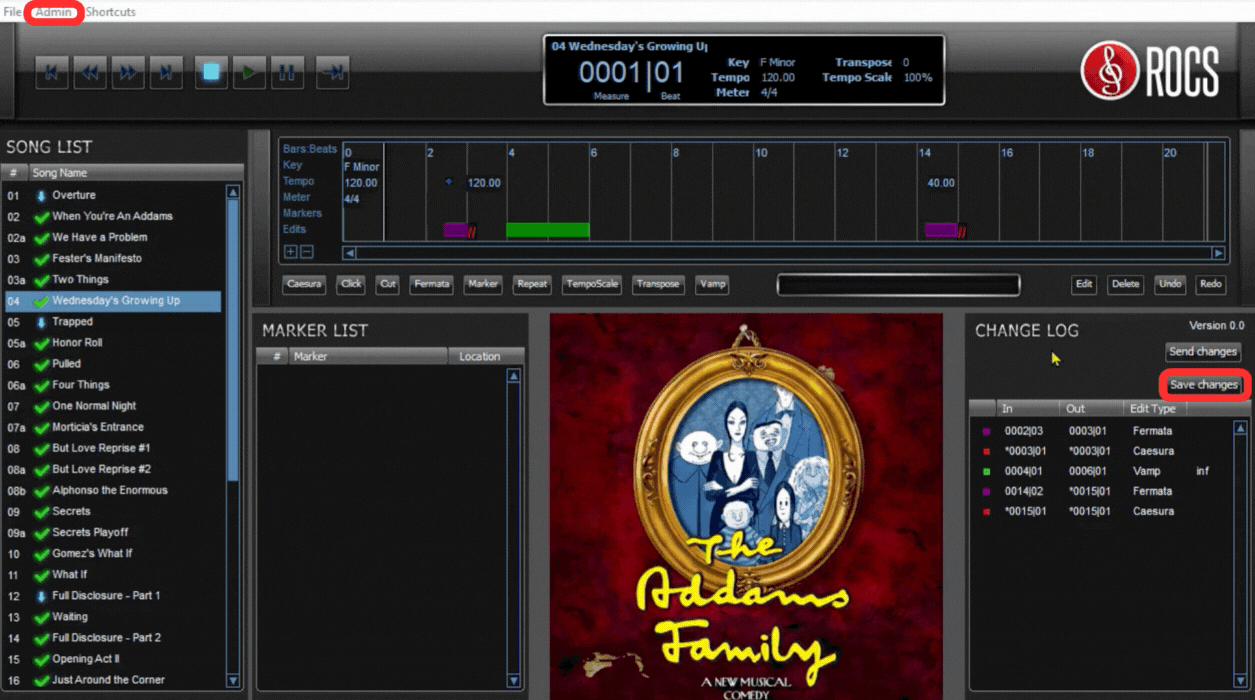
Event List (Previously Known as “Change Log“)
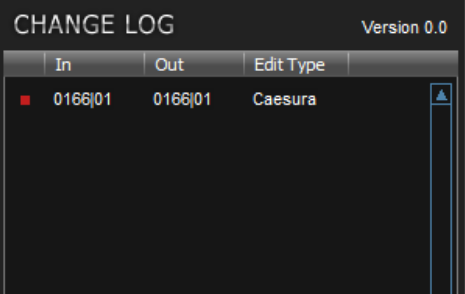
This section displays a list of each event within the selected song. Each item has several pieces of data, including the color of how the event shows in the timeline, in bar, out bar, event type, and the number of repeats (if applicable). By default, all events in Stage|Tracks match exactly as listed in the score.
Event Log (Change Log) Buttons
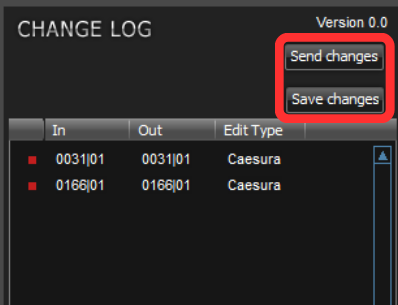
Here is a list of the Event List buttons and what they do:
- Send Changes (Recommended)
- Uploads changes to the cloud (ROCS server) and sends them to your cast members and production staff’s instance of Show|Ready.
- These changes will upload to Stage|Tracks.
- Sending changes saves a backup to the cloud (ROCS server), providing peace of mind in case your device crashes.
- Save Changes
- Saves the changes to your local device without sending the changes to your cast members or production staff’s instance of Show|Ready.
- These changes are NOT saved to the cloud (ROCS server) and will NOT upload to Stage|Tracks.
- Saving changes means there is no backup if your device crashes. Any edits you have made to your show will be lost.
For more information on how to use the Event List buttons, check out:
- Sending Stage|Tracks Changes to Your Production Staff and Cast Members
- Saving Stage|Tracks Changes to Your Device
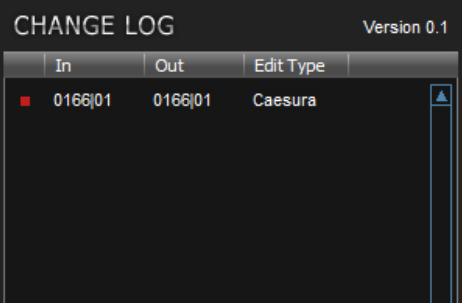
The event list also contains the version number. Every time changes are saved and sent to the cast, a new version number is generated automatically, starting with Version 0.0 and increasing incrementally (for example, Version 0.1).
Version 0.0
Event List (Change Log) Buttons
Version 0.1
3. General Edits in Stage|Tracks
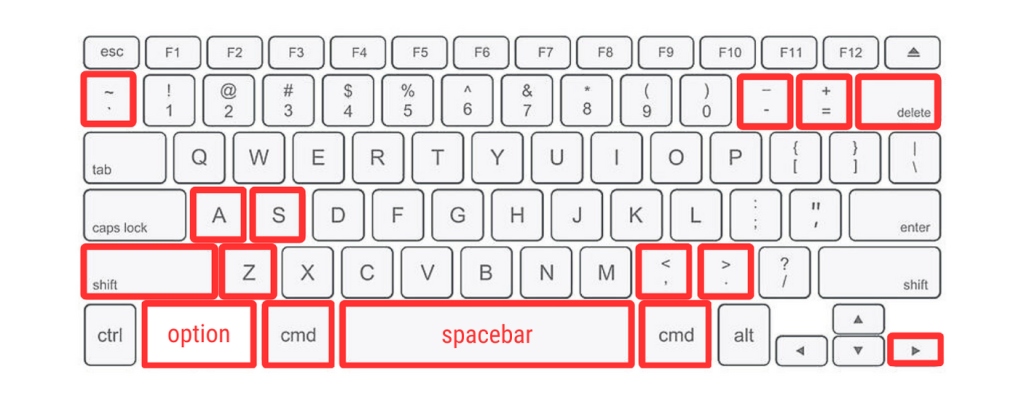
Here is a list of keyboard shortcuts to help you quickly navigate or add edits.
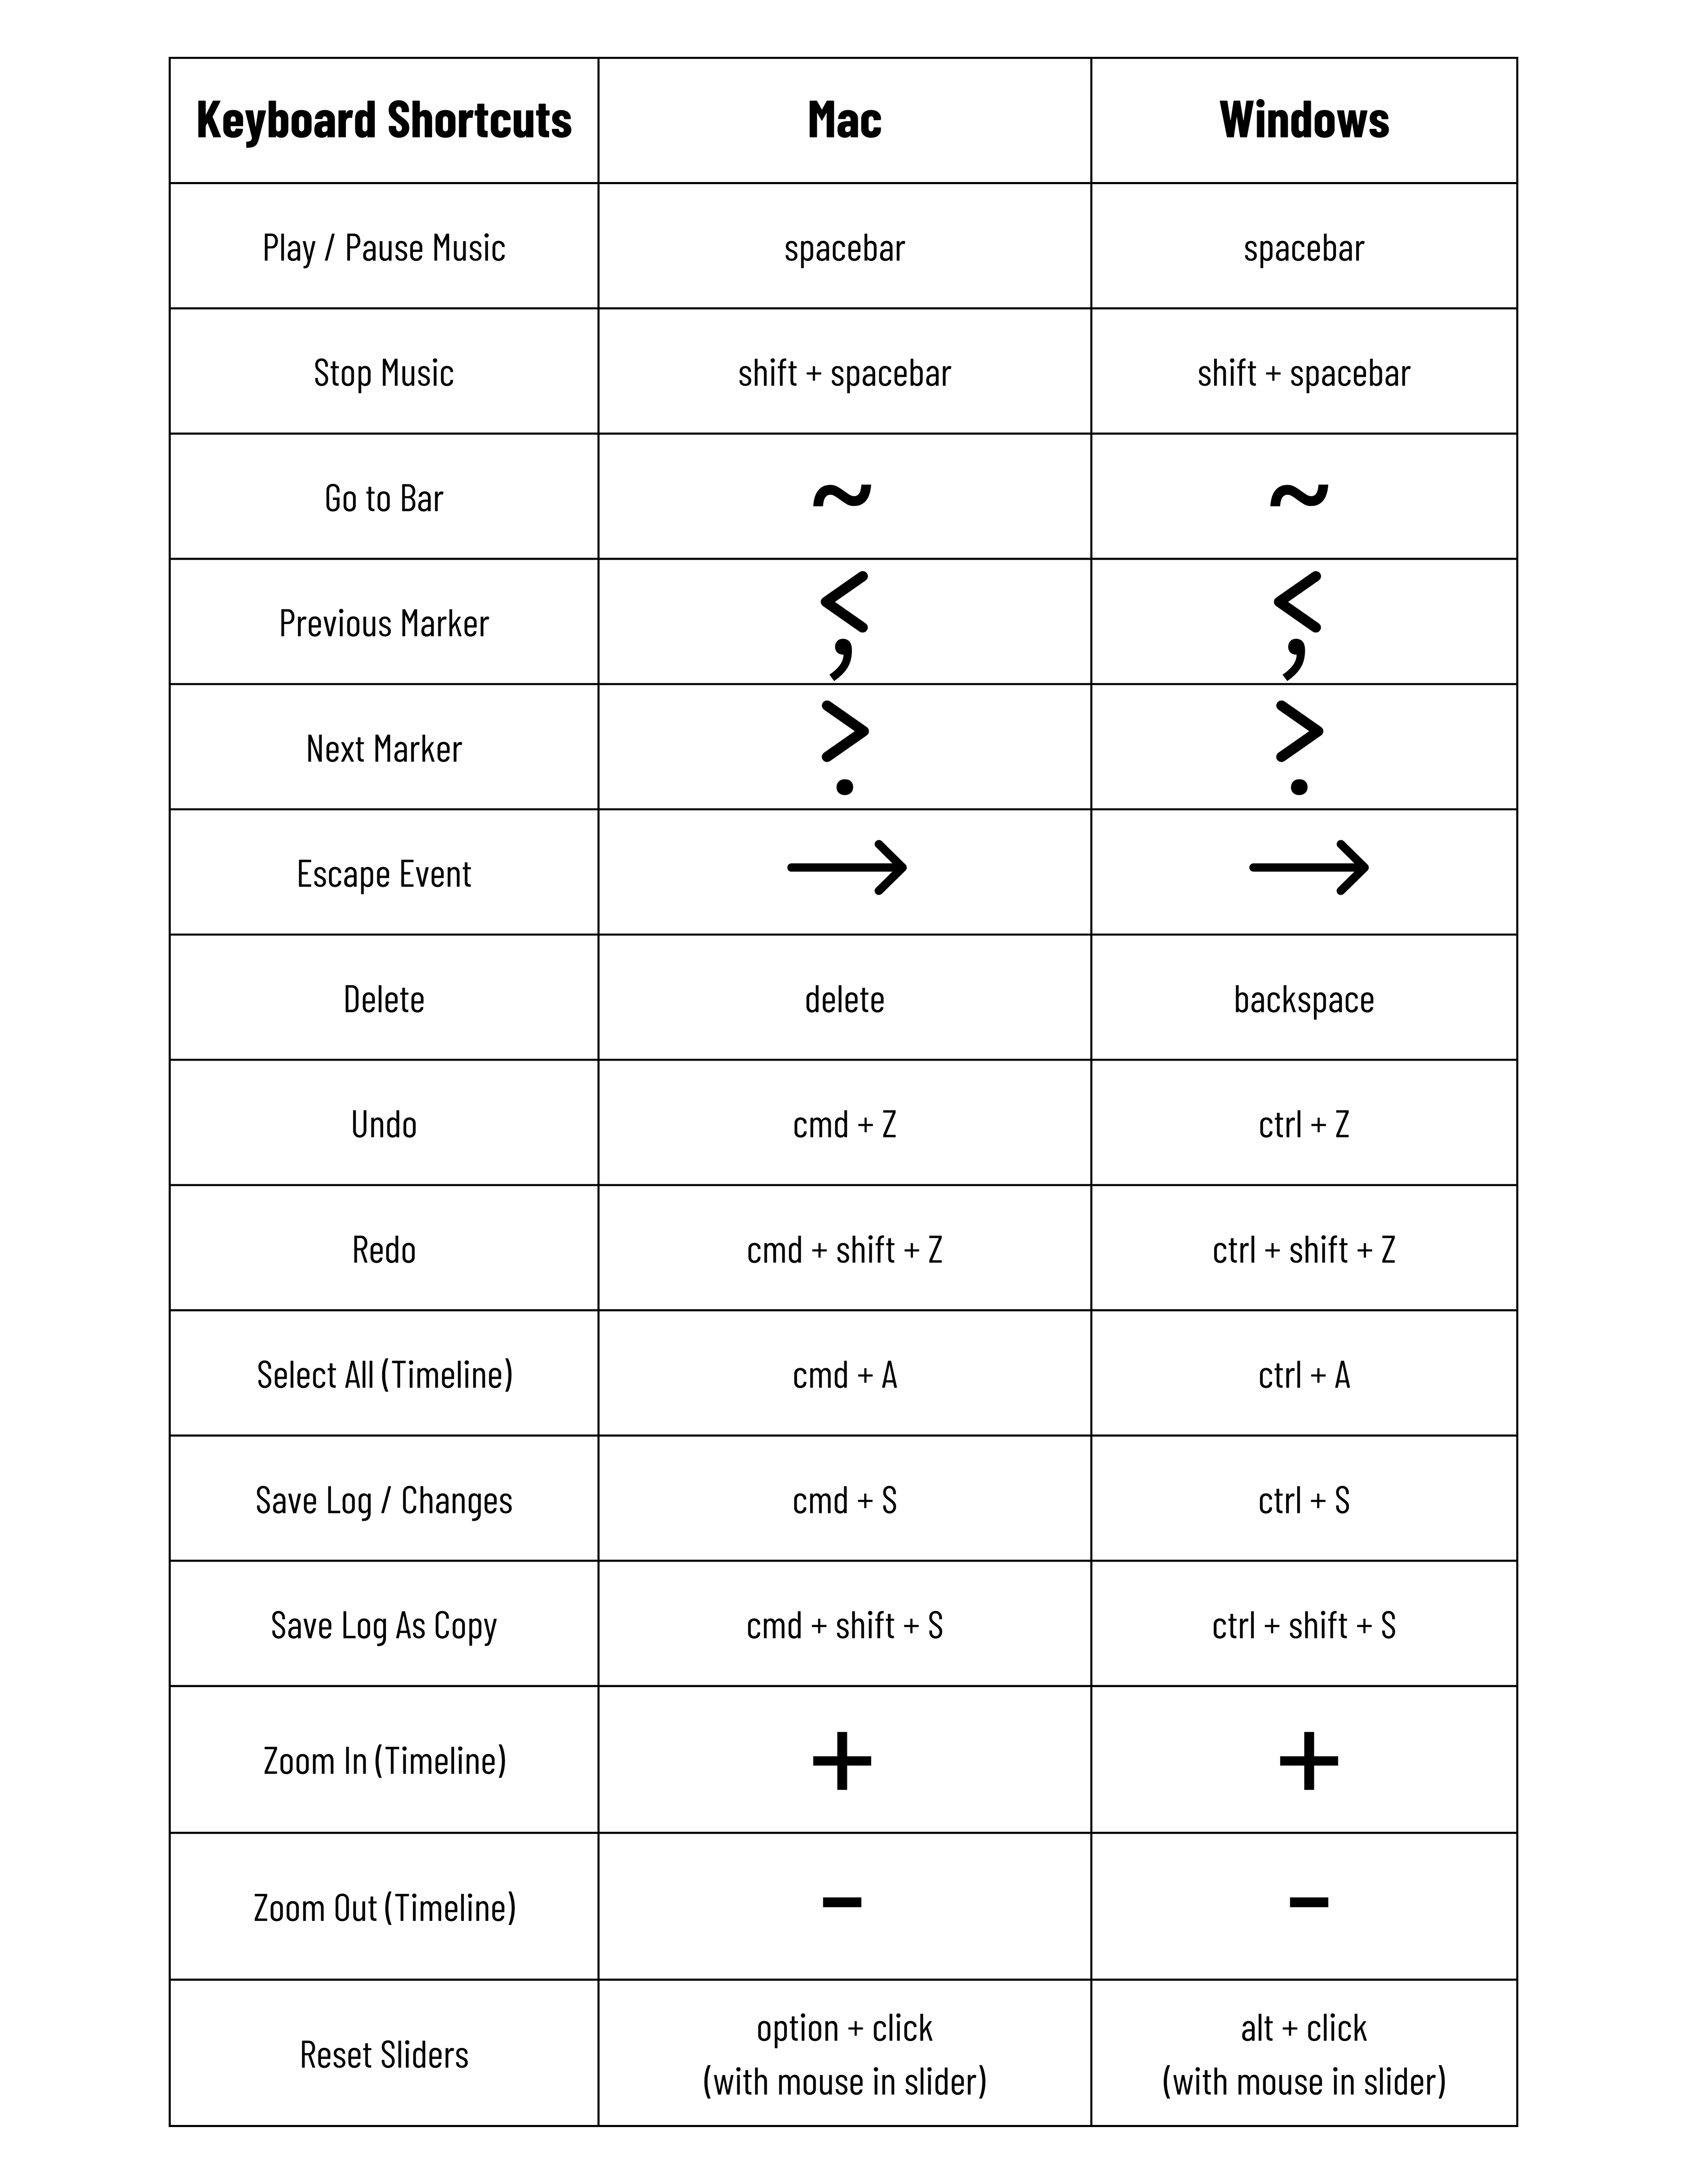
For easy reference, we have provided examples of the Mac and Windows keyboards with all the keys listed above.
Mac Keyboard
Windows Keyboard
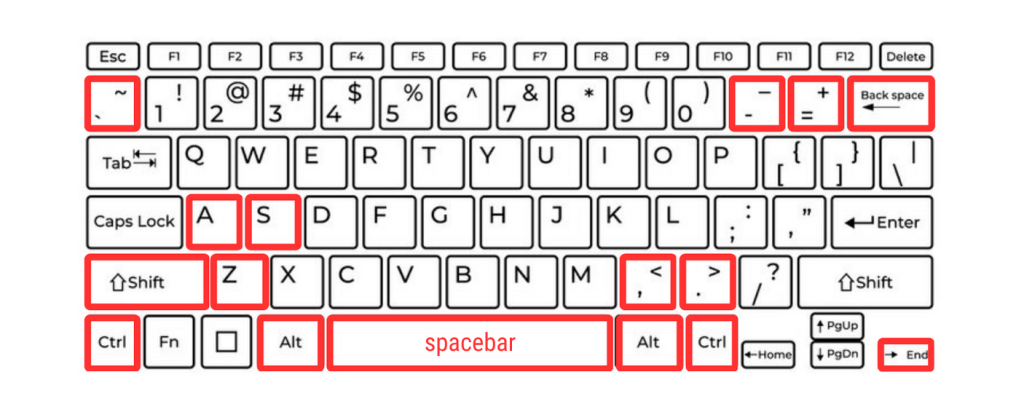
NOTE: Your keyboard might be different than what is pictured above.
The Event Controls allow directors to add events to customize their show, so they can share them with their production staff and cast members in real-time (as opposed to the Temporary Modifications in Show|Ready). By default, all events in Stage|Tracks match exactly as listed in the score.
Here is the list of the Event Controls. To learn more specifics about each event, click on the links below:
To add a new event, you can do that in the following ways:
- Highlight the area you want to add an edit in the Timeline and click one of the Event Controls (see list above).
- Click one of the Event Controls (see list above), select from the various Event Options, and press Okay.
When you click on the Event Controls, a pop-up window appears. While each button will have its own specific settings, you may see some of the following options:
- Event Type – the drop-down menu where you can pick from caesura, click, cut, marker, repeat, skip, tempo scale, transpose, or vamp.
- In Bar – the measure of where you want the event to start.
- In Beat – the beat of where you want the event to start.
- Out Bar – the measure of where you want the event to end.
- Out Beat – the beat of where you want the event to end.
- Select All – (if applicable) select the entire song.
Event Type

In Bar, In Beat, Out Bar, Out Beat
To modify an existing event, you can do that in the following ways:
- Click and drag the existing event inside the Timeline.
- Double-click an event in the Timeline or Event List and change the Edit Options. Click Okay OR press Enter on the keyboard.
- Click an event in the Timeline or Change Log and click the Edit button to change the Edit Options. Click Okay OR press Enter on the keyboard.
To delete an existing event, you can do that in the following ways:
- Click an event in the Timeline or Event List, and click the Delete button in the Edit Controls to remove it.
- For Mac, click an event in the Timeline or Event List, and press the Delete on your keyboard.
- For Windows, click an event in the Timeline or Event List, and press the Backspace on your keyboard.
To undo recent events changes you just made, you can do that in the following ways:
- Click the Undo button in the Edit Controls.
- For Mac, press the command + Z on your keyboard
- For Windows, press the ctrl + Z on your keyboard.
Undoing removes the last event change you made from the Timeline and Event List.
To redo recent events changes you just made, you can do that in the following ways:
- Click the Redo button in the Edit Controls.
- For Mac, press the command + shift + Z on your keyboard
- For Windows, press the ctrl + shift + Z on your keyboard.
This will add back the last event change you made to the Timeline and Event List.
Returning to Previous Event Log
Sometimes it may be necessary to revert to a previous version of your event log. Be careful, as any changes you made since that time will be lost.
To go back to a previous event log, you will do the following:
- Click on Admin at the top-left of the menu bar.
- Click on View Past Logs from the drop-down menu.
- Select the version you wish to return to and click Load Selected.
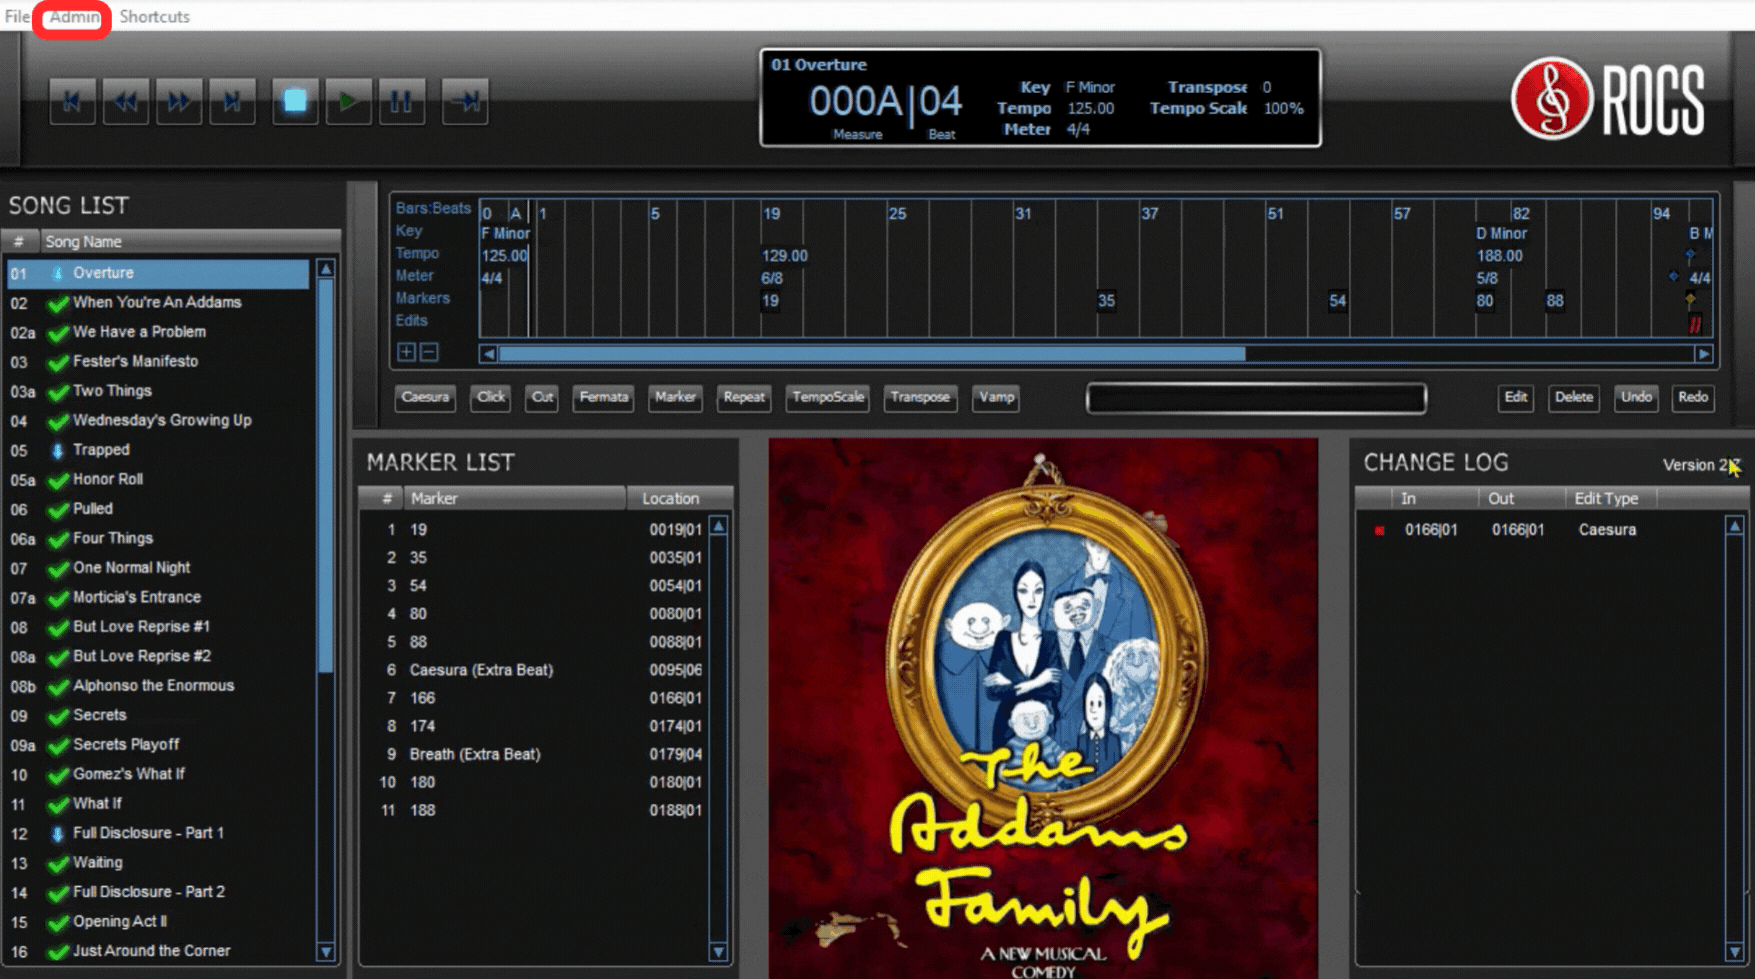
NOTE: Once you have loaded the previous event log, you can continue making edits as usual. Click Save Changes to save the newest version in the Event Log. When you’re ready to send the changes to your cast members and production team, click Send Changes in the Event Log.
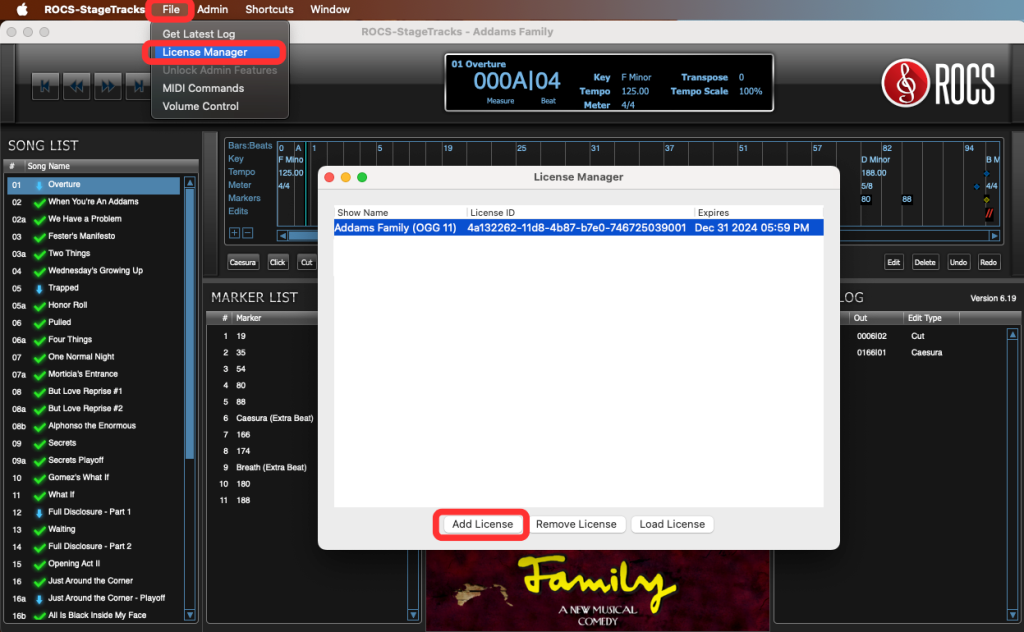
Using the License Manager to Add Another Show
Sometimes you might have two different shows happening at the same time, so you need to load multiple codes into Show|Ready at the same time.
To another another show code, you will do the following:
- Go to File.
- Click on License Manager in the drop-down menu.
- In the pop-up window, click Add License.
Once the show code is loaded, you can always go back into the License Manager to select and load a previous show.
4. Making Specific Edits in Stage|Tracks
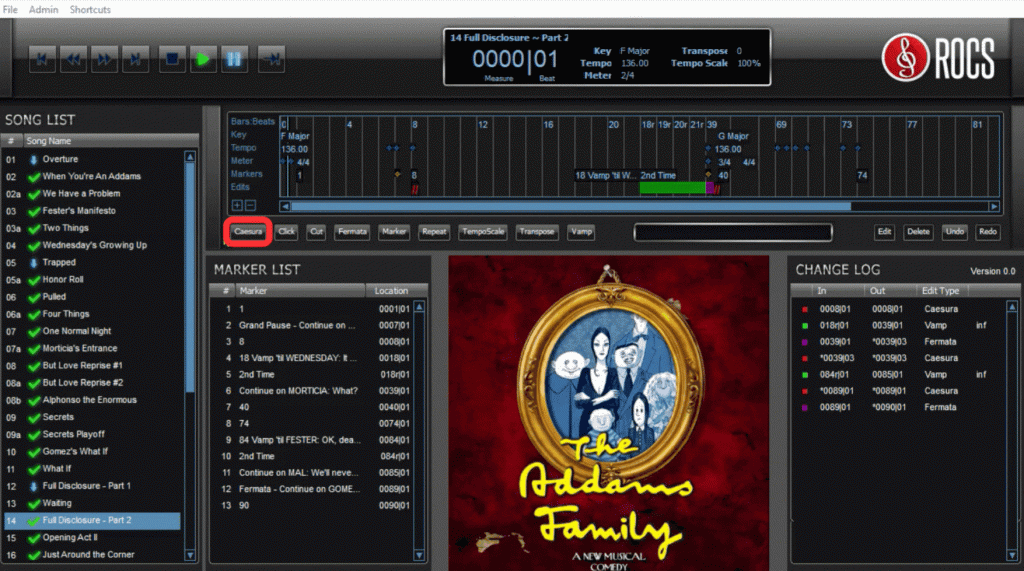
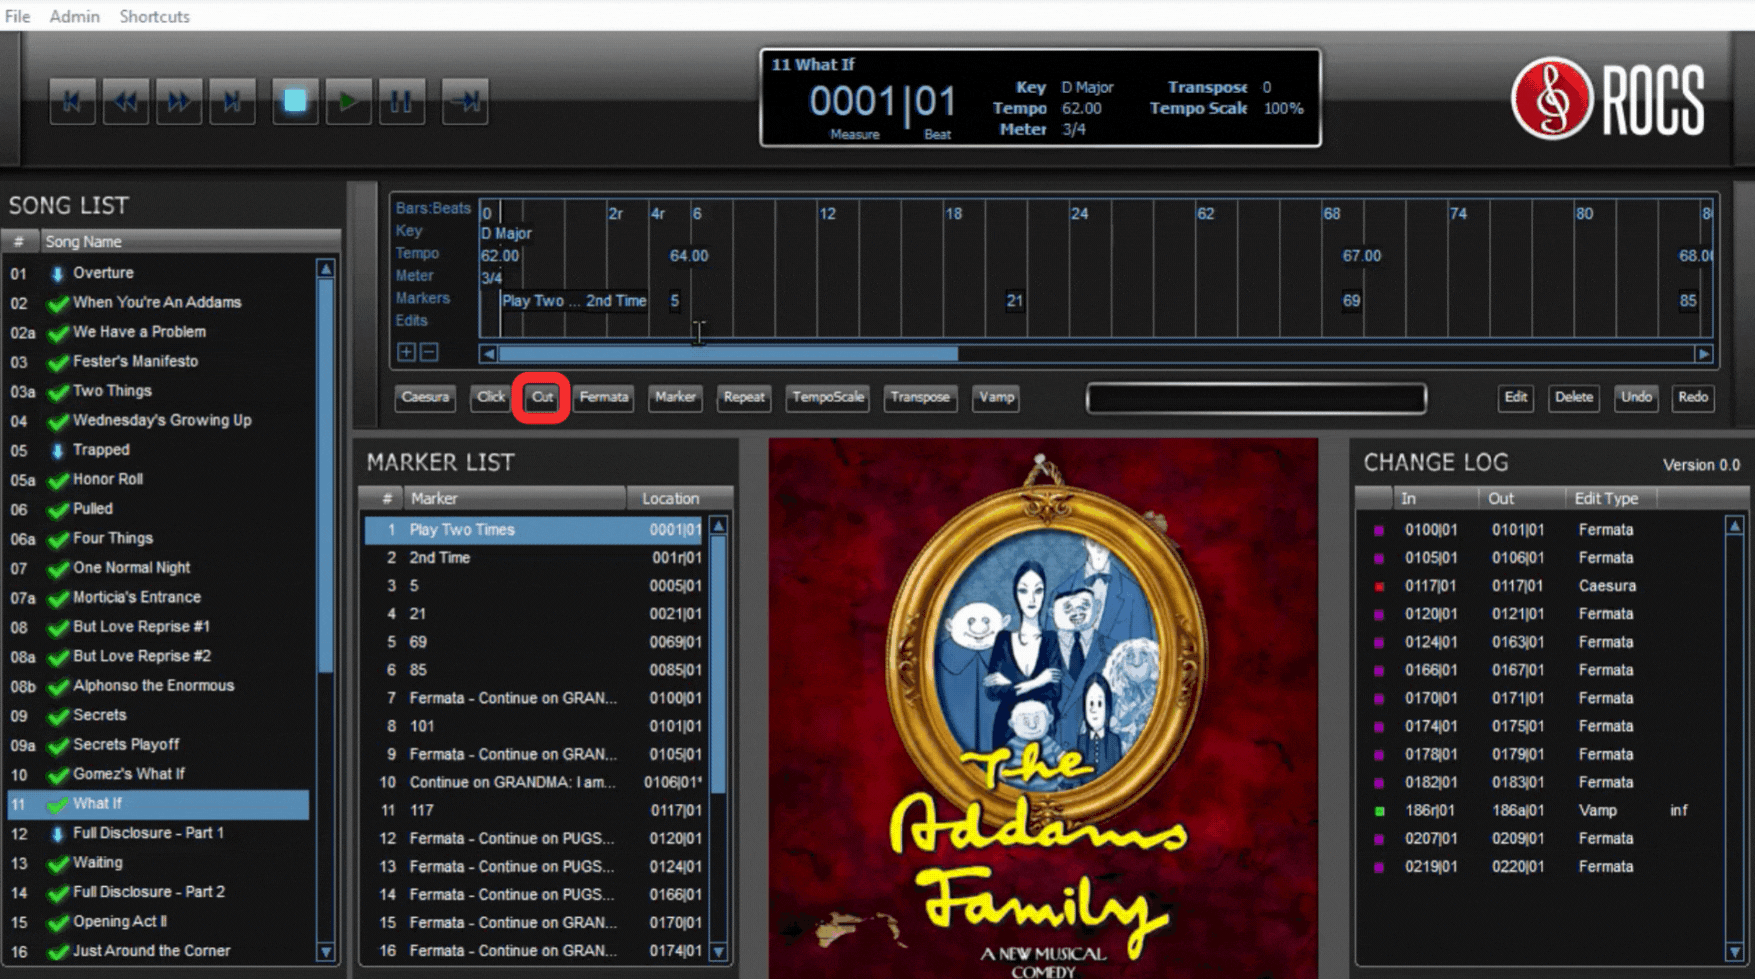
Caesura adds a pause in a song, perhaps for additional dialogue time or another break in the action. Caesuras are reflected in the Timeline and Event List.
To add a caesura, you will do the following:
- Go to the Timeline and select the point where you want to add a caesura.
- Click on the Caesura button in the Event Controls.
- Verify the In Bar and In Beat are correct, OR type in the specific numbers.
- Click Okay, OR press Enter to save changes.
- The caesura is represented in the timeline as two red slanted bars.
Adding a caesura will automatically pause playback indefinitely, until you trigger it to continue. To resume playback after a caesura, you can do so in the following ways:
- Once the Timeline Playhead is at a caesura, click the Escape Event button (|).
- Press the Right Arrow () on your keyboard.
- Press the Spacebar on your keyboard.
You will notice that caesuras in the Event List with an asterisk (*) are not placed exactly on the beat. The asterisk notifies you that the “in / out” display value of the Event List has been rounded to the nearest beat. These caesuras are created by ROCS to facilitate very specific pauses written in the score.
NOTE: If you remove the caesuras with an asterisk (*), while you can re-add a caesura later, it’s impossible to add them back to their original location (yikes!). Please be sure that you want to delete these caesuras before doing so. If you removed a special caesura and need to restore it, you must return to a previous Event List. But be aware, that you will need to redo any additional edits you’ve made since that time. Don’t do it, don’t make it weird. You have been warned. 😉
Click changes the subdivision of the click track to aid in following the beat. There may be slower passages when you need eighth note or even sixteenth note clicks, but you won’t need those subdivisions at higher tempos. Click tracks are reflected in the Song Info, Timeline, and Event List.
To change the click track speed, you will do the following:
- Go to the Timeline and highlight the section where you want to change the click subdivision.
- Click on the Click button in the Event Controls.
- Verify the In Bar, In Beat, Out Bar, Out Beat are correct, OR type in the specific numbers.
- (Optional) Click Select All if you want to change the click resolution on the entire song.
- Select one of the Music Note Options from the drop-down menu.
- Click Okay to save changes.
- The click is represented in the timeline as a dark green bar.
Changing the click track in the Timeline will automatically update the speed of the clicks on playback.
Music Note Options

NOTE: You will not hear the click in Stage|Tracks. Thus, adjusting the click in the Timeline will NOT automatically update the click subdivision for that section of playback in Stage|Tracks. However, since the click track is available in Show|Ready, your changes to the click resolution will be reflected there.
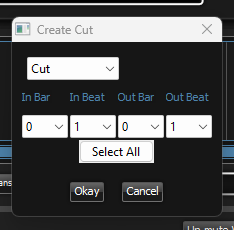
Cut removes sections of music from playback, if you wish to shorten a dance break or transition. Cuts are reflected in the Song Info, Timeline, and Event List.
To add a cut, you will do the following:
- Go to the Timeline and highlight the section you want to cut.
- Click on the Cut button in the Event Controls.
- Verify the In Bar, In Beat, Out Bar, Out Beat are correct, OR type in the specific numbers.
- Click Okay to save changes.
- The cut will be represented in the timeline as a red bar.
Adding a cut in the Timeline will automatically remove that section you cut from playback.
NOTE: While you can click Select All to cut the entire song, you can also go to the Playlist and change the Playback State to an X to skip the song. Be aware that changing the playback state to an X, your production staff and cast members won’t see this update when you send changes, since it saves only to your local device.
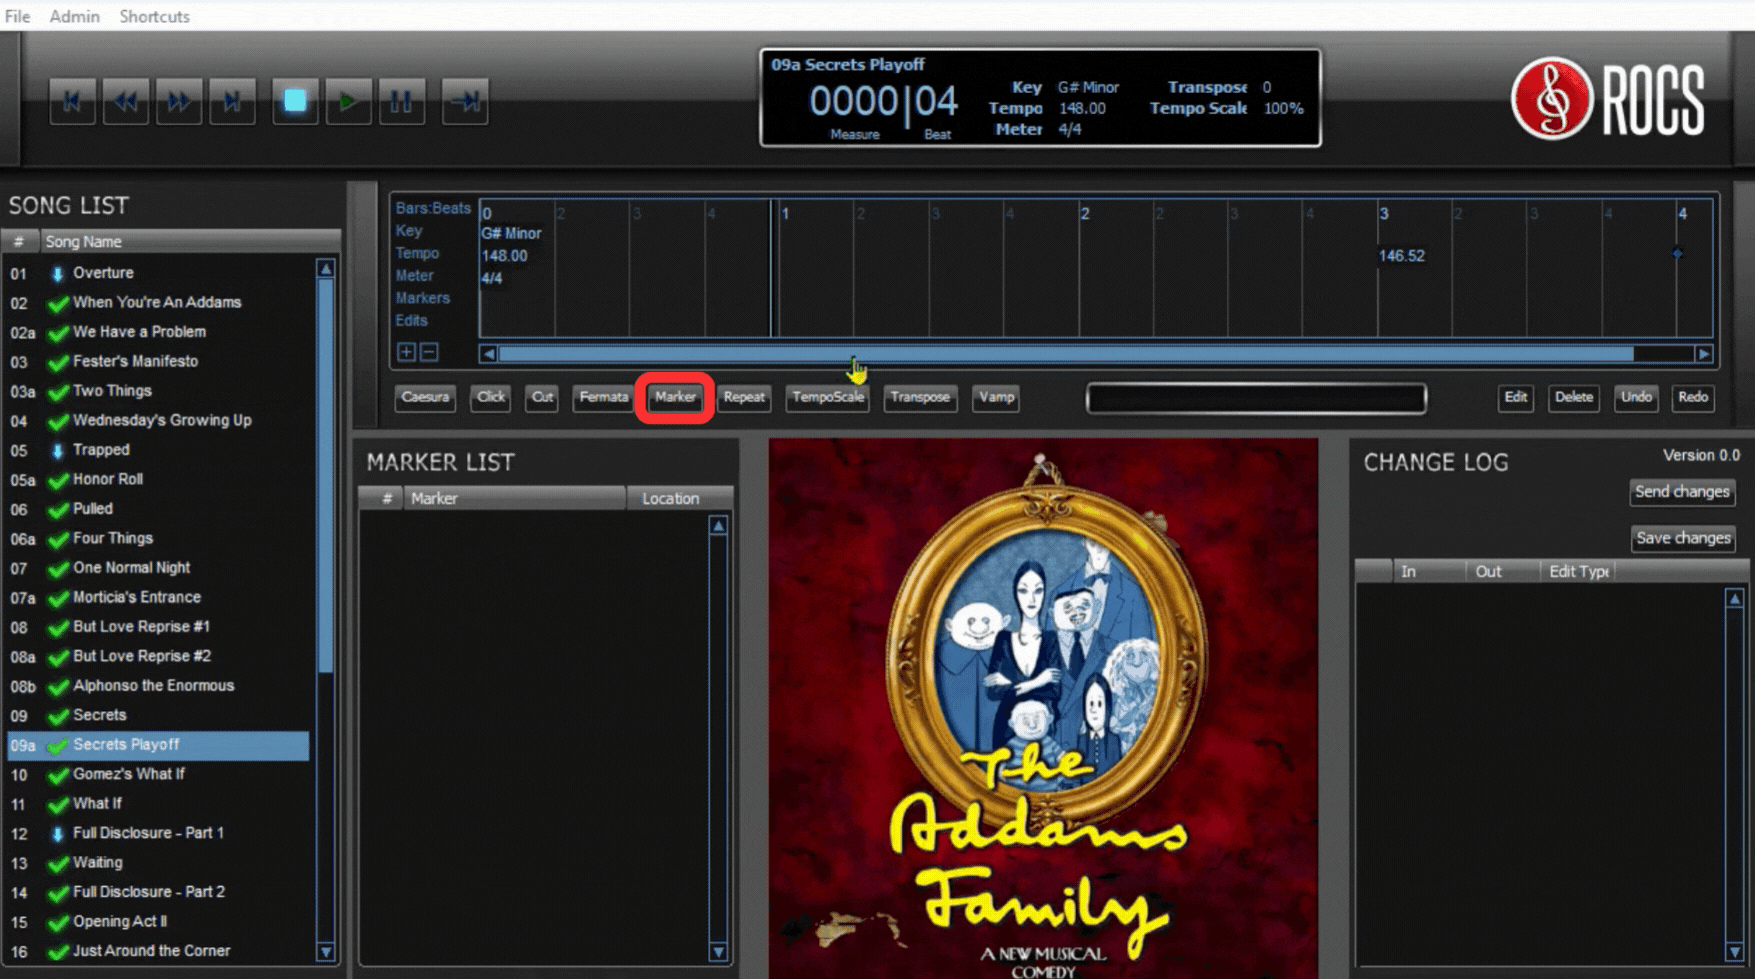
Markers show locations from the score or include rehearsal comments for the cast or director. These markers can be changed or added at the director’s discretion. Markers are reflected in the Song Info, Timeline, and Event List.
To add a marker, you will do the following:
- Go to the Timeline and select the moment where you want to add a marker.
- Click on the Marker button in the Event Controls.
- Verify the In Bar and In Beat are correct, OR type in the specific numbers.
- In the Marker textbox type the comment.
- Click Okay to save changes.
- The marker will be represented in the timeline as text.
Adding a marker in the Timeline will not affect playback. However, you will see the comment in that section during playback.
Repeat allows a section to be played a fixed number of times according to the score, which accommodates any extra time needed for stage business. Repeats are different than a Vamp, which will repeat an indefinite amount of times and require you to escape the event. Repeats are reflected in the Song Info, Timeline, and Event List.
To add a repeat, you will do the following:
- Go to the Timeline and highlight the section to which you want to add a repeat.
- Click on the Repeat button in the Event Controls.
- Verify the In Bar, In Beat, Out Bar, Out Beat are correct, OR type in the specific numbers.
- Type a number in the Repeat Count field. The Repeat Count indicates the total number of times the section plays.
- Click Okay to save changes.
- The repeat will be represented in the timeline as an orange bar.
Adding a repeat in the Timeline will automatically repeat that section as many times as are listed and then resume normal playback. To exit a repeat earlier than the predetermined number of repeats, you can do so in the following ways:
- Once the Timeline Playhead is at a repeat, click the Escape Event button (|).
- Press the Right Arrow () on your keyboard.
- Press the Spacebar on your keyboard.
Skip allows you to execute an instant skip to the end of a section in a song when desired. For fermatas written in the score, we have recorded more time than might be needed, since stretching audio too far yields undesirable results. You may desire to skip or jump out of a section to move on. Skips are reflected in the Song Info, Timeline, and Event List.
To add a skip, you will do the following:
- Go to the Timeline and highlight the section where you want to add a skip.
- Click on the Skip button in the Event Controls.
- Verify the In Bar, In Beat, Out Bar, Out Beat are correct, OR type in the specific numbers.
- Click Okay to save changes.
- The skip will be represented in the timeline as a purple bar.
Adding a skip in the Timeline will not affect playback unless you trigger it to skip. To skip to the end of a skip, you can do so in the following ways:
- Once the Timeline Playhead is at a skip, click the Escape Event button (|).
- Press the Right Arrow () on your keyboard.
- Press the Spacebar on your keyboard.
NOTE: Fermata has been replaced with the Skip button
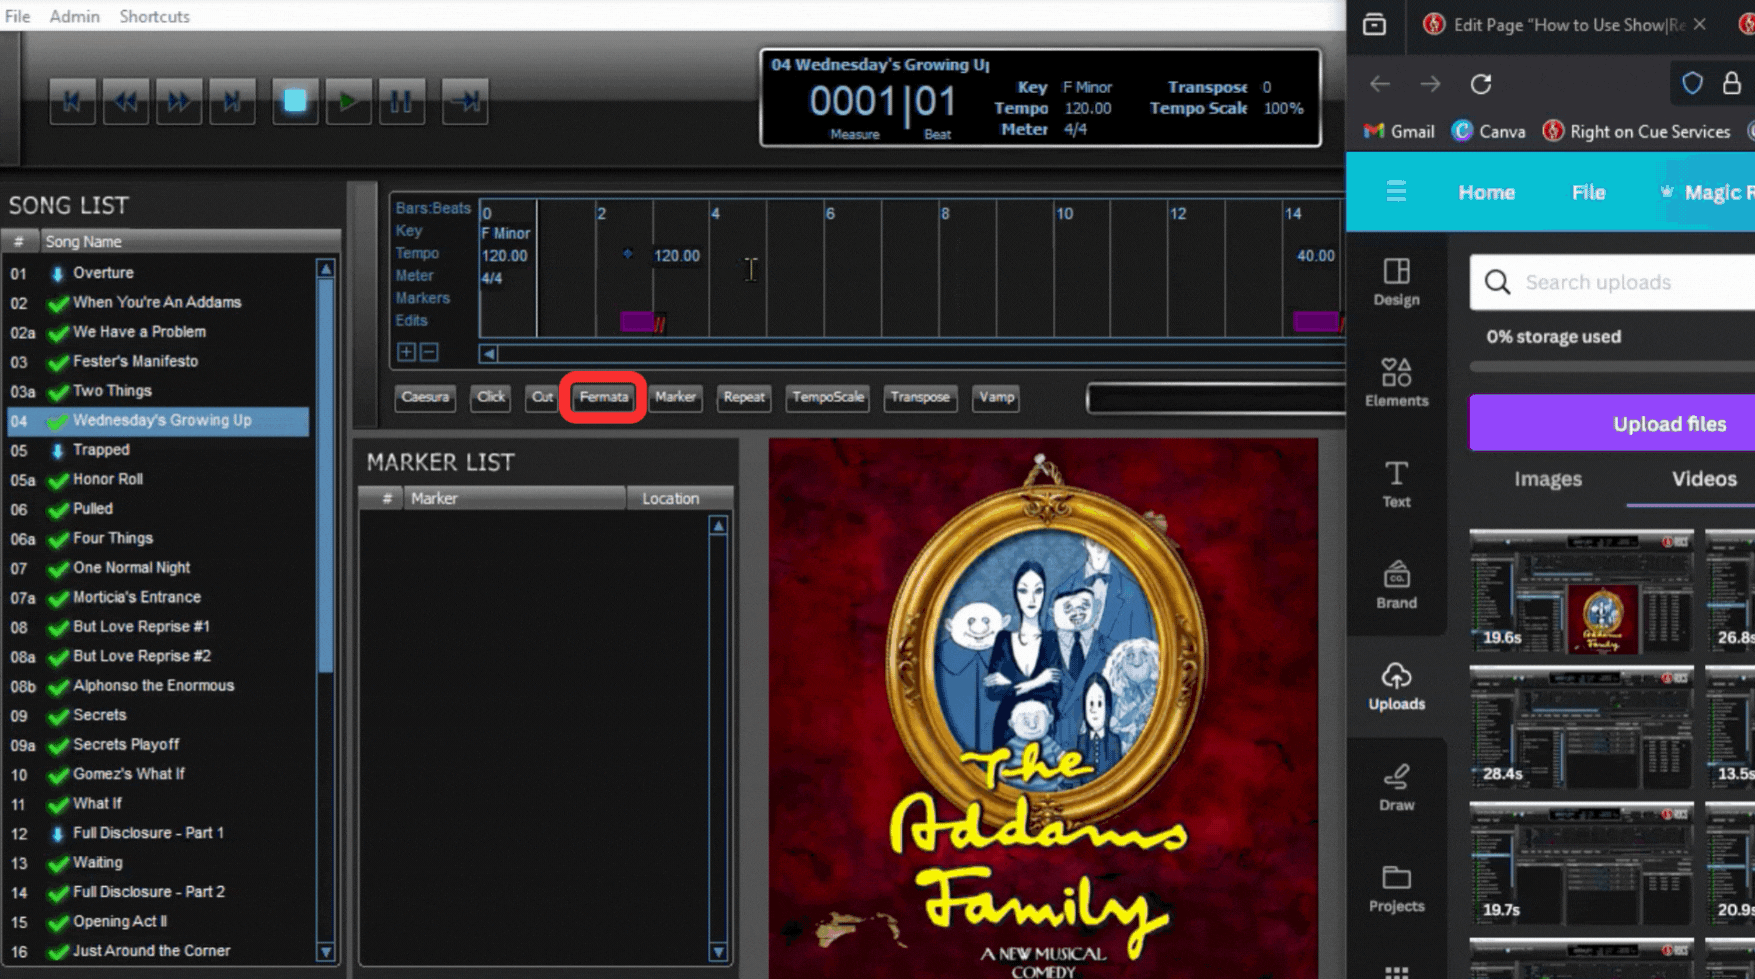
NOTE: Depending on score requirements, preset skips are often paired with preset caesuras (as seen in the example above). Often the caesura is placed inside the skip, so if additional time is needed beyond the preset skip, the playback will pause and wait until you trigger it by using the Escape Event button. In some cases, the caesura is placed after the skip, so that playback skips to the caesura, and waits until you trigger it.
Tempo scale allows you to change the speed in a section of a song. For example, if your cast members need more time to complete choreography, you can slow down the tempo to give them more time. Changes to the tempo are reflected in the Song Info, Timeline, and Event List.
To change the tempo scale, you will do the following:
- Go to the Timeline and highlight the section where you want to change the tempo.
- Click on the Tempo Scale button in the Event Controls.
- Verify the In Bar, In Beat, Out Bar, Out Beat are correct, OR type in the specific numbers.
- Select a number in the Tempo Scale field. We recommend changing the the tempo by +/- of 30% or less.
- Click Okay to save changes.
- The tempo change will be represented in the timeline as a blue bar.
Adjusting the tempo scale in the Timeline will automatically change the speed in that section in playback.
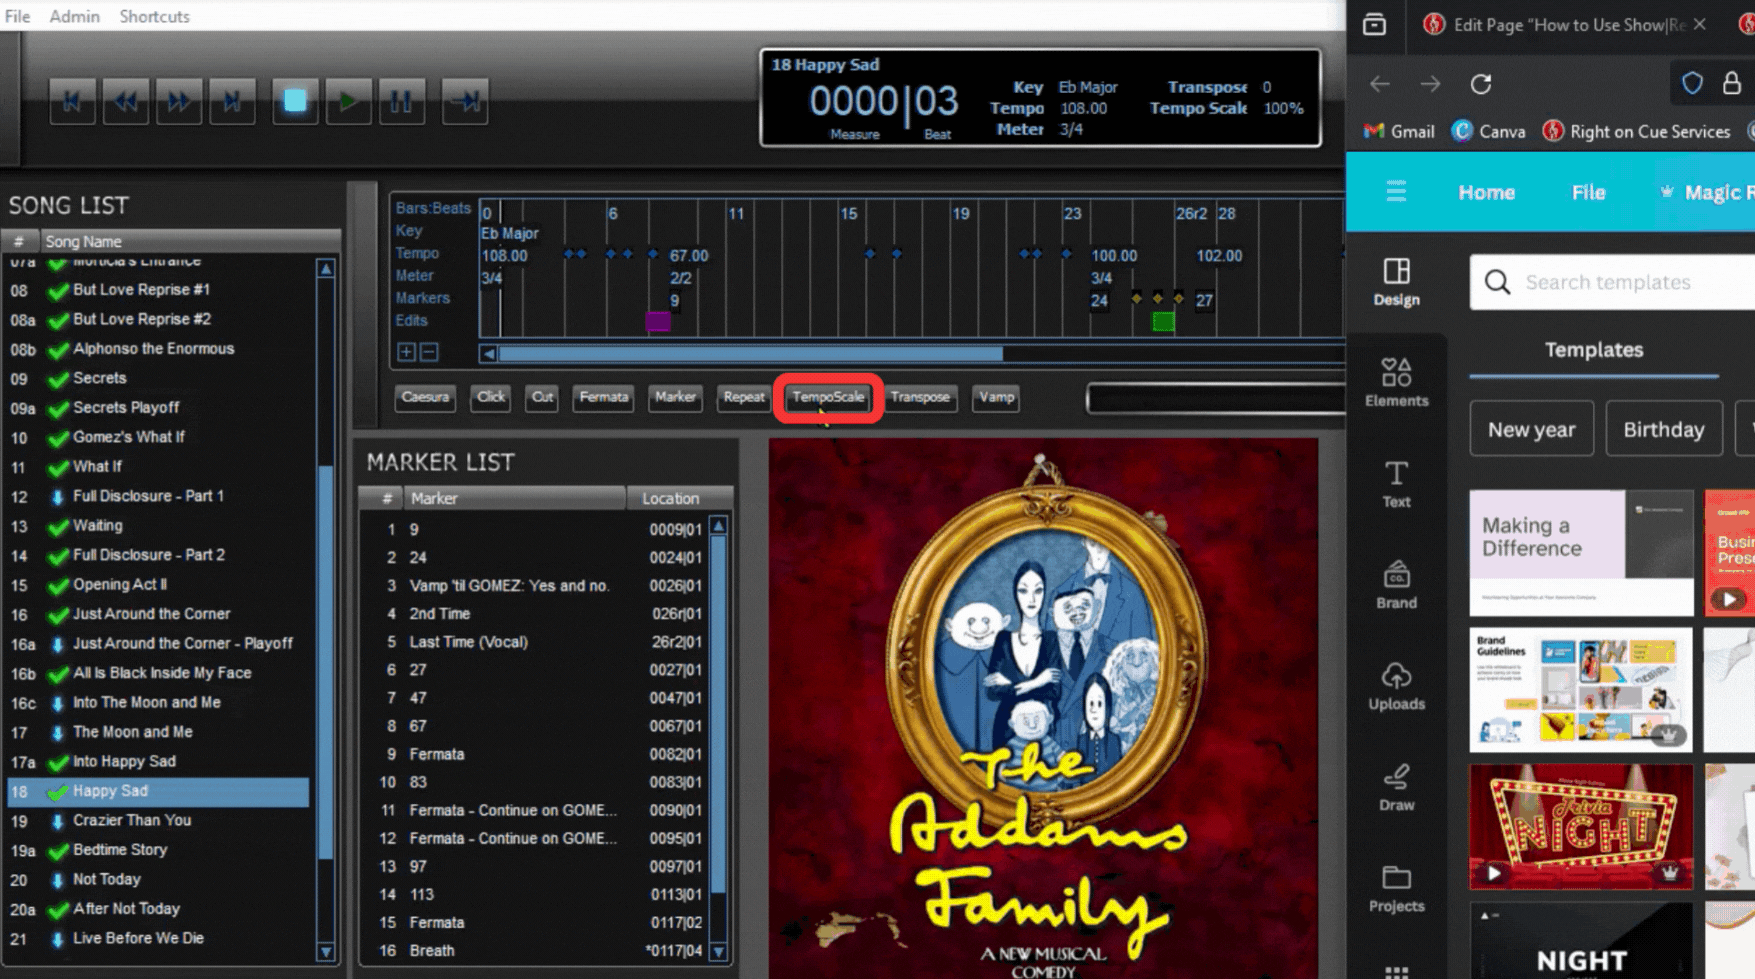
NOTE: While it is possible to change the tempo a large amount, it is recommended not to go beyond a 30% increase or decrease, especially when using Stage|Tracks in conjunction with Show|Ready. Beyond 30% reduces the quality of the sound recording.
Transpositions change the key in which the song plays. This allows you to adjust the song to accommodate specific vocal ranges. Changes to the transposition are reflected in the Song Info, Timeline, and Event List.
To change the transposition, you will do the following:
- Go to the Timeline and highlight the section where you want to change the key.
- Click on the Transpose button in the Event Controls.
- Verify the In Bar, In Beat, Out Bar, Out Beat are correct, OR type in the specific numbers.
- Select a number in the Half Steps drop-down box. We recommend changing the key by +/- of four half-steps or less.
- Click Okay to save changes.
- The transposition change will be represented in the timeline as a purple bar.
Adjusting the key in the Timeline automatically changes the key in that section in playback.
NOTE: While it is possible to transpose an octave in either direction, we recommended to go no more than four half-steps in either direction, especially when using Stage|Tracks in conjunction with Show|Ready. Beyond four half-steps reduces the quality of the sound recording.
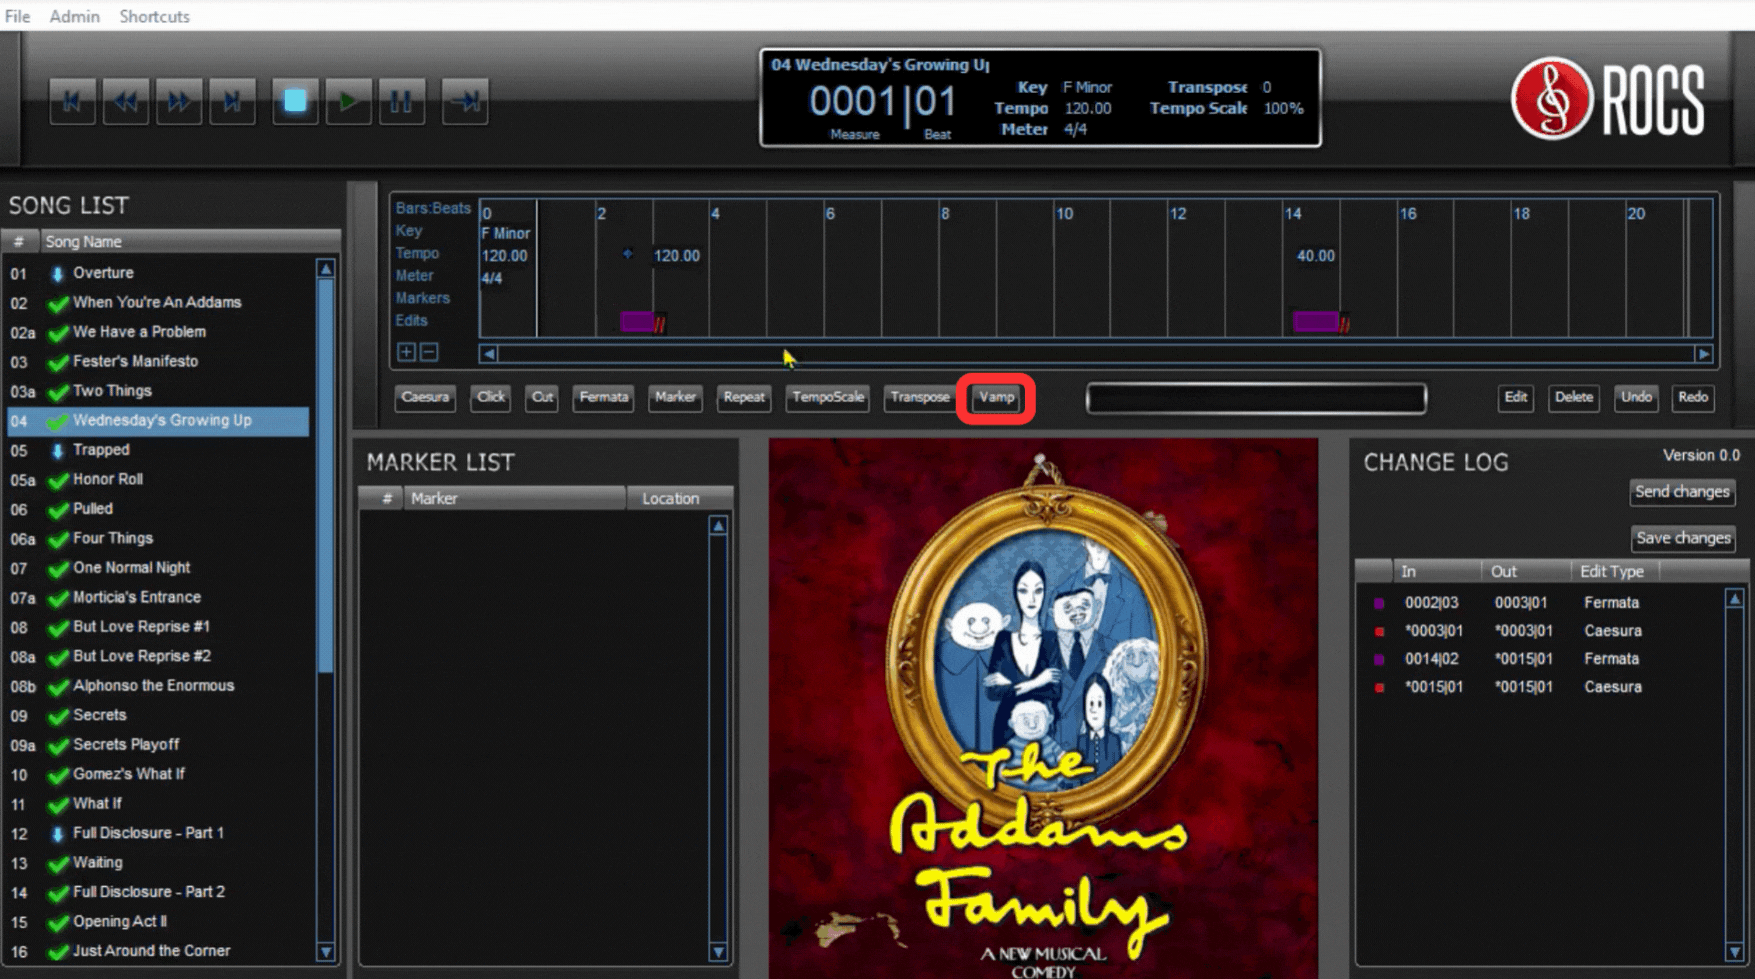
Vamp allows a section to be played an indefinite number of times according to the score, which accommodates any extra time needed for stage business. Vamps require you to trigger an escape to continue playback. Vamps are different than a Repeat, which will play a fixed number of times and don’t require you to escape the event. Vamps are reflected in the Song Info, Timeline, and Event List.
To add a vamp, you will do the following:
- Go to the Timeline and highlight the section where you want to add a vamp.
- Click on the Vamp button in the Event Controls.
- Verify the In Bar, In Beat, Out Bar, Out Beat are correct, OR type in the specific numbers.
- For an indefinite vamp, keep the Vamp Count at zero.
- If you want to change a vamp to a fixed number of repeats, you can enter that number in the vamp count field. The vamp count number indicates the total number of times the section will be played.
- Click Okay to save changes.
- The vamp will be represented in the timeline as a green bar.
Adding an indefinite vamp in the Timeline will automatically make that section loop indefinitely, until you trigger it to continue playback. To exit a vamp, you can do so in the following ways:
- Once the Timeline Playhead is at a vamp, click the Escape Event button (|).
- Press the Right Arrow () in your keyboard.
- Press the Spacebar on your keyboard.
5. Uploading Stage|Tracks Changes
Sending Stage|Tracks Changes to Your Production Staff and Cast Members
At any point when you would like to share your edits, you can send those changes to your cast instantly via the cloud (ROCS server). You can always go back into Stage|Tracks later to make more edits the next time you open the software. When you send your edits, they upload to both Stage|Tracks, and the rehearsal tool Show|Ready, keeping your production staff, cast members, and anyone else involved with your show on the same page.
Sending changes instantly to your production staff in Stage|Tracks, and cast members in Show|Ready, and, can be done in the following ways:
- In the Event List section, click the Send Changes button.
- Go to the top menu, click Admin, and select Upload Current Log.

NOTE: Be aware that if you have the software open on multiple computers and different users make edits and don’t click “Send Changes,” you can have conflicting event logs that don’t match. We always recommend sending changes after every edit session to prevent event log conflicts.
Saving Stage|Tracks Changes to Your Device
As you make changes, you can save them locally to your device. However, we always recommend you upload the changes to the cloud (ROCS server) by clicking the Send Changes button. Sending changes ensures that you have a backup if your device crashes. You can always go back into Show|Ready later to make more edits the next time you open the software.
Saving changes locally on your computer can be done in the following ways:
- In the Event List section, click the Save Changes button.
- Go to the top menu, click Admin, and select Save Log.
NOTE: Instead of saving locally, when you’re done making changes, we recommend you click “Save Changes” to save a backup of your show. Be aware that when saving the changes to your local computer, it will NOT instantly send those changes to your cast members or production staff. Changes won’t upload to the cloud (ROCS server), so if your device crashes, there won’t be a backup. Also, if you have the software open on multiple computers and different users make edits and don’t click “Send Changes,” you can have conflicting event logs that don’t match. We always recommend sending changes after every edit session to prevent event log conflicts.
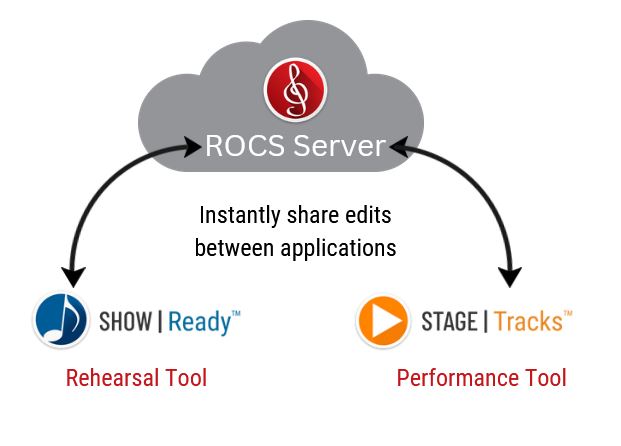
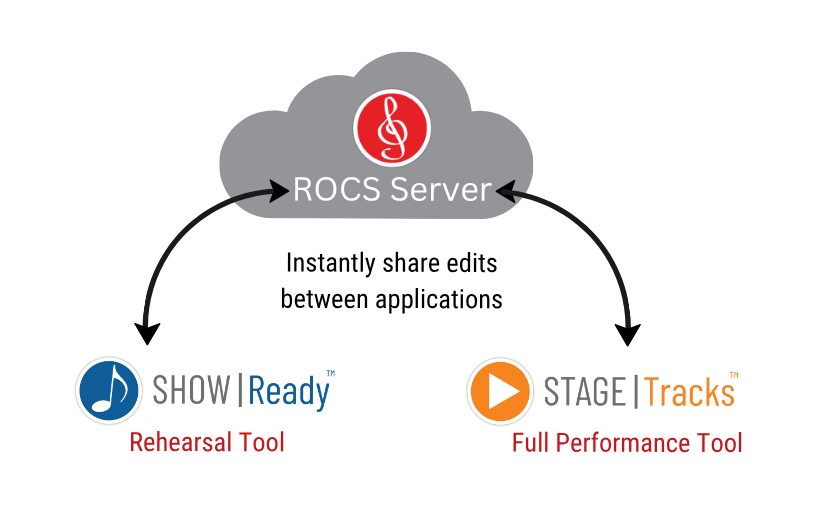
How Show|Ready and Stage|Tracks Work Together
After you have customized your show, it’s time to prepare for your performance. This is when Stage|Tracks comes in! If you have ordered Stage|Tracks, a month before your opening night, you will receive another email from ROCS licensing with access codes to grant you access to Stage|Tracks which you will use for your performance. All your hard work in customizing your show will pay off if you use the desktop version of Stage|Tracks, as all your edits are applied to the performance tracks instantly!
- For information on how to the performance tool, check out How to Use Stage|Tracks.
- For information on how these tools integrate, check out Show|Ready and Stage|Tracks Comparison Chart.
Sending Stage|Tracks Changes to Show|Ready
At any point when making changes in Stage|Tracks, you can send those changes to your Show|Ready instantly via the cloud (ROCS server). You do this the same way as sending edits to your cast members. These changes instantly apply to your production team’s Stage|Tracks and your cast member’s Show|Ready, making your life easier.
Sending changes instantly to your cast members in Show|Ready and production staff in Stage|Tracks can be done in the following ways:
- In the Event List section, click the Send Changes button.
- Go to the top menu, click Admin, and select Upload Current Log
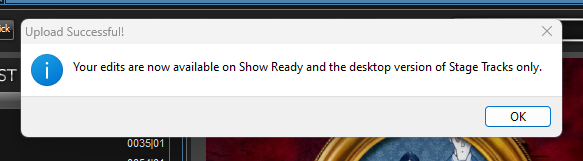
The next time you log into Stage|Tracks or Show|Ready, a pop-up message will appear with the notification “Downloaded New Event Log Version [number].” Click OK to close.
Sending Stage|Tracks Changes to ROCS|Player (for mobile devices)
When you’re done making all of your edits, they will not instantly appear in ROCS|Player because of the limited functionality of mobile devices. You must first upload the Event List and then contact ROCS at licensing@rightoncueservices.com to inform them to apply it to ROCS|Player. You will add your edits directly in Stage|Tracks and upload your event list, as we cannot accept a list of edits typed out via email. Uploading your event list ensures that we can make those edits accurately in a timely manner.
When submitting edits to ROCS to be uploaded into ROCS|Player, be aware that this process takes 2 – 5 business days. The first round of edits is free. Each additional round of submissions for ROCS|Player costs $75. Alternatively, if you want your edits to be instantly updated, we highly recommend using the desktop version of Stage|Tracks on your computer to access the full feature set. This is the recommended route, and there isn’t an additional cost.
Uploading your event list to the ROCS server can be done one of two ways:
- In the Event List section, click the Send Changes button.
- Go to the top menu, click Admin, and select Upload Current Log.
NOTE: Due to the limited functionality of mobile devices and ROCS|Player, indefinite vamps and skips are not available. You can’t directly edit in the ROCS|Player app. You must submit those edits ROCS. If you want more functionality, we highly recommend using the desktop full-performance tool Stage|Tracks instead.